 |
Yesterday, I installed swift springs and SPL rear camber arms with toe bolts. I didn't notice the instructions that came with the camber arms until I was cleaning up today.
|
|||||||
 4Likes
 |
|
|
LinkBack | Thread Tools | Display Modes |
|
|
#1 (permalink) |
|
Track Member
Join Date: Sep 2013
Location: Brookston, IN
Age: 55
Posts: 683
Drives: '12 PW Touring Sport
Rep Power: 619            |
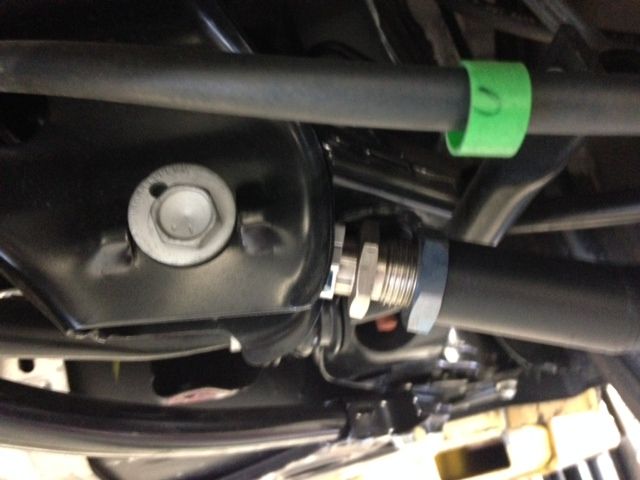
Yesterday, I installed swift springs and SPL rear camber arms with toe bolts. I didn't notice the instructions that came with the camber arms until I was cleaning up today. I just adjusted them out to match the stock arms.
The directions show that the adjustment in the larger section shouldn't be adjust out more than 3/4". Mine were ~1-1/4". I didn't think too much of it because I was taking it to get an alignment today and would have them fix it. I took the instruction sheet with me to get the alignment and explained what I did. When I get it home, I check and it is still extended out 1-1/4". Should I be concerned? Has anyone taken one of these arms apart? How far down the arm does the larger threaded section extend? I don't track the car and generally don't push it too hard, but there are those occasions. I have the lifetime alignment, so I will probably just take it back and get it adjusted properly, but it's a hassle and need to know if this is a major point of concern. I was planning to take it back in a month after the springs had settled. Is it ok to put a couple hundred miles on it like this? It currently looks similar to the first picture with the X on it. Here is the sheet I'm referring to and a copy of my alignment specs.  
Last edited by Silly Rabbit; 08-03-2014 at 04:48 PM. |
|
|

|
|
|
#4 (permalink) |
|
Track Member
 |
Yea and if you read a few posts further down you will find people telling you to not do that! That DIY thread is incorrect
Do it right! SPL put those directions in the box for a reason. please do it correctly. You dont want to over extend those arms and have just a few threads holding your rear suspension together. DIY: SPL Parts Rear Camber Arms Install
__________________
The Build Last edited by Super Werty; 08-03-2014 at 06:01 PM. |
|
|

|
|
|
#5 (permalink) |
|
Track Member
Join Date: Sep 2013
Location: Brookston, IN
Age: 55
Posts: 683
Drives: '12 PW Touring Sport
Rep Power: 619            |
I know you are right. I'm just not looking forward to messing with it again. I will get under there tomorrow and mark it off where it is now and then unbolt the arms and set them so they are in spec and put it back together. I should be able to keep the camber close to where it is now and get the arms in spec. Then I'll deal with another alignment.
I added a comment to the DIY with reference to the SPL spec sheet. Last edited by Silly Rabbit; 08-03-2014 at 06:10 PM. |
|
|

|
|
|
#6 (permalink) |
|
Ronin Samurai - Assassin
 Join Date: Dec 2011
Location: Fayettenam,Pennsyltucky
Age: 69
Posts: 35,351
Drives: 2011 Nismo GM 6M
Rep Power: 2684438            |
Your first post shows a picture of the front upper control arms. In your next post with pictures. You show the rear. So.... which is it? The front or the rear you're asking about?
__________________
 浪人 - 殺し屋 "The Difficult Anytime, The Impossible By Appointment Only" http://www.the370z.com/members-370z-...o-journal.html |
|
|

|
|
|
#7 (permalink) | |
|
Track Member
Join Date: Sep 2013
Location: Brookston, IN
Age: 55
Posts: 683
Drives: '12 PW Touring Sport
Rep Power: 619            |
Quote:
I am talking about the rear. I decided not to do anything with the front for now. |
|
|
|

|
|
|
#8 (permalink) | |
|
Ronin Samurai - Assassin
 Join Date: Dec 2011
Location: Fayettenam,Pennsyltucky
Age: 69
Posts: 35,351
Drives: 2011 Nismo GM 6M
Rep Power: 2684438            |
Quote:

__________________
 浪人 - 殺し屋 "The Difficult Anytime, The Impossible By Appointment Only" http://www.the370z.com/members-370z-...o-journal.html |
|
|
|

|
|
|
#9 (permalink) |
|
Track Member
Join Date: Sep 2013
Location: Brookston, IN
Age: 55
Posts: 683
Drives: '12 PW Touring Sport
Rep Power: 619            |
It took about an hour, but I got the arms back off and split the adjustment between the two areas and got the arm back in spec. Basically, back the lock nut off, then screwed the larger section into the arm 1/2" and unscrewed the eye section 1/2". Did the best I could to get the arms back to the same length and installed in the same spot. All the same, I'm taking it back to get aligned again tomorrow. I feel better now that they aren't over extended.
|
|
|

|
|
|
#10 (permalink) |
|
Base Member
 Join Date: May 2014
Location: Bay Area
Posts: 114
Drives: 2015 S4, 2015 A3
Rep Power: 11  |
Hi, it was kind of hard to take a pic but does this appear to be set correctly. Can't measure it until I got home but this thread got me worried lol.

__________________
MEISTERSCHAFT | SWIFT | SPL | WORK| NISMO | PROJECT KICS| AEROJACKET
Soon to be for sale: - Muteki 32901N Neon Chrome SR48 Open End and Locking Lug Nuts - Forgestar F14 19" 19x9 ET=21 Semi Concave 19x11 ET=24 Deep Concave |
|
|

|
 |
| Bookmarks |
|
|
 Similar Threads
|
||||
| Thread | Thread Starter | Forum | Replies | Last Post |
| Suspension adjustments and how they affect handling | M.Bonanni | Brakes & Suspension | 66 | 01-16-2025 05:47 PM |
| Any adjustments for K&N drop ins and Nismo Exhaust? | ceverman3619 | Intake/Exhaust | 3 | 03-20-2012 04:07 PM |
| Adjustments after cornered balanced | SPOHN | Brakes & Suspension | 4 | 04-25-2011 03:45 PM |
| Car Function Adjustments Available Only with Nav? | SoCal 370Z | Audio & Video | 17 | 01-25-2011 04:25 PM |