
 |
Originally Posted by Elmo370z 1. Elmo370z 2. Dragonbreath For real. I'll send you money as soon as you start accepting lol.
|
|||||||
 |
|
|
LinkBack | Thread Tools | Display Modes |
|
|
#31 (permalink) |
|
A True Z Fanatic
Join Date: Jan 2012
Location: Strangeland
Posts: 1,054
Drives: 09 370z
Rep Power: 74            |
2. Dragonbreath For real. I'll send you money as soon as you start accepting lol.
__________________
2009 370z touring w/sports package Last edited by zguynate; 06-09-2016 at 10:16 PM. |
|
|

|
|
|
#33 (permalink) | |
|
A True Z Fanatic
Join Date: Mar 2009
Location: Chicago
Posts: 3,669
Drives: 370
Rep Power: 974724            |
Quote:
Long day.. just had to wrap up a driveshaft and tuneup in a IS300 then changed the fuel filter in a 880rwhp 350z, time to head home... tomorrow I will be working in the CNC all day so I am hoping to knock out some prototypes. |
|
|
|

|
|
|
#36 (permalink) |
|
Enthusiast Member
Join Date: Sep 2013
Location: San Antonio
Posts: 387
Drives: 11 370Z MB M6
Rep Power: 16            |
After realizing I couldn't borrow my daughter’s car any longer I decided to try and put the pump assembly back together. What I did may not be a permanent fix, but it will hold for a while. This fix of mine relegated me of my only option later(if it does fail) would be to purchase Phunk’s machined top hat.
After putting it all back together my way, the lights came on and I thought of a cheap alternative to anyone who may not want to buy the top hat or needs their baby right now. I am not trying to steal thunder or hurt Phunk’s profit margins, but I believe the option I describe will be a permanent fix and should only cost about $10 to $15 to fix. All items should hopefully be found at local hardware or auto store. What you will need. All materials should be stainless (2) 1ft. pieces of 8-32 all thread (2) 8-32 cap or acorn nuts. (6-8) 8-32 thin hex nuts. (4) thin washers One tube of fuel safe gasket sealer or JB weld. 1/8" drill In this description, there are a few unknowns which you guys and gals will be able to be figured out easily. 1. Screw cap nut onto one end. May use a jam nut to lock onto all thread, or just cram the hell out of it. (unkown) Will the cap nut interfere with bottom housing of assembly? If so, may need to grind a bit of nut away for clearance.  2. Slide all thread through lower pump housing with cap nut on bottom. Place two nuts on to other end followed by washer and adjust length to mimic original rod height considering plastic that broke off. Do not forget black spacer and spring on appropriate side prior to placing nuts and washer. 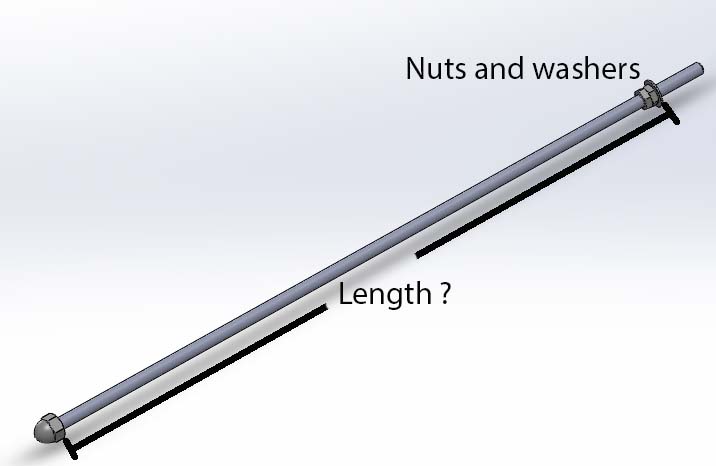 3. Using 1/8” drill, drill the top hat through the stand offs keeping as centered as possible. Using a 1/8” thread will allow the all thread to engage and help seal tank. 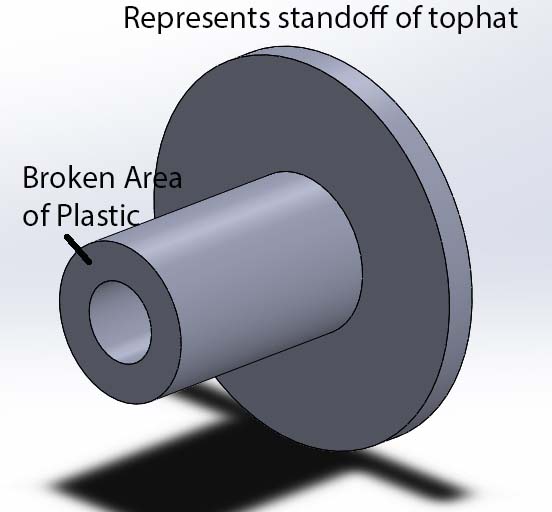 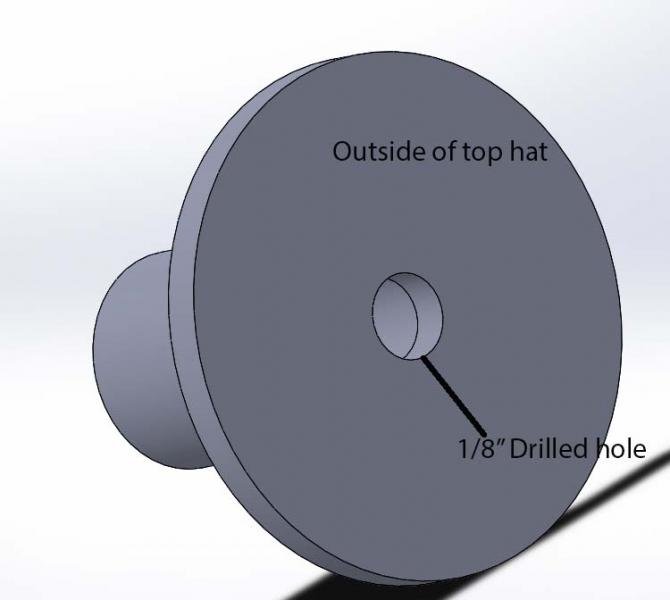 4. Using hair dryer, heat up the plastic to soften it. This will prevent cracking while assembling. Just above the nuts or in hole in standoff add sealant or jbweld to help seal tank. Screw the all thread through the hole until the standoff bottoms out on the washer. Adjust to approximate height of original. 5. Place washer and nut on top and tighten.(may also add a lock washer between washer and nut for peice of mind) 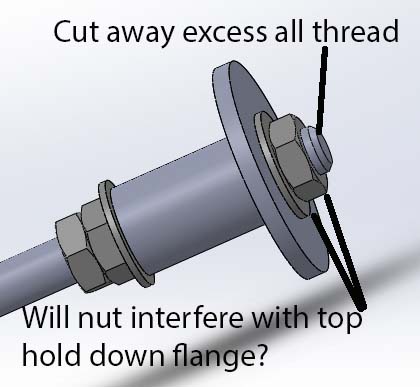 6. Clean all excess sealant from inside and outside of tank area on top hat. Allow to dry and place back in tank. I don’t know if the top nut and washer will interfere with the flange that holds the pump down. These are things I didn’t measure, because I wasn’t thinking of a better fix when I had it out. Doh! If someone out there wants to try this fix, I would take those measurements prior to doing all of this. I do believe this is a permanent fix, because it would take a lot to rip the all thread from the top hat. (it won’t happen) There may be a little trouble trying to compress it in the tank, due to all thread catching the bottom assembly as it slides through the hole. Other than that I don’t know why this would not work. Let me know what you think and if I missed anything. If you guys want answer the unknows, I will make a better write up and place it in DIY. This could also be a quicker kit Phunk could machine for maybe $40-$50. Would be and extremely cheap fix either way. Pump assembly from Nissan $450 Pump assembly from Ebay $425 Top hat from Phunk $150 - $175 Phunks Justice fix $40-$50 kit.(assumed) DIY for $10 - $15 Your call! Last edited by Justice97; 06-12-2016 at 01:51 PM. |
|
|

|
|
|
#37 (permalink) |
|
Enthusiast Member
Join Date: Sep 2013
Location: San Antonio
Posts: 387
Drives: 11 370Z MB M6
Rep Power: 16            |
Now for how I fixed mine. (Images below) I am a bit ashamed, but hey it got my baby on the road and it may last a while.
1. Remove piece of broken stand off from rod. 2. With a dryer warm up top hat standoff. 3. With something backing and protecting top of top hat, tap rod into standoff of top hat. There should be a hole there that extends to flange of top hat. I had to tap pretty hard. Allow to cool. I left it for a few hours. At 1st the rod was being pushed out by the plastic because it was so tight, but then it seamed to stop moving. There is a pretty sharp little barb on end of the rod that snaps into a groove into original hole and I think that barb sank into the plastic pretty well. I tried, using pretty strong force, to remove the rod and I was unable. (Disclaimer-I am not Hercules) 4. Reassemble and place back in tank. This is by no means a recommended fix, but if it brakes and you really need it, it should take about 2-3 hours. If you don't want to wait for cooling and just want to get it back in tank then maybe 1.5 hours. Cost here is only time. When I placed it in the tank, it still had about 3/8" of compression on spring so I know it is on bottom of tank. If you are at the track or somewhere you have no way of getting home, 10 and 8 mm sockets phillips screw drivers and you can be back on the road in no time at zero cost. 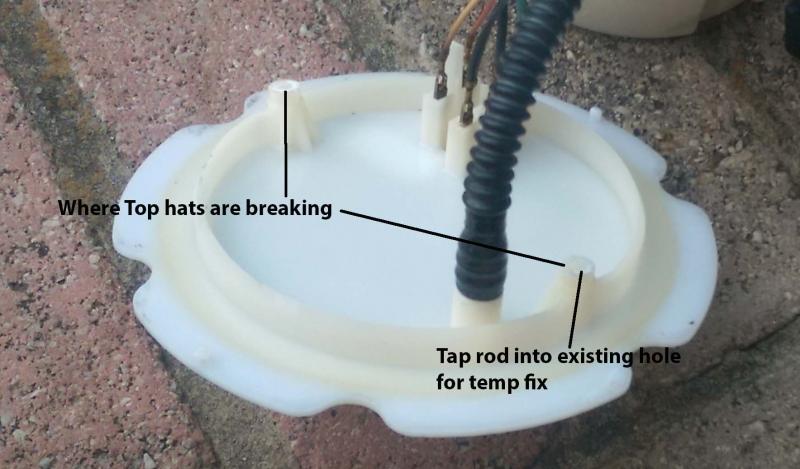 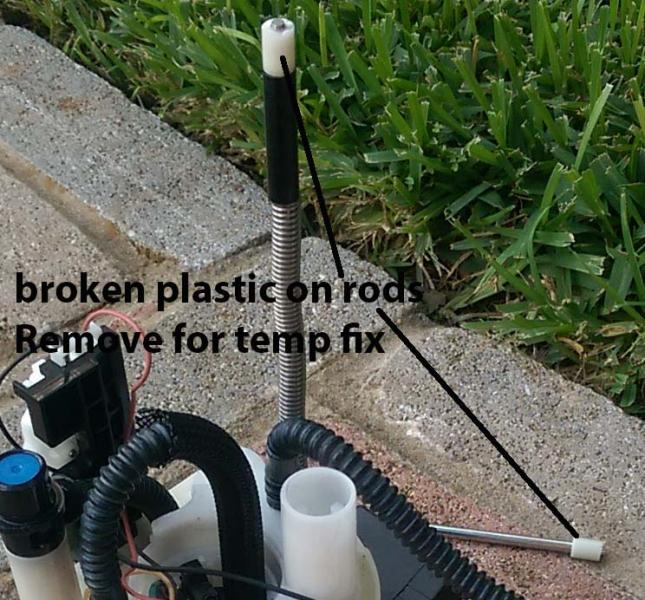 Just some advice, tow trucks suck. Last edited by Justice97; 06-12-2016 at 12:45 PM. |
|
|

|
|
|
#41 (permalink) |
|
Enthusiast Member
 Join Date: Jun 2013
Location: Huntsville, AL
Posts: 406
Drives: MB 370z
Rep Power: 12      |
I'm post poning my RRP install for a while to include this. Given I've seen three break in the last few months I will need one I am sure.
__________________
2010 Monterey Blue 370Z
|
|
|

|
 |
| Bookmarks |
|
|
 Similar Threads
|
||||
| Thread | Thread Starter | Forum | Replies | Last Post |
| Snapped some pics | fairz | Member's 370Z Gallery | 2 | 10-15-2014 05:06 AM |
| Snapped Bolt | ///PureSwank | Engine & Drivetrain | 5 | 05-22-2013 01:19 PM |
| Snapped Spacer Lug | Grindkiezer | Brakes & Suspension | 9 | 03-17-2013 05:13 PM |
| Rear lug nut snapped off, what to do? | RyanWest | Wheels & Tires | 3 | 10-12-2012 08:48 PM |
| Wheel snapped off with brakes | Carbon_z | Brakes & Suspension | 30 | 01-13-2012 09:22 AM |