
 |
**its about due time I started one. ive been looming in the shadows about this forum for a while now simply chiming in "here and there" where I felt I
|
|||||||
 |
|
|
LinkBack | Thread Tools | Display Modes |
|
|
#1 (permalink) |
|
Track Member
Join Date: Apr 2012
Location: Wapakoneta, Ohio
Posts: 506
Drives: 2011 BS Nismo 370z
Rep Power: 44            |
**its about due time I started one. ive been looming in the shadows about this forum for a while now simply chiming in "here and there" where I felt I could help people and/or if I needed help of others. bare with me updates will be progressively as I figure out how I want to format this.**
Ive really been putting this off for some time now, so many questions go through my head when trying to type up something like this haha. How to start it out, how to flow the thread, what is important and what isn't. A little about myself and the car. I financed my 2011 Brilliant Silver Nismo(#374) from Reineke Nissan/Mazda here in Lima, Ohio brand new at 20 years old on October 30th 2012. Used my old auto 03 Lemans Orange Z and a repossessed engagement ring as a down payment.  needless to say I very well might have been the most accomplished/happy feeling 20yr old on the planet that day! needless to say I very well might have been the most accomplished/happy feeling 20yr old on the planet that day!the day I bought her 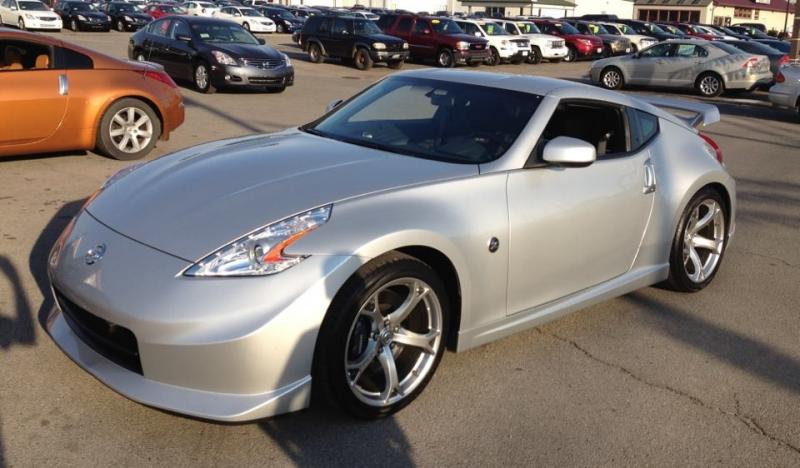 I spent the next six months or better religiously living in these forums learning literally EVERYTHING I could about this car as I did with my 350z. As soon as I bought it I craved for more speed out of it but I enjoyed it none the less as it was my first standard gearbox ride. every time I got behind the wheel I felt more of a "man"; there's no other feeling in the world than a late night cruise throwing gears. About 8-ish months in I had made my mod decisions. I wasn't going to waste my time with buying bolt-on's that I knew eventually I would grow tired of instead I went straight for forced induction. Received my kit the first week of August last year and ordered an exhaust immediately following. I went into the install knowledgeable of what I was doing but honestly unprepared for the road ahead.
__________________
Always under construction. . . 
Last edited by Rid3_FaM0uS; 08-20-2014 at 02:42 PM. |
|
|

|
|
|
#2 (permalink) |
|
Track Member
Join Date: Apr 2012
Location: Wapakoneta, Ohio
Posts: 506
Drives: 2011 BS Nismo 370z
Rep Power: 44            |
GTM TT Install
So fast forward to about the 2nd of August 2013 and my turbo kit has arrived. I ran the car up to the shop that night and immediately started tearing the car down. Made it up to drilling and tapping the block that night. 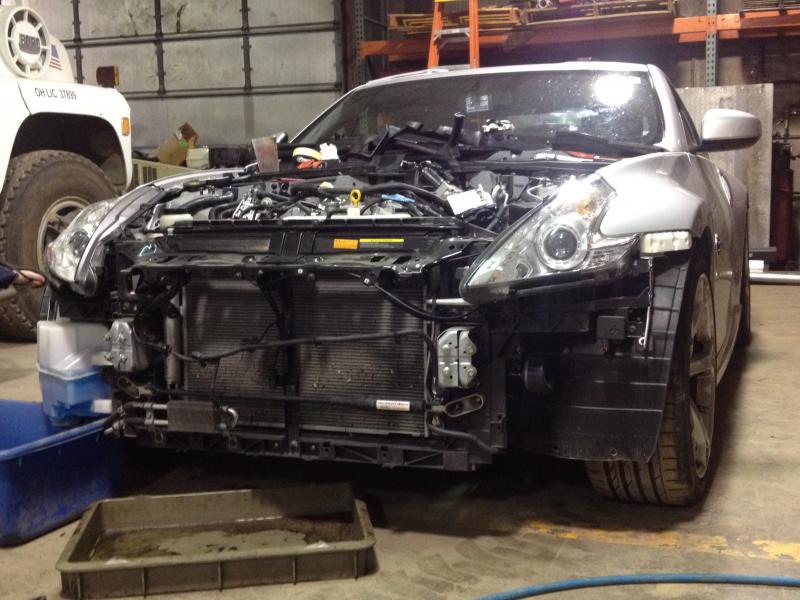  Following day was filled with several headaches but I managed to make some progress getting the driver side turbo up and the rack components installed. Had to take a break for a few days from it at this point then got back to It on the weekend and finished the install. 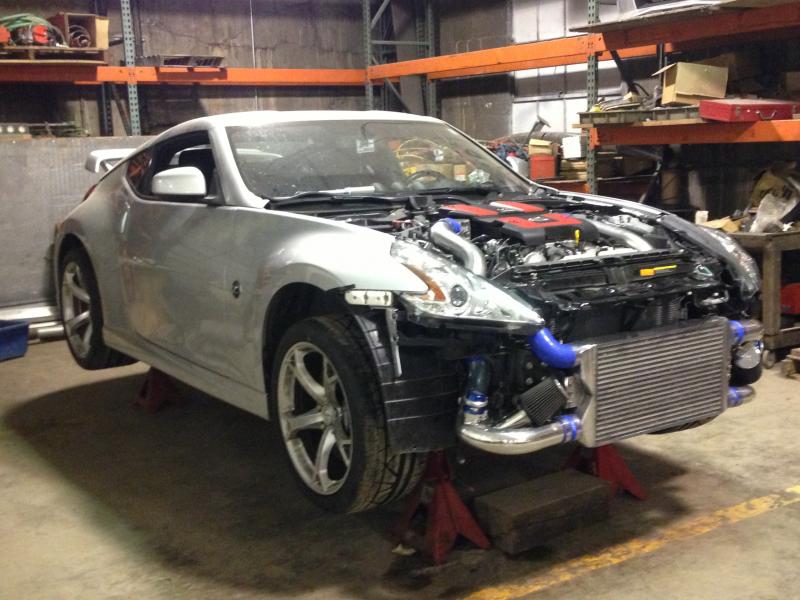 Then I had to wait on Sam for my tunes. Took 2-3 days IIRC to send emails back and forth(plus an issue with a fuse not allowing my osiris cable to properly communicate with the ECU in his defense) and finally receive my startup tune. First start up had a slight coolant leak from the driver side "T" but other than that things went smooth. I was eager to take her down the road for all the logging which went rather smooth I was very impressed. Her first time mobile boosted 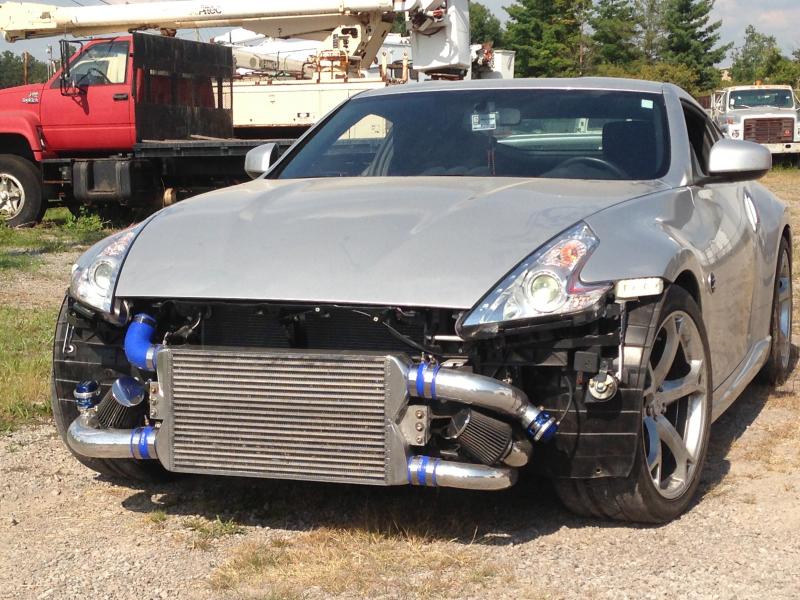 Drove the car to my second job that Sunday night (I believe it was) with no front bumper and got ALL KINDS of stares around town haha. She was happy on 4.4 lbs for a while. Tightened up the waste gates springs and it bumped up to about 5.2lbs. Read up and got familiarized with my boost controller and had it sitting around 7.8lbs for a little while. My full 2.5" exhaust showed up the end of that October and I knew it was game on then. Immediately I saw a gain of 4lbs of boost and I could feel it on the butt dyno! The car began to "feel fast" at this point. The clutch then began to have issues with the torque I was asking of it so I bought a 5 puck SZ clutch w/upgraded CSC and aluminum flywheel. The car was ready for battle now. I had a blast with it until winter hit; I couldn't get myself OUT of the damn car honestly. It was the most fun I could enjoy on the daily in a very long time. December came around and I decided it was time. I promised myself this car would never see a snow flake and I intended to keep it that way.
__________________
Always under construction. . . 
Last edited by Rid3_FaM0uS; 08-20-2014 at 09:37 PM. |
|
|

|
|
|
#3 (permalink) |
|
Track Member
Join Date: Apr 2012
Location: Wapakoneta, Ohio
Posts: 506
Drives: 2011 BS Nismo 370z
Rep Power: 44            |
E85 Conversion/Winter Wire Tuck Project
Over the cold months I looked around to try and find something to keep myself busy. I started doing a full re polish on the piping and cooler 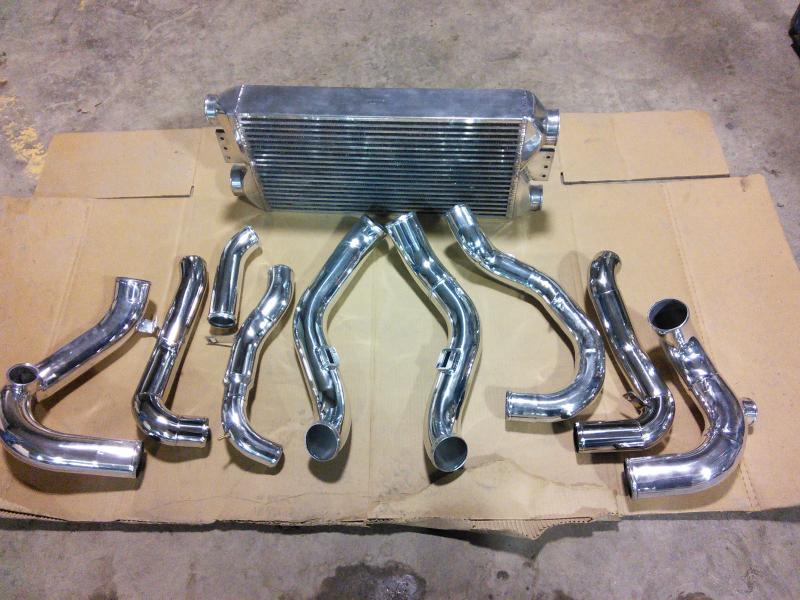 as well as started looking into a light "O&G style" wire tuck. About this time faceglides E85 numbers showed up. I told myself, "Jesus the kind of kills I could get around here! I'VE GOT TO HAVE THAT!" Immediately it was full speed ahead on what I needed to do to convert to an E85 car, and run reliable (questionably stock block safe) power. Got a 485 Walbro pump and sent it as well as my fuel hanger to Charles at CJ Motorsports. The next week he sent me back a full stage 2 kit plus my modified in tank fuel pump setup. 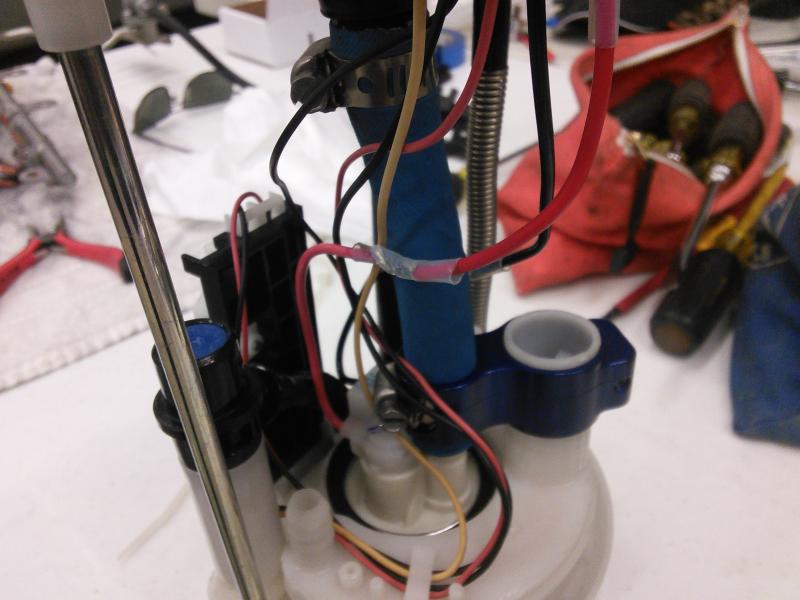 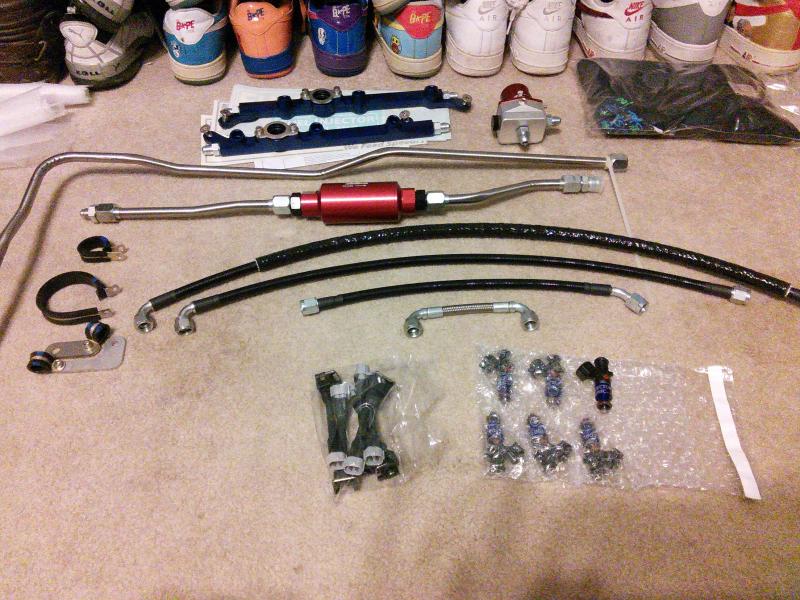 It was time to get to work installing the goodies. Pulling the old lines out was "kind of" a pain in my @ss on jack stands BUT never the less I told myself if I could install a full turbo kit on four jack stands I could pull out and install a new fuel system. Once I weaved the factory hard line out(in one piece mind you) the rest of it was cake. Charles system fit FLAWLESSLY and the stainless lines were bent perfect AN lines were all cut to perfect lengths; holding the rails in my hand was heaven! 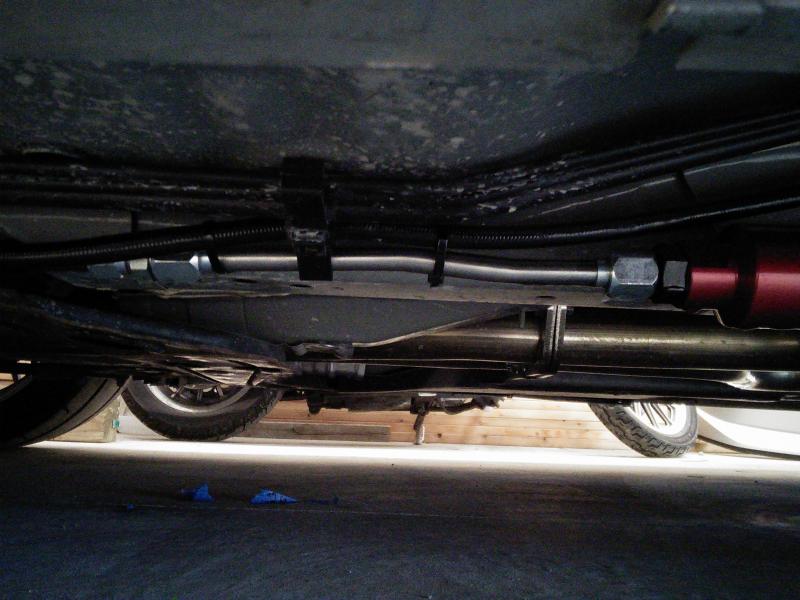 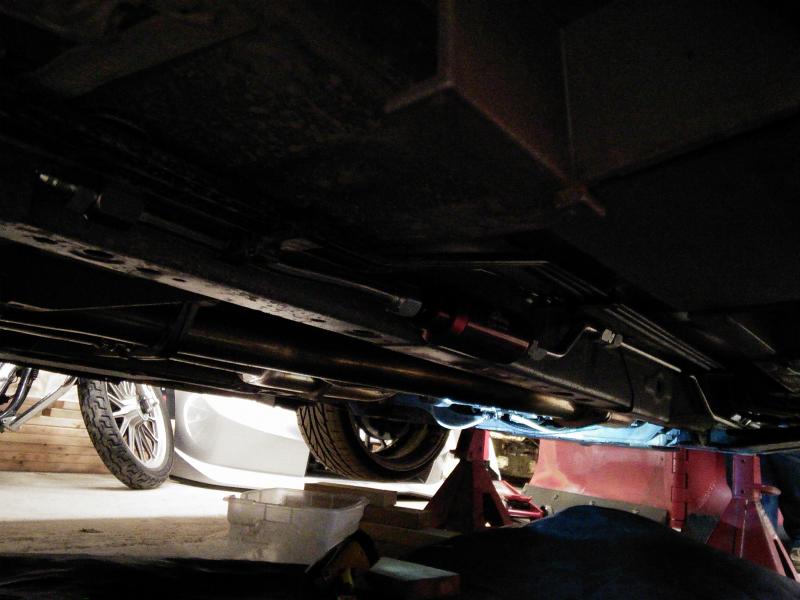 I went to test fit the new injectors and well I ended up with something of this sort 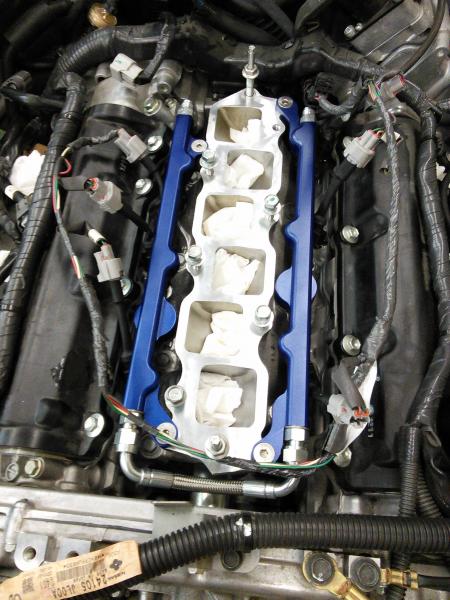 So then began my quest to install NOT ONLY install an E85 system but now take on a FULL engine harness wire tuck! DIY engine bay wire tuck Ill keep the wire tuck section short and sweet as I built a DIY thread on it that I would like to continue as soon as I get the engine back in. Received my new rims in February so I was even more excited! I became the first owner with a Z34(to my knowledge) with VIP Modular VR06's. 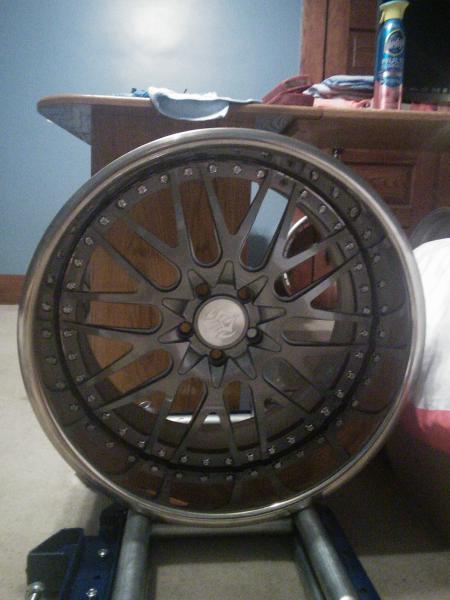 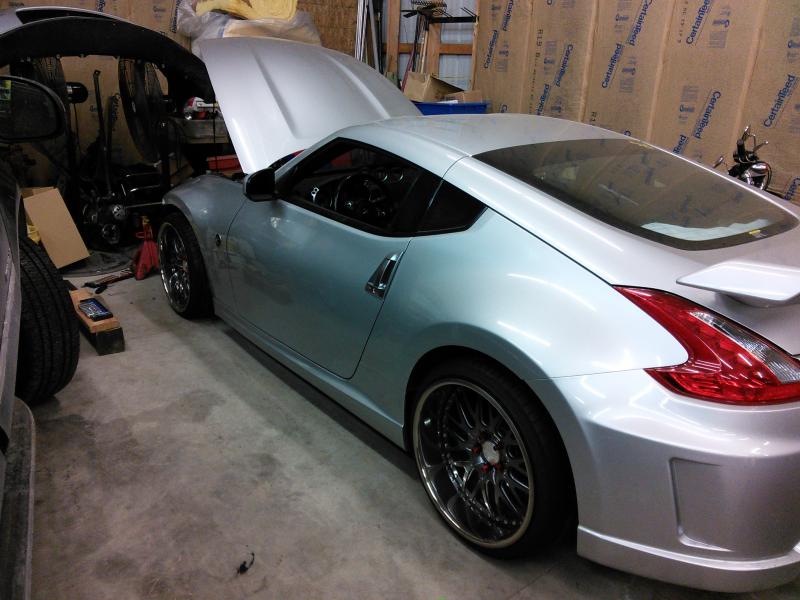 I went with +15 all the way around and to my dismay it didn't clear my front sport brakes like I figured so I had to make an emergency trip to Summit for some 20mm wheel spacers I decided to buy two sets and add 20mm square. Also picked up some tires that would legitimately hold this proposed 600 whp. 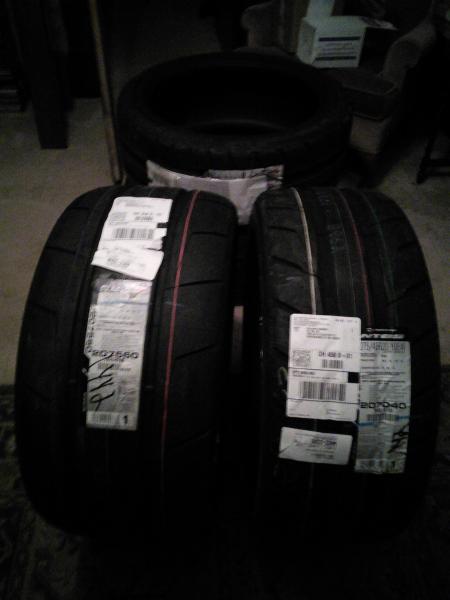 decided to install a TWM short throw and accent it with a shiny new shift knob from PWJDM. I must say taking off the old shift knob wasn't too bad; a strap wrench will be your best friend though! picked two of them up at my local parts store for $10 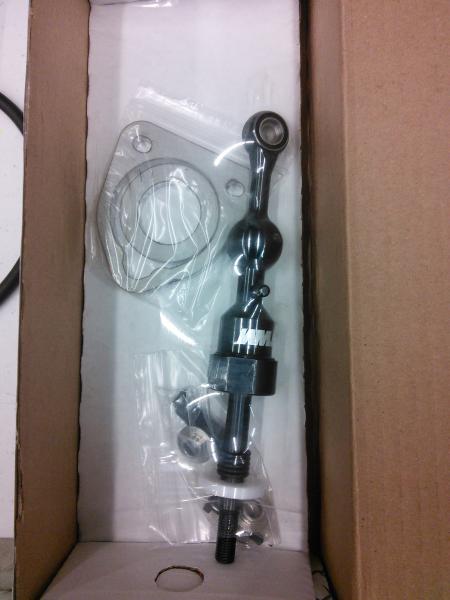 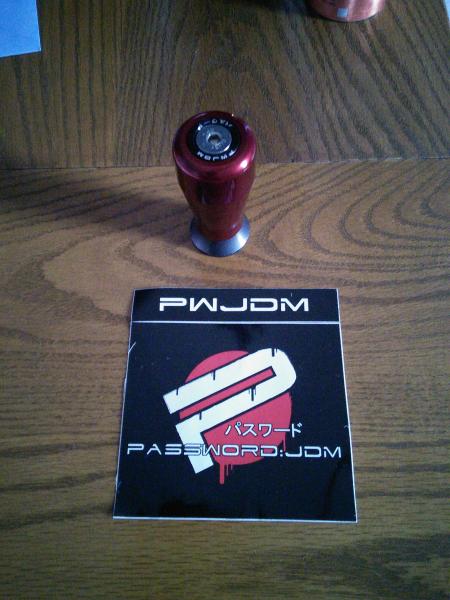 This work and SEVERAL unaccounted for headaches (fender rub issues on a 20/40 tire was the biggest problem to solve) 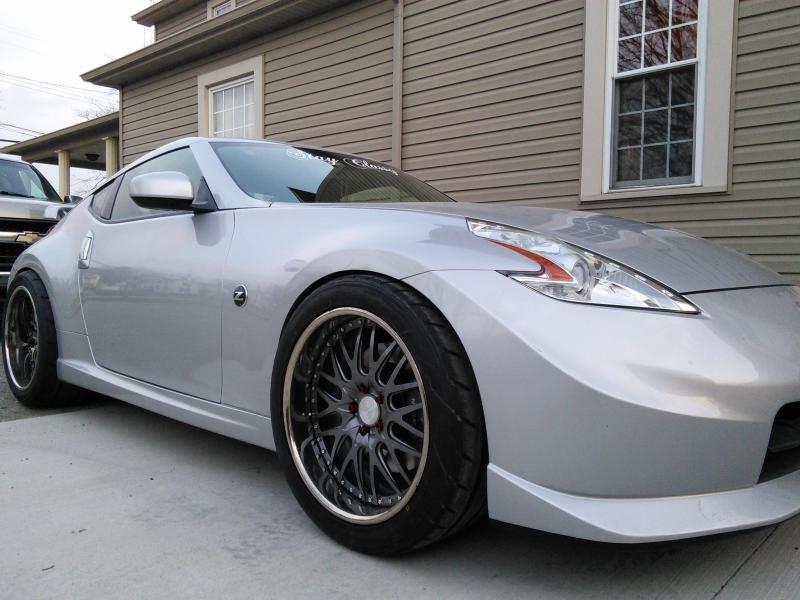 took me up into May, and in the mean time I had scheduled(and re scheduled) several appointments with Dynosty until we FINALLY came to a date that would fit both parties(mostly mine) schedules. I was very excited as it felt like things were finally starting to come together! SN: don't make fun of my wheel poke >.> some people like hellaunfunctional stance; I prefer a manly stance to each their own! I did this for 2 reasons: I am currently quite interested in potentially running the fly1motorsports wide body kit and I also wanted a tad more wheel base on the car
__________________
Always under construction. . . 
Last edited by Rid3_FaM0uS; 08-21-2014 at 07:05 AM. |
|
|

|
|
|
#4 (permalink) |
|
Track Member
Join Date: Apr 2012
Location: Wapakoneta, Ohio
Posts: 506
Drives: 2011 BS Nismo 370z
Rep Power: 44            |
Friday April 11, 2014 - AKA The Death of Betsy
Moving on to the week leading up to my tune date; I received my oil cooler(5 months behind but I wasn't worried Tony is a stand up guy and I knew he was VERY busy with the gorgeous new turbo kit installs that he had freshly pushed out into the market) from Fast Intentions and It couldn't have made for more perfect timing! Gave the car a good prep wash on Sunday night and took her out for a spin to test the new short throw(it was then that I discovered me and the new front tires were going to have some serious issues with one another.) brought it back in for the night and on Monday after work I began to install the oil cooler and change oil for the dyno tune. Took me about an evening fighting with the lines to properly to install what I could. Setrab conveniently bagged up a -10 fitting for my core in place if what was supposed to be a second -8 so I had to have Dan with F.I. Rush deliver me a new fitting. It arrived on Thursday afternoon so after work I bolted my @ss home to finish the install on that and get oil back in the car. I spent the rest of the evening thoroughly cleaning the car inside and out as well as inspecting all the clamps fittings hoses(EVERYTHING) for leaks or issues. I found myself still awake at 4:30 AM messing with the car and we had to leave for Louisville, Kentucky by 5am. Loaded the car into the trailer and started to head south. Arrived at Dynosty shortly before 9 am; unloaded the car, took it down the road to reset the Christmas tree from trying to change front tires to counter the fender rub issue up front come back park the car for just a minute while they finish pulling cars out of the shop and what do ya know I've got a slow oil drip from my turbo oil feed distribution block. Story of my damn life. Anyways from here on out the rest of the story still makes me very livid to tell to this day but life goes on. Here is the thread for those of you who are honestly interested in it. It is time. It goes into detail as to how the day went and issues I ran into. I made it back home that night sometime around 9:30-10:30 iirc and stayed up until 3:30 am pulling apart everything but the bell housing bolts, the motor mounts, and evacuating/disconnecting the AC. I had been up since 6am on Thursday the 10th(45 hours) with ZERO sleep so I was ready to rip off heads and shi+ down throats of just about anything that looked at me crooked.
__________________
Always under construction. . . 
Last edited by Rid3_FaM0uS; 08-21-2014 at 02:45 PM. |
|
|

|
|
|
#5 (permalink) |
|
Track Member
Join Date: Apr 2012
Location: Wapakoneta, Ohio
Posts: 506
Drives: 2011 BS Nismo 370z
Rep Power: 44            |
Engine Build
So I guess I had better get on with the good stuff huh? I think I've kept people at bay long enough. some of you may have seen my photos floating around; I've had them uploaded for several days now to continue updating the thread but apparently I have once again reached my picture limit(sadly). I really need to find some place simple and easy to use to archive all these pictures. Anyway, on with the show! so with the motor torn down. . . 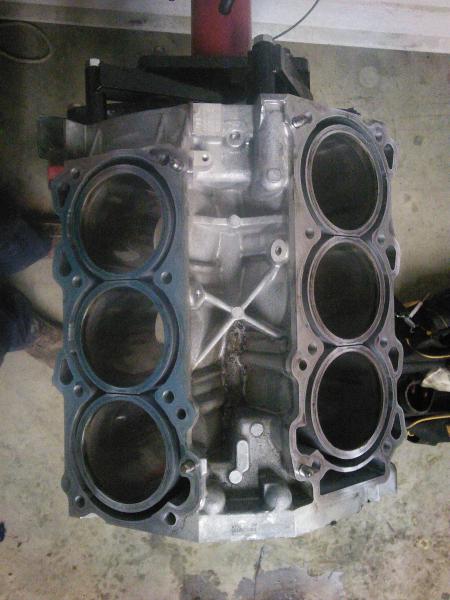 and the cause of death determined. . .  the block was then sent to Stan Ray & Sons (machine shop) on 4/15/2014 and I began to order new internals and parts to build the motor. received the block back by Friday with a fresh .020 bore over; opted not to deck the block as the engine didn't die due to a head gasket failure and gasket material was removed from the entire block via either a razor or brass bristle brush in a dremel. From the beginning of this build I wanted to set out to do some things differently than most. I didn't want to stop at 550whp I wanted to go 800 or beyond; I didn't want a 10 second car Instead I've decided to shoot for 9's because lets be honest for the kind of money and work I've put into the car a 10 second pass just wouldn't feel. . . "satisfying" to say the least. I also decided I would rebuild my own motor. mind you this isn't my first VQ rebuild, but I will tell those of you whom may get the idea after myself, this isn't like installing your stillen gen 3 intakes or a CBE. This requires serious mechanical aptitude; EASILY $1000 in tools alone and also the know how to "properly" use said tools (standard main/connecting rod oil clearance in your block is around 14 TEN THOUSANDTHS to put things in prospective for those of you slightly interested). moving on; in the mean time that my block was being bored I started experimenting with some ideas and throwing them around in my head. Here was the start of the thought process. 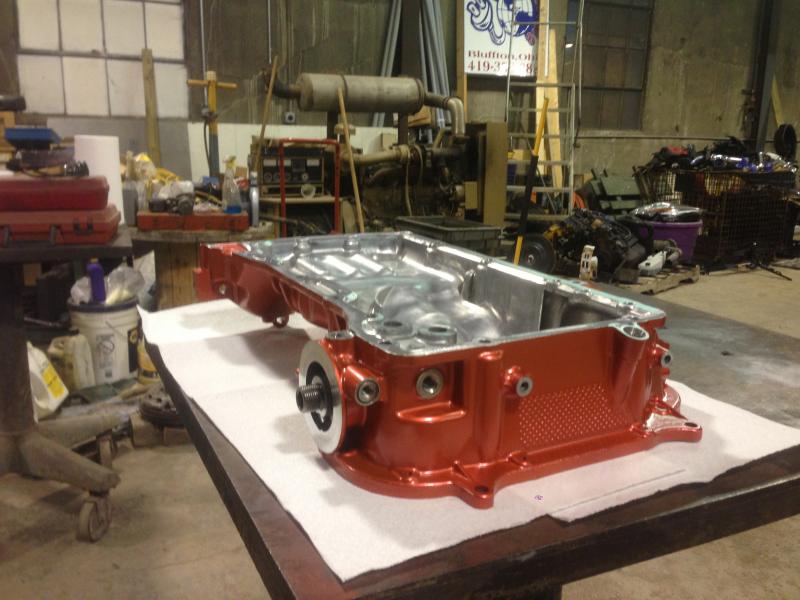 "Ricey" or not I liked it; several others agreed it would be sweet so I decided I would go forth painting my engine red with a slight metallic flake. Not so much metallic that it looked like a care bear $hat all over it but just enough to make a subtle change to the appearance under the right light. little did I know that pulling this off would take an unbelievable about of surface preparation! never the less this was a self done build so I was adamant to prevail. After easily three evenings of meticulous preparation it was finally time to paint the short block. 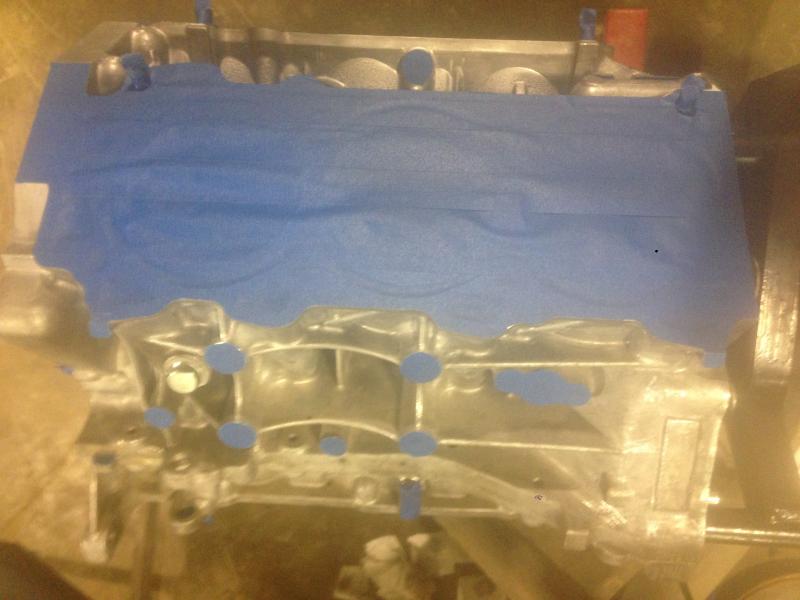 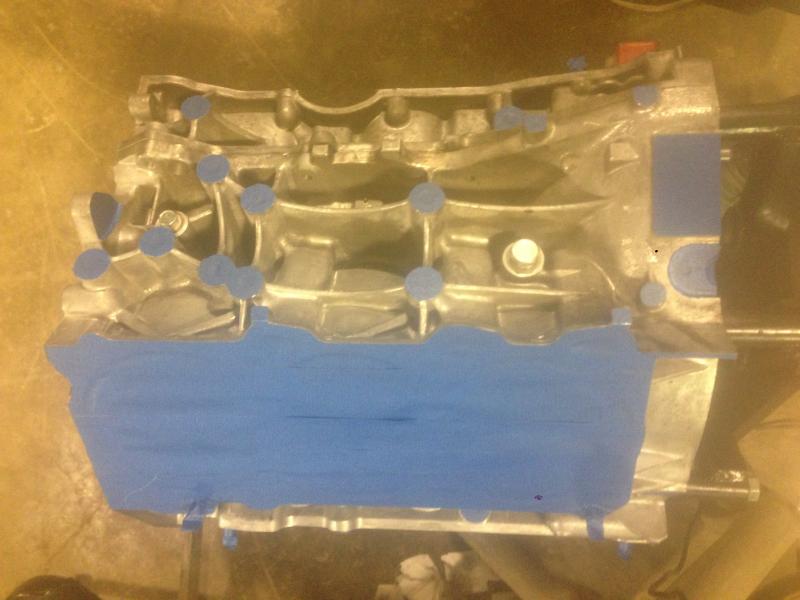 Here was the outcome. 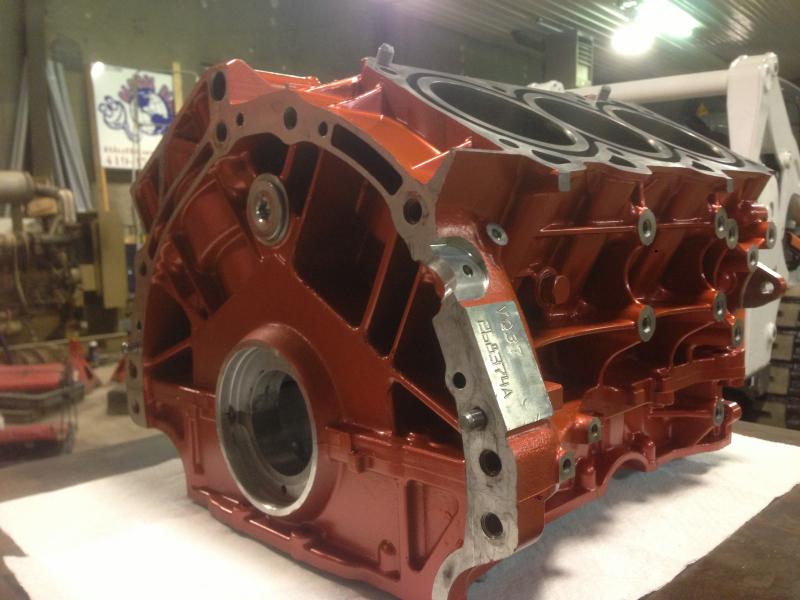 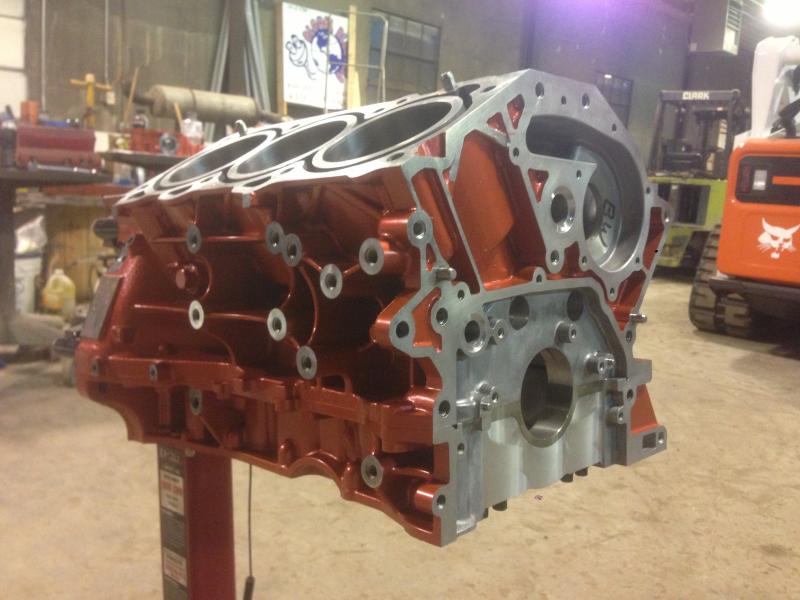 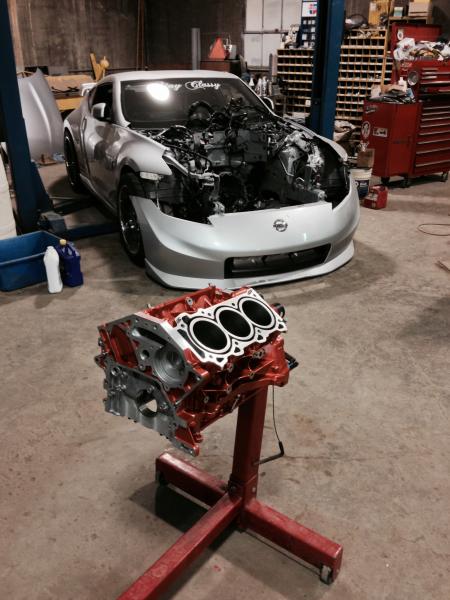 For my first time ever doing something like this I had to stand back and pat myself on the back. "not too shabby" I must say. I moved on to the timing chain assembly and It arguably may have turned out to be my favorite piece of the whole process. I was intending to polish this instead but there is already an Indiana guy here (pretty local) with a bad@ss pearl white nismo that has a polished timing chain cover. I didn't want him to feel like I was stealing his idea while we were at local car shows together so I took a different route. 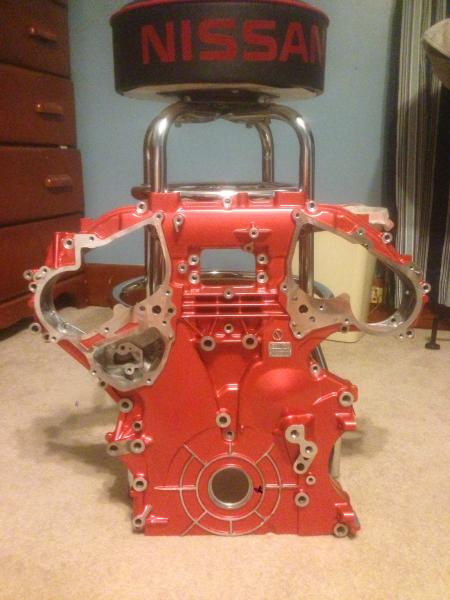 Cylinder heads were up next. once again several days in preparation. I went ahead and cleaned up all of the carbon from the bottoms of the valves too just for the sake of "freshening things up" 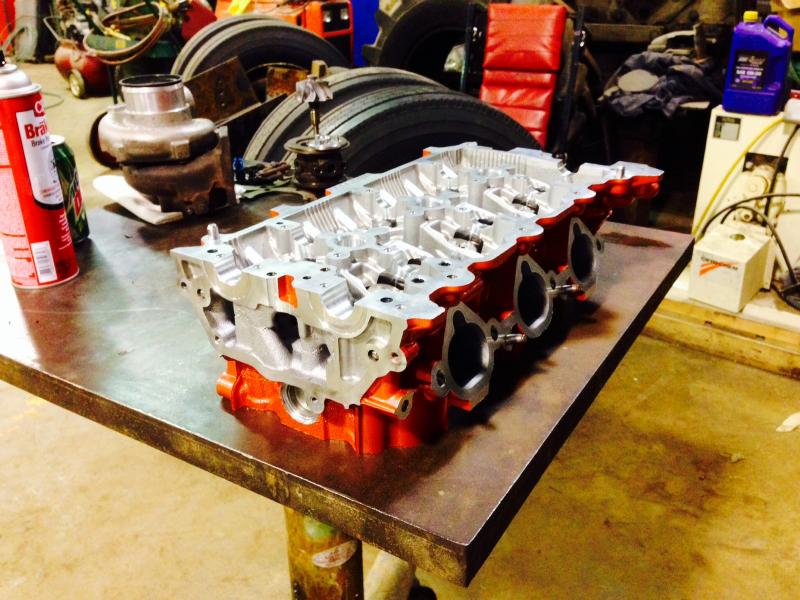 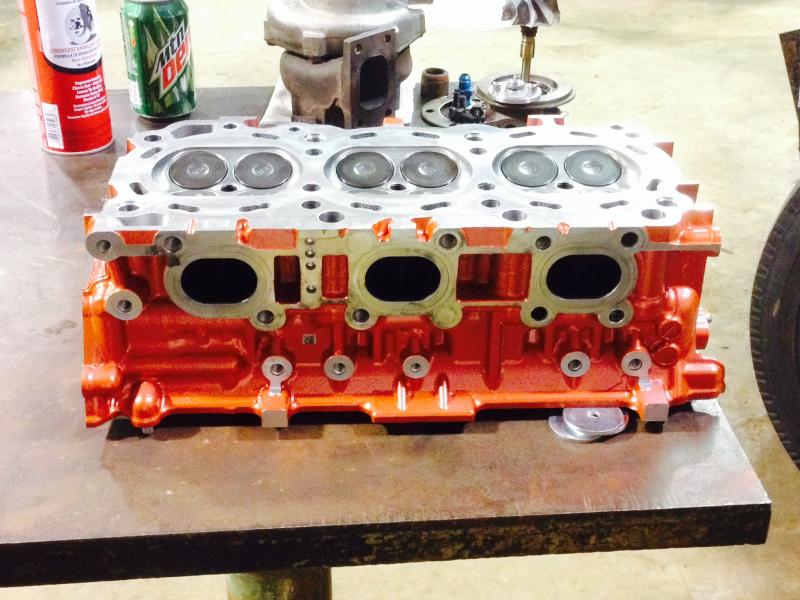 with all the paint out of the way It was time to begin work on the serious stuff. I began to check connecting rod-crank journal clearances get bearings sized and ordered; 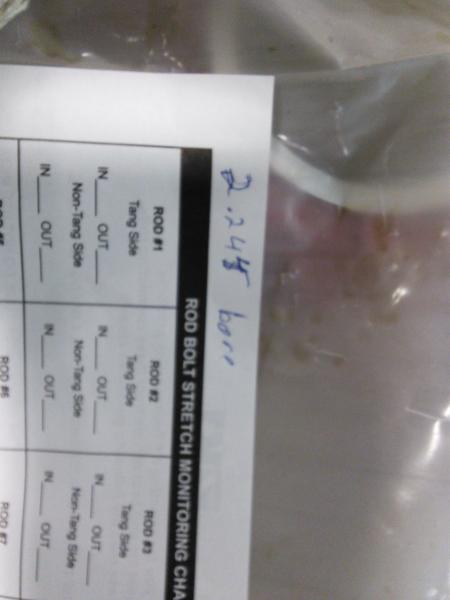 as well as the main journal to main bore to verify the bearings I received from motion lab were the right size(went ahead and installed the ARP main studs as well); Unfortunately they were not. 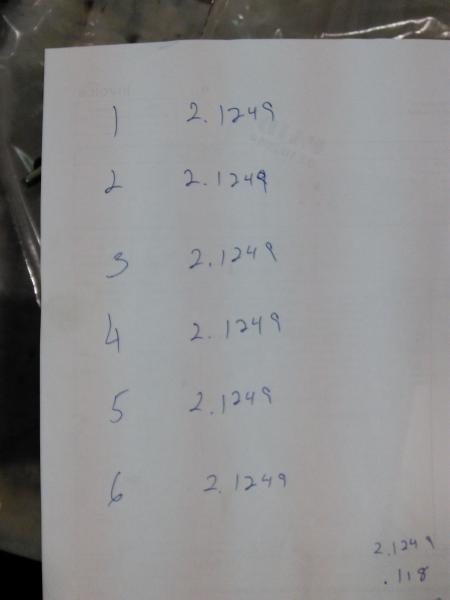 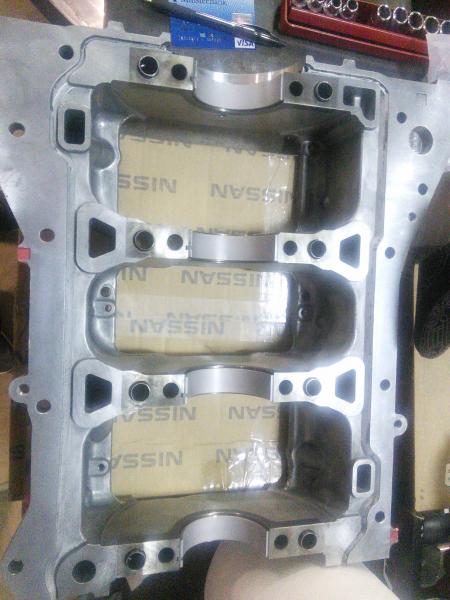 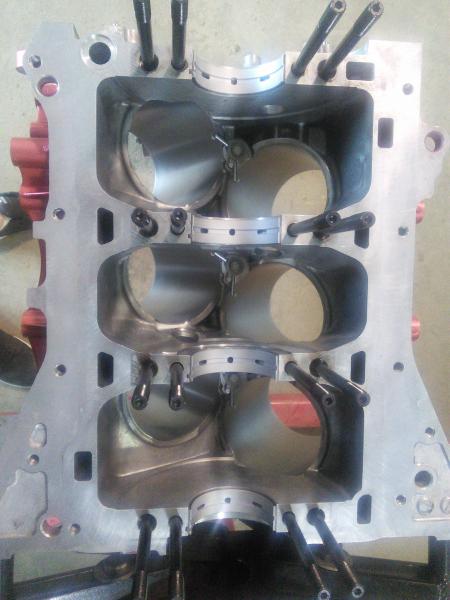 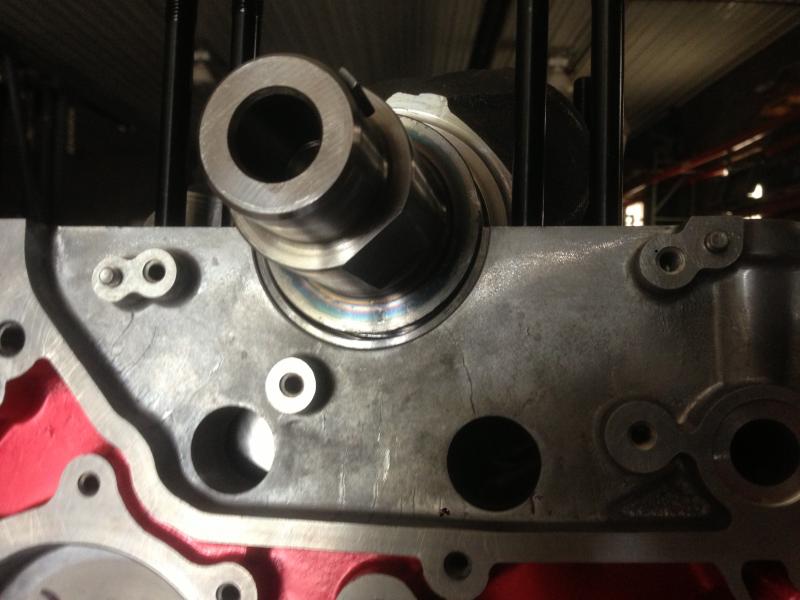 and so stopped my dealings with motion lab. NOT because they are a bad shop; they are an awesome group of guys I spoke to Alex on what seemed like a daily basis for the longest time trying to iron out gremlins and spoke to both he and Todd for an hour and 15min about tuning and a little more in depth insight on what could have happened to my factory short block. I was just infuriated that when I had shown Alex this picture in an email he "politely" pretty much called me a dumbass for trying to tell him my bearings were .010 too large and stated instead that I had a bent crank. I went ahead and bit the bullet held my toungue and purchased as second set of bearings the proper size at my local Nissan dealer at the same time I purchased my connecting rod bearings. took probably a week or better for all of the bearings to arrive from California but the day they did assembly began immediately. 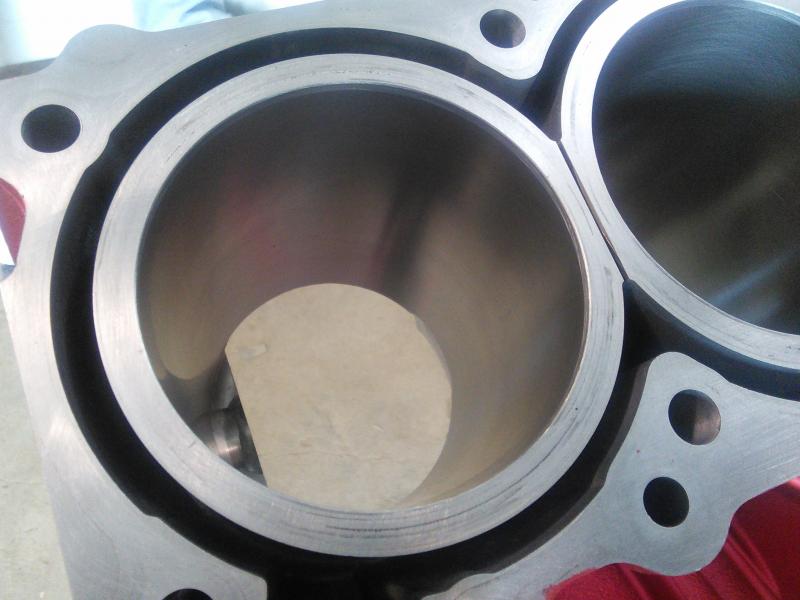 ooohhhhh pretty cylinder walls again haha waiting for a new rotating assembly. 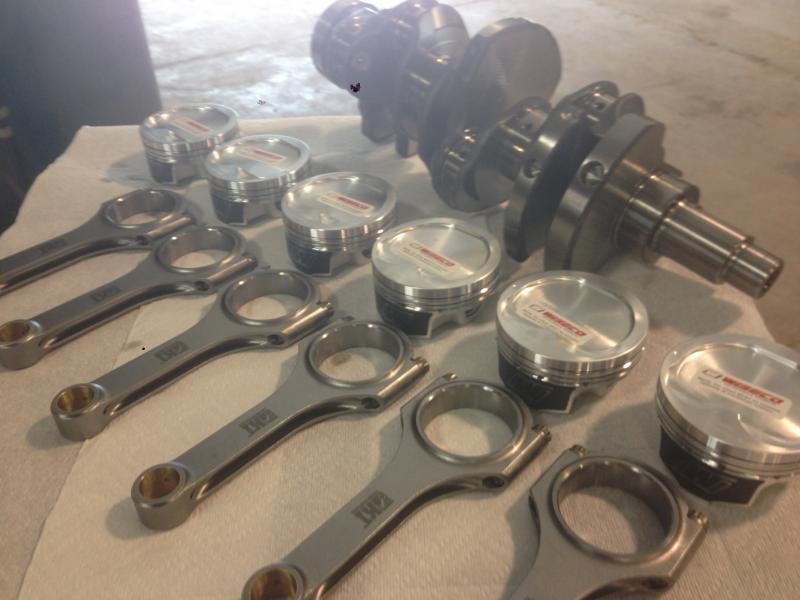 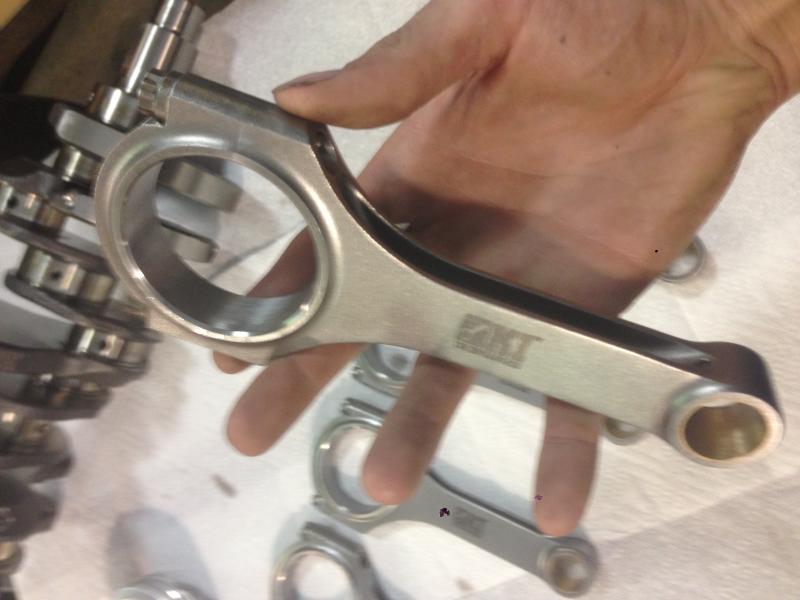 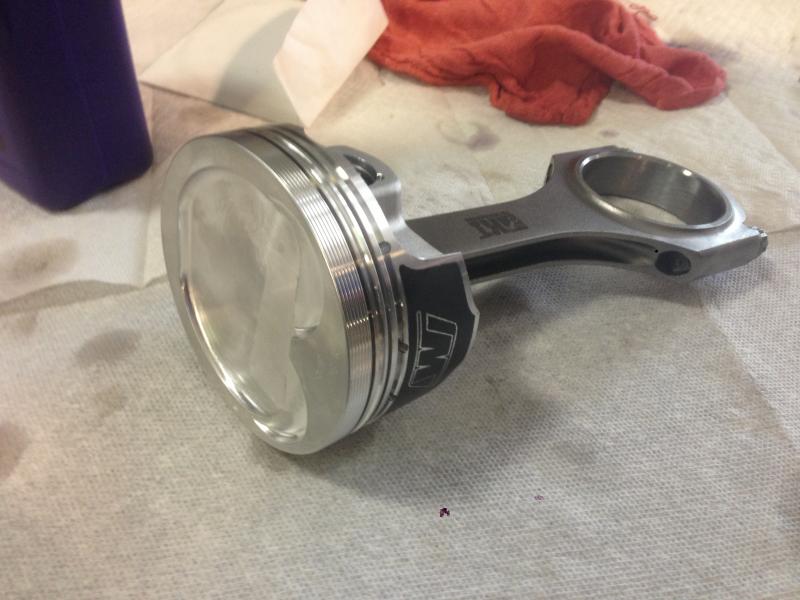 first connecting rod and piston installed  full rotating assembly finished, and torque turned; with head studs and head gaskets  heads/exhaust cams installed as well as VVEL cradles polished and installed 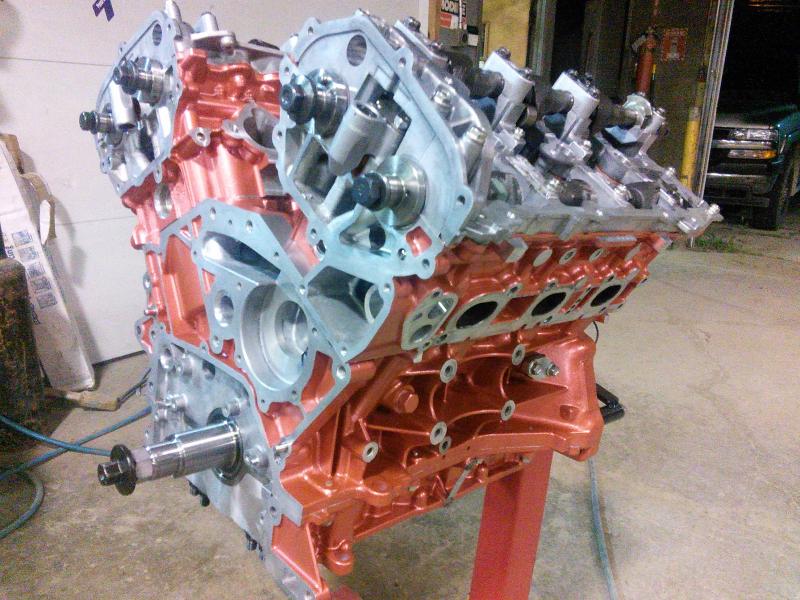 rear timing chain cover installed along with oil pump, water pump, and chain guides+tensioner (note: wait to install the chain guides until after you have installed the cam gears otherwise youll never be able to make enough slack in the chain to properly fit it on.)  Full timing assembly set  Front timing cover installed along with polished cam gear covers and front main seal(sensors were installed to close up the spots that were unnecessary to leave open to chance any sort of air born contaminants. 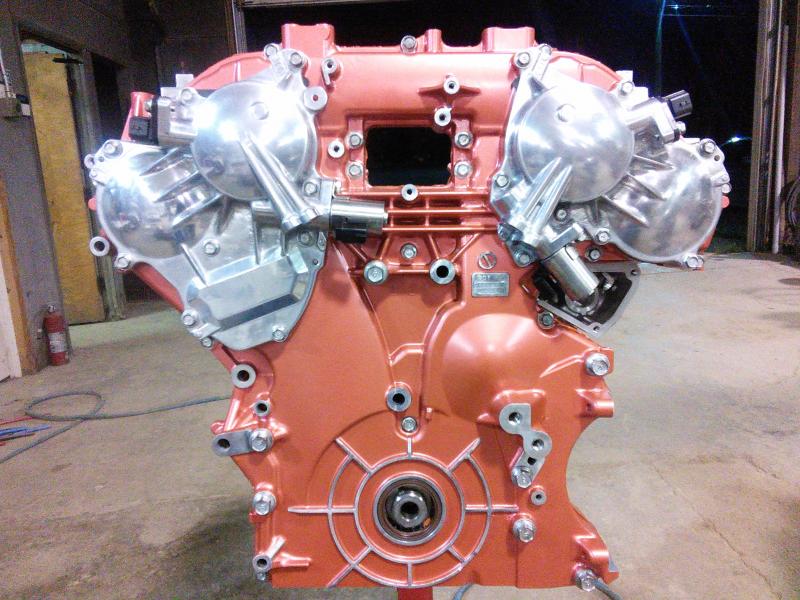 that wrapped it up for the first evening. I would resume the next day after work. 8-6-2014 update: continuing on I found my final road block in my built engine. Being that the factory "Main studs" are a 12pt flange bolt style stud, and the ARP main studs are a "true" stud and nut style main stud, the ARP studs are taller than our factory OEM Nissan main girdle studs. 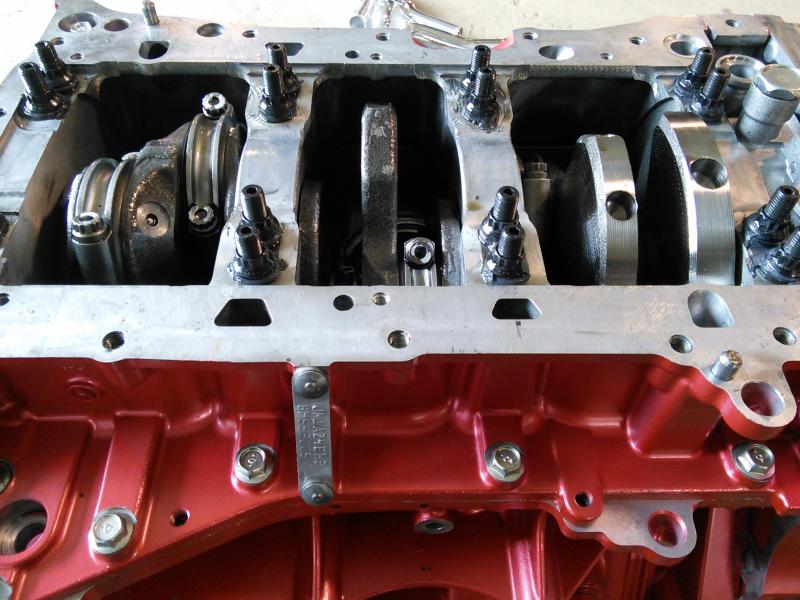 Because of this your crank windage tray no longer seats properly to be bolted to the main girdle. 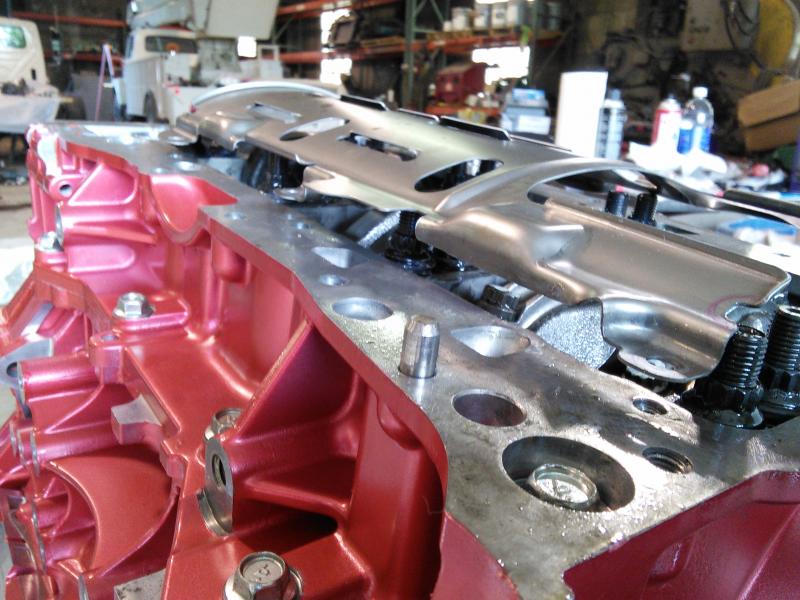 now my first thought was "oh I can just space the windage tray up off the studs like the LS guys can do" Nope. there are two baffles in the upper oil pan that prevent that from happening 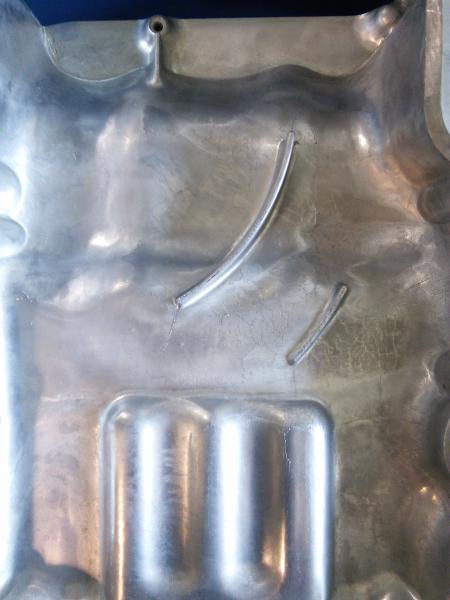 so your only options are to either A) grind the baffles off of your oil pan(idiotic) or B) adjust the windage tray to fit around the studs as it did the factory suds Heres my finished product 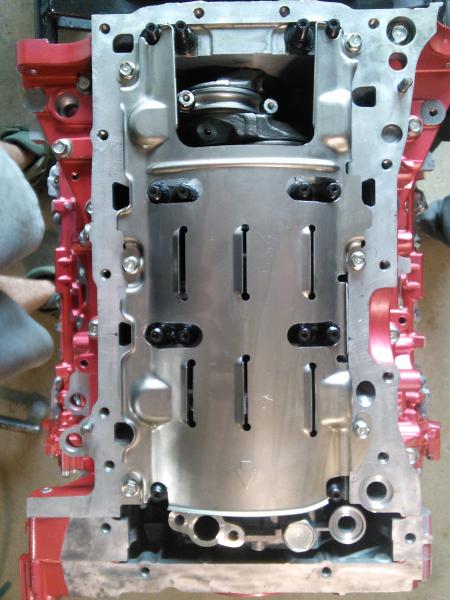 upper oil pan installed and properly fitted 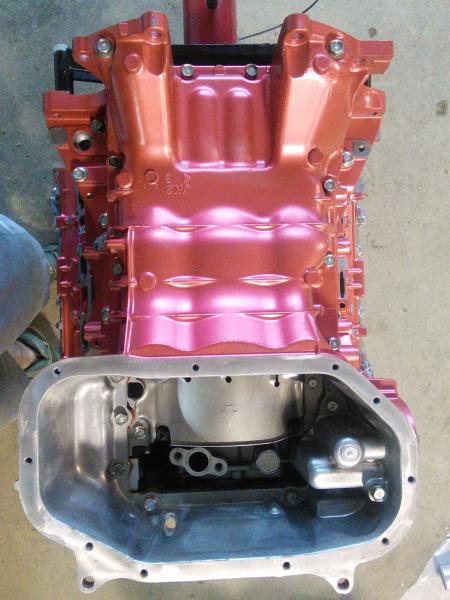 Oil pan spacer and pan installed 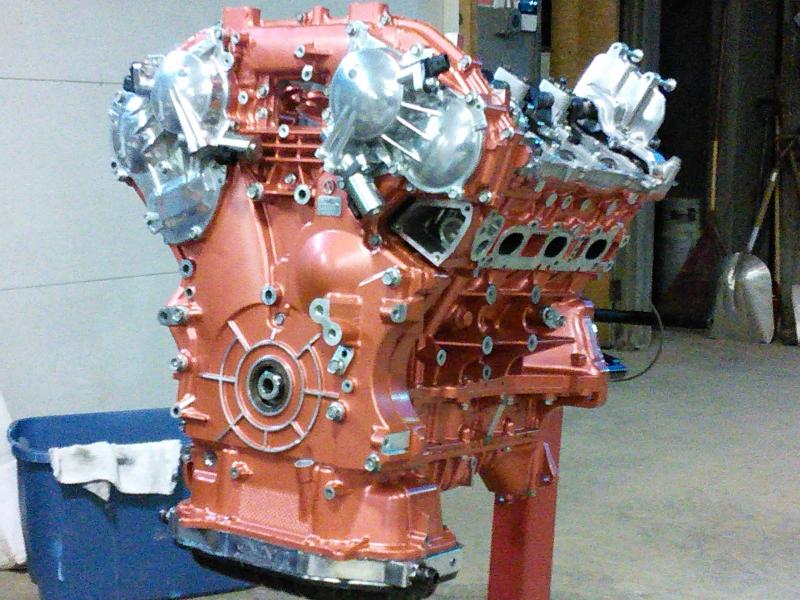 valve covers and VVEL actuators installed 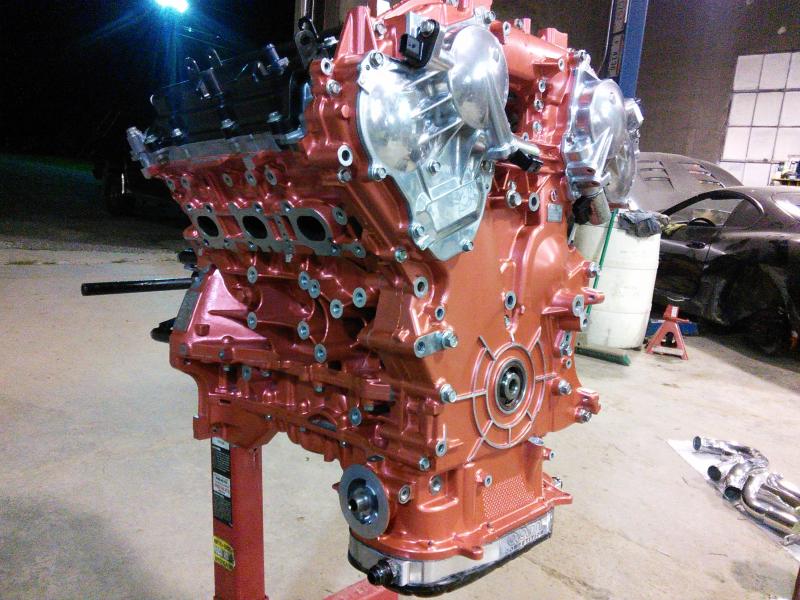 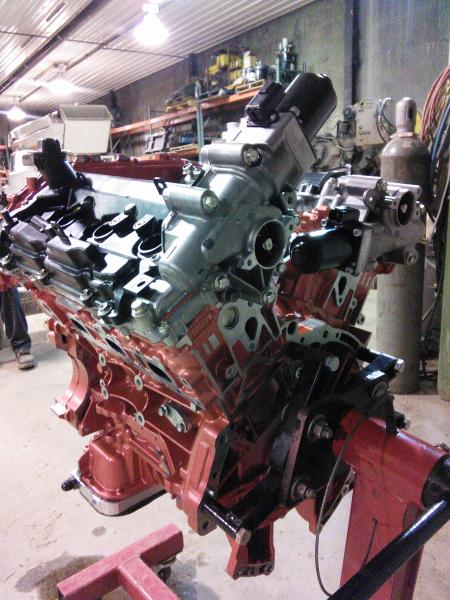 and finished! 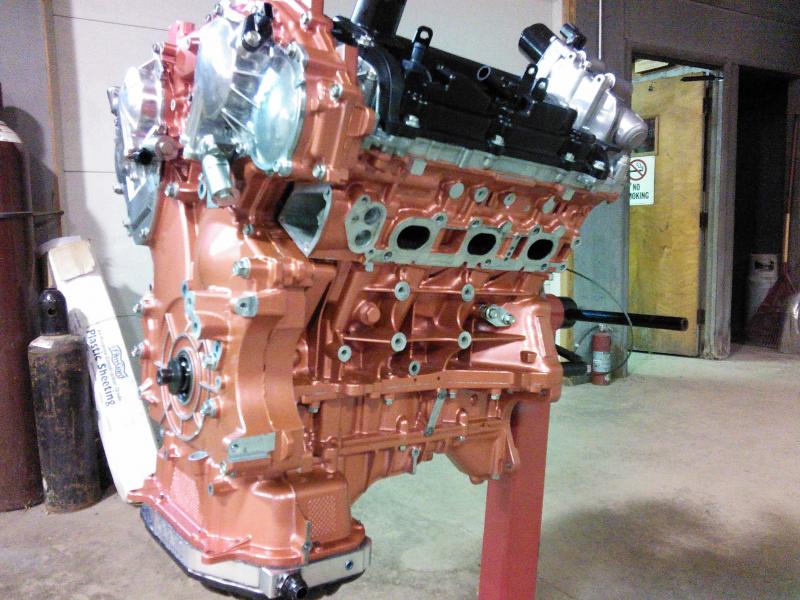 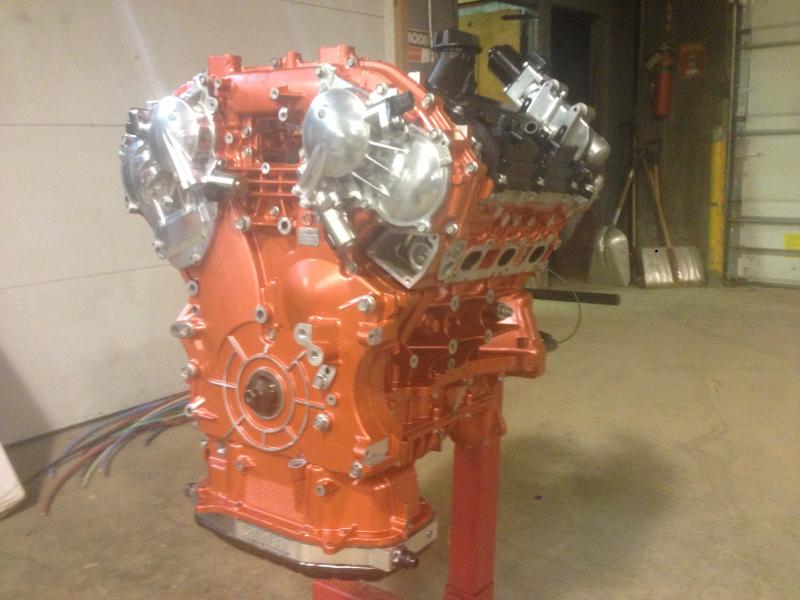 that's all I've got for now guys will keep the updates coming soon! 
__________________
Always under construction. . . 
Last edited by Rid3_FaM0uS; 10-16-2014 at 02:39 PM. |
|
|

|
|
|
#6 (permalink) |
|
A True Z Fanatic
Join Date: Jul 2013
Location: Whore Island, MN
Posts: 1,243
Drives: 40th F.I. Twin Turbo
Rep Power: 18            |
850hp. You're crazy man! Crazy! I like it! Sub'd.
__________________
2010 370Z 40th Anniversary (#480 born 1/19/2010)
Fast Intentions Twin Turbo | Varis Arising II | Limited Edition Recaro Sportster | Tuned by Specialty Z | 604hp 525 torque @14lbs boost on 100 octane |
|
|

|
|
|
#7 (permalink) |
|
A True Z Fanatic
 Join Date: Jul 2011
Location: Pittsburgh PA
Posts: 38,517
Drives: 15 GT-R BE/09 370Z
Rep Power: 1402085            |
i just read a write up on some companys website of a 800+WHP Z so i'm guessing it's yours?
__________________
324whp/258wtq AAM Tuned |F.I. NonRes CF CBE/NonRes TestPipes #373|UpRev Tuner|Akuma Motorsports Intakes|Z1 34 Row Oil Cooler |
|
|

|
|
|
#8 (permalink) |
|
Track Member
Join Date: Apr 2012
Location: Wapakoneta, Ohio
Posts: 506
Drives: 2011 BS Nismo 370z
Rep Power: 44            |
No sir; true meaning of built not bought here in this thread! All of my work to my car (other than alignments) has been done by myself.
__________________
Always under construction. . . 
|
|
|

|
|
|
#9 (permalink) | |
|
A True Z Fanatic
 Join Date: Jul 2011
Location: Pittsburgh PA
Posts: 38,517
Drives: 15 GT-R BE/09 370Z
Rep Power: 1402085            |
Quote:
i'm excited to see it all 
__________________
324whp/258wtq AAM Tuned |F.I. NonRes CF CBE/NonRes TestPipes #373|UpRev Tuner|Akuma Motorsports Intakes|Z1 34 Row Oil Cooler |
|
|
|

|
|
|
#10 (permalink) |
|
Track Member
Join Date: Apr 2012
Location: Wapakoneta, Ohio
Posts: 506
Drives: 2011 BS Nismo 370z
Rep Power: 44            |
sorry man slowly but surely! I'm trying to get it all up but there's a TON of info I have to post! bare in mind this build is not complete and running just yet but those are the goal numbers. I have made every step I need in my mind to make this power level. I wanted some place to compile this where members could SEE AND BELIEVE(unlike another thread) that high hp is possible to achieve from this car.
__________________
Always under construction. . . 
|
|
|

|
|
|
#11 (permalink) |
|
A True Z Fanatic
Join Date: Feb 2009
Location: Texas
Posts: 30,879
Drives: 370z
Rep Power: 4211            |
In for the write up, the one you are referring to FP is this one I believe: John’s 370Z TT+ |
The owner is on here as tturbo370z I believe.
__________________
theDreamer's Z // Fast Intentions // Uprev // GTM // HKS // TEIN theDreamer's Silvia // URAS // GREDDY Houston Zs // Facebook // Twitter // Instagram |
|
|

|
|
|
#12 (permalink) | |
|
A True Z Fanatic
 Join Date: Jul 2011
Location: Pittsburgh PA
Posts: 38,517
Drives: 15 GT-R BE/09 370Z
Rep Power: 1402085            |
Quote:
 i think i know which thread you're speaking of lol 
__________________
324whp/258wtq AAM Tuned |F.I. NonRes CF CBE/NonRes TestPipes #373|UpRev Tuner|Akuma Motorsports Intakes|Z1 34 Row Oil Cooler |
|
|
|

|
|
|
#13 (permalink) | |
|
A True Z Fanatic
 Join Date: Jul 2011
Location: Pittsburgh PA
Posts: 38,517
Drives: 15 GT-R BE/09 370Z
Rep Power: 1402085            |
Quote:

__________________
324whp/258wtq AAM Tuned |F.I. NonRes CF CBE/NonRes TestPipes #373|UpRev Tuner|Akuma Motorsports Intakes|Z1 34 Row Oil Cooler |
|
|
|

|
|
|
#14 (permalink) |
|
A True Z Fanatic
Join Date: Feb 2009
Location: Texas
Posts: 30,879
Drives: 370z
Rep Power: 4211            |
Always helps that I keep track of all these details, which I need to update soon actually. More boost owners popping up lately!
__________________
theDreamer's Z // Fast Intentions // Uprev // GTM // HKS // TEIN theDreamer's Silvia // URAS // GREDDY Houston Zs // Facebook // Twitter // Instagram |
|
|

|
|
|
#15 (permalink) | |
|
Track Member
Join Date: Apr 2012
Location: Wapakoneta, Ohio
Posts: 506
Drives: 2011 BS Nismo 370z
Rep Power: 44            |
Quote:

__________________
Always under construction. . . 
|
|
|
|

|
 |
| Bookmarks |
|
|
 Similar Threads
|
||||
| Thread | Thread Starter | Forum | Replies | Last Post |
| ENT-Z Build Thread | ENT-Z | Member's 370Z Gallery | 68 | 09-06-2014 10:00 PM |
| Finally, my very own TT build thread. | Vinny | Forced Induction | 46 | 12-06-2012 06:25 AM |
| UAM Customers Build Thread. | Jamaica | Forced Induction | 90 | 04-19-2012 10:24 PM |
| California build thread | bigaudiofanat | Audio & Video | 95 | 01-27-2012 11:00 PM |
| THE "Lets argue about Bullitt's build with out ruining Bullitt's build thread" THREAD | Reaper42 | Forced Induction | 14 | 01-22-2011 05:24 PM |