Nissan 370Z Forum  

wstar's Journal

I think later this evening I'm going to make some more attempts at routing the front cables more "correctly", I can't imagine this is what's intended: Although it does technically

Go Back   Nissan 370Z Forum > Nissan 370Z General Area > Member's 370Z Gallery


Like Tree183Likes

Reply
 
LinkBack Thread Tools Display Modes
Old 06-28-2009, 01:07 PM   #181 (permalink)
A True Z Fanatic
 
wstar's Avatar
 
Join Date: Mar 2009
Location: Houston, TX
Posts: 4,024
Drives: too slow
Rep Power: 3594
wstar has a reputation beyond reputewstar has a reputation beyond reputewstar has a reputation beyond reputewstar has a reputation beyond reputewstar has a reputation beyond reputewstar has a reputation beyond reputewstar has a reputation beyond reputewstar has a reputation beyond reputewstar has a reputation beyond reputewstar has a reputation beyond reputewstar has a reputation beyond repute
Default

I think later this evening I'm going to make some more attempts at routing the front cables more "correctly", I can't imagine this is what's intended:


Although it does technically seem to work in terms of clearance/rubbing/suspension travel, etc. I'm going to want to re-bleed after getting more speed bleeders in this week too, as I'm pretty sure the rear calipers aren't bled very perfectly.
__________________
7AT Track Car!
Journal thread / Car setup details
wstar is offline   Reply With Quote
Old 06-29-2009, 08:55 AM   #182 (permalink)
Enthusiast Member
 
miguez's Avatar
 
Join Date: Apr 2009
Location: Columbus, Ohio
Posts: 359
Drives: '04 Cavalier
Rep Power: 181
miguez has a reputation beyond reputemiguez has a reputation beyond reputemiguez has a reputation beyond reputemiguez has a reputation beyond reputemiguez has a reputation beyond reputemiguez has a reputation beyond reputemiguez has a reputation beyond reputemiguez has a reputation beyond reputemiguez has a reputation beyond reputemiguez has a reputation beyond reputemiguez has a reputation beyond repute
Default

To me the interesting result of the routing on the picture you show above is that it allows for suspension travel and wheel turning with plenty to spare, while remaining relatively fixed other than that, given the inherent stability that loop gives the hose. At least that's what it would seem.
miguez is offline   Reply With Quote
Old 06-29-2009, 10:22 AM   #183 (permalink)
A True Z Fanatic
 
wstar's Avatar
 
Join Date: Mar 2009
Location: Houston, TX
Posts: 4,024
Drives: too slow
Rep Power: 3594
wstar has a reputation beyond reputewstar has a reputation beyond reputewstar has a reputation beyond reputewstar has a reputation beyond reputewstar has a reputation beyond reputewstar has a reputation beyond reputewstar has a reputation beyond reputewstar has a reputation beyond reputewstar has a reputation beyond reputewstar has a reputation beyond reputewstar has a reputation beyond repute
Default

Quote:
Originally Posted by miguez View Post
To me the interesting result of the routing on the picture you show above is that it allows for suspension travel and wheel turning with plenty to spare, while remaining relatively fixed other than that, given the inherent stability that loop gives the hose. At least that's what it would seem.
I sent the pic to coz@czp, he told me what I did wrong, I just need to fix it today. I'll get some pics of the correct routing (afaik) on the front and rear before I put the wheels back on.
__________________
7AT Track Car!
Journal thread / Car setup details
wstar is offline   Reply With Quote
Old 06-29-2009, 02:03 PM   #184 (permalink)
A True Z Fanatic
 
wstar's Avatar
 
Join Date: Mar 2009
Location: Houston, TX
Posts: 4,024
Drives: too slow
Rep Power: 3594
wstar has a reputation beyond reputewstar has a reputation beyond reputewstar has a reputation beyond reputewstar has a reputation beyond reputewstar has a reputation beyond reputewstar has a reputation beyond reputewstar has a reputation beyond reputewstar has a reputation beyond reputewstar has a reputation beyond reputewstar has a reputation beyond reputewstar has a reputation beyond repute
Default

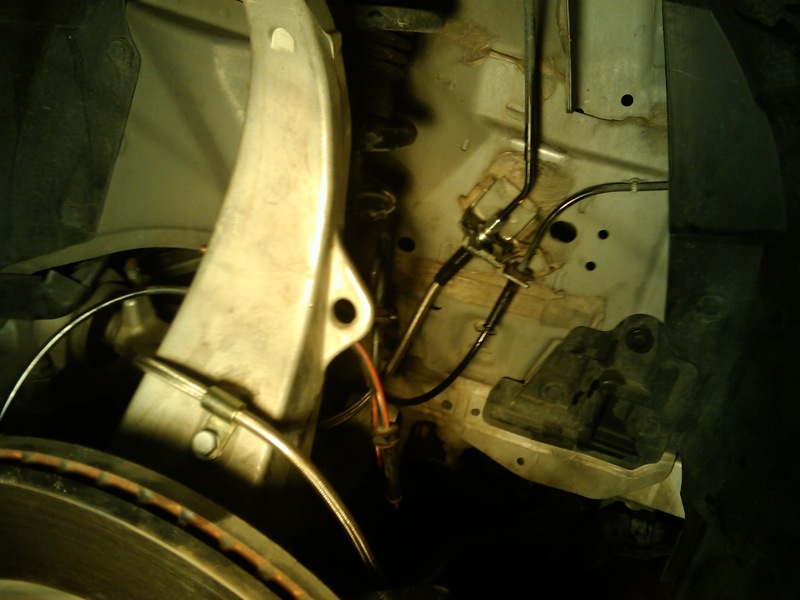
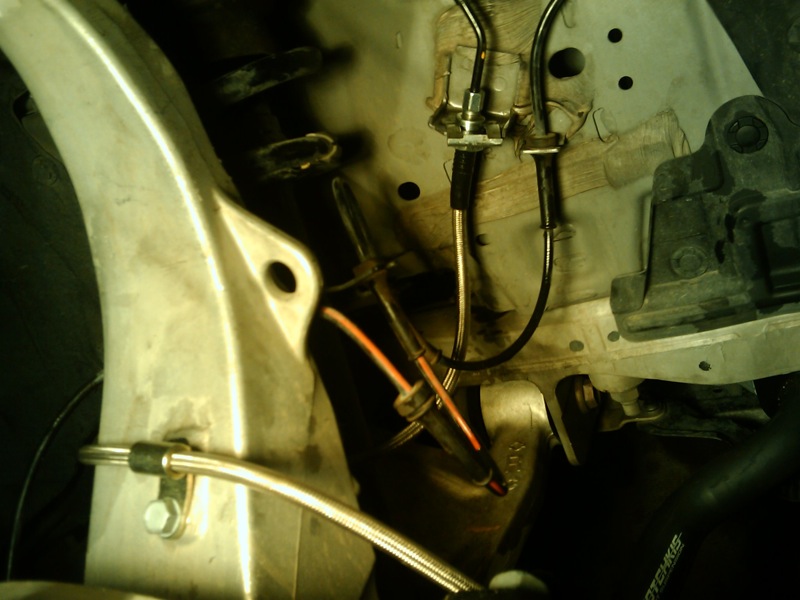
Coz got me sorted out on the brake line routing, this is what they look like now:

Rear (sorry, blurry pic):


Three views of the front:


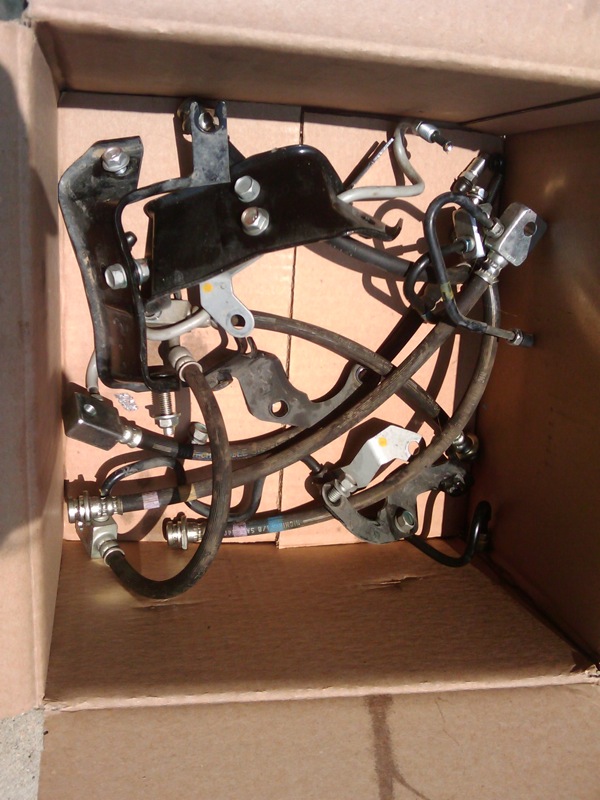
Also, here's the box-o-parts from the OEM stuff that came off. Between all the brackets and fittings that went away and were replaced with the simple braided line, seems like I probably shaved a tiny amount of weight with this too:


I just now stuck the wheels back on the car, haven't even torqued the lug nuts down yet or lowered the car, gotta get some real work done here before I get back to that. I probably won't do any "driving impressions" for a few days, because like I said earlier I didn't order enough speed bleeders, and as a result I'm pretty sure I have air bubbles in the lines, which are going to cause more problems with mushy pedal feel than the braided lines could ever make up for

Once the new bleeders come in later in the week I'll re-bleed again and see how it feels. For now I'm just gonna take it easy and not trust my brakes much.
__________________
7AT Track Car!
Journal thread / Car setup details
wstar is offline   Reply With Quote
Old 06-29-2009, 03:42 PM   #185 (permalink)
The370Z.com Sponsor
 
Josh@STILLEN's Avatar
 
Join Date: Dec 2008
Location: Costa Mesa, CA
Posts: 1,197
Drives: 2004 G35 Coupe 6MT
Rep Power: 533
Josh@STILLEN has a reputation beyond reputeJosh@STILLEN has a reputation beyond reputeJosh@STILLEN has a reputation beyond reputeJosh@STILLEN has a reputation beyond reputeJosh@STILLEN has a reputation beyond reputeJosh@STILLEN has a reputation beyond reputeJosh@STILLEN has a reputation beyond reputeJosh@STILLEN has a reputation beyond reputeJosh@STILLEN has a reputation beyond reputeJosh@STILLEN has a reputation beyond reputeJosh@STILLEN has a reputation beyond repute
Default

Quote:
Originally Posted by wstar View Post
I sent the pic to coz@czp, he told me what I did wrong, I just need to fix it today. I'll get some pics of the correct routing (afaik) on the front and rear before I put the wheels back on.
Are you sure this is the routing path they specified? I would make sure you can go full lock without tugging those lines hard. It would appear (from the pictures) that if the knuckle was turned fully, it seems short on slack.

On the steel locator bracket, does it appear that over time it will chafe with the stainless line moving, or am I missing something?
Josh@STILLEN is offline   Reply With Quote
Old 06-29-2009, 04:03 PM   #186 (permalink)
A True Z Fanatic
 
wstar's Avatar
 
Join Date: Mar 2009
Location: Houston, TX
Posts: 4,024
Drives: too slow
Rep Power: 3594
wstar has a reputation beyond reputewstar has a reputation beyond reputewstar has a reputation beyond reputewstar has a reputation beyond reputewstar has a reputation beyond reputewstar has a reputation beyond reputewstar has a reputation beyond reputewstar has a reputation beyond reputewstar has a reputation beyond reputewstar has a reputation beyond reputewstar has a reputation beyond repute
Default

Quote:
Originally Posted by Josh@STILLEN View Post
Are you sure this is the routing path they specified? I would make sure you can go full lock without tugging those lines hard. It would appear (from the pictures) that if the knuckle was turned fully, it seems short on slack.

On the steel locator bracket, does it appear that over time it will chafe with the stainless line moving, or am I missing something?
I did test the steering travel, the lines don't get stressed. The front suspension was hanging (as in, tires off the ground, and jack stands not on anything suspension related) when I did the steering check, so I assume suspension travel will be ok too, as it will only go up (more slack) from here.

The original steel brackets (the black ones) were removed per CZP. That arm that the front cable is wrapped around now though... yes I am worried about it chafing against the corners of it. The lines are teflon coated, and I'm pulling the wheels back off to rebleed later in the week and not planning to drive many miles between, so we'll see how it looks then. I figure worst case I can pad those corners somehow (like, glue on some soft rubber material there).

When I was scoping around the net for pics of braided line installs I came across your (Stillen) 350Z lines. By eyeballing it they look 370Z applicable, although I don't know if there were any small changes in lengths from the 350Z (you would think not, but who knows). CZP's lines are very different from your kit though. Where yours uses the stock brackets and affixes at multiple points like the stock lines, theirs is just a single braided line with one floating mounting tab on it.
__________________
7AT Track Car!
Journal thread / Car setup details
wstar is offline   Reply With Quote
Old 06-29-2009, 04:07 PM   #187 (permalink)
A True Z Fanatic
 
wstar's Avatar
 
Join Date: Mar 2009
Location: Houston, TX
Posts: 4,024
Drives: too slow
Rep Power: 3594
wstar has a reputation beyond reputewstar has a reputation beyond reputewstar has a reputation beyond reputewstar has a reputation beyond reputewstar has a reputation beyond reputewstar has a reputation beyond reputewstar has a reputation beyond reputewstar has a reputation beyond reputewstar has a reputation beyond reputewstar has a reputation beyond reputewstar has a reputation beyond repute
Default

Oh maybe I misread what you meant Josh, if you're referring to the little bracket CZP shipped that's in use, I don't think that one will chafe. It holds snug and has soft edges, and there's really not much slippage that's going to happen there anyways, as the side towards the caliper is a straight, stiff, and relatively immobilized section so to speak (there's no suspension movement between the caliper and that bracket).
__________________
7AT Track Car!
Journal thread / Car setup details
wstar is offline   Reply With Quote
Old 06-29-2009, 04:32 PM   #188 (permalink)
The370Z.com Sponsor
 
Josh@STILLEN's Avatar
 
Join Date: Dec 2008
Location: Costa Mesa, CA
Posts: 1,197
Drives: 2004 G35 Coupe 6MT
Rep Power: 533
Josh@STILLEN has a reputation beyond reputeJosh@STILLEN has a reputation beyond reputeJosh@STILLEN has a reputation beyond reputeJosh@STILLEN has a reputation beyond reputeJosh@STILLEN has a reputation beyond reputeJosh@STILLEN has a reputation beyond reputeJosh@STILLEN has a reputation beyond reputeJosh@STILLEN has a reputation beyond reputeJosh@STILLEN has a reputation beyond reputeJosh@STILLEN has a reputation beyond reputeJosh@STILLEN has a reputation beyond repute
Default

Cool.. I would definitely recheck the full left/right lock when you get the wheels down.. just to make sure. I can't imagine that thing pulling loose at full travel.. yikes!

Yes, there are some significant differences between the goodridge setup and CZP, but that's a fantastic price point, and the ultimate goal of improved brake feel will be there. Awesome for again taking the time to document the install.
Josh@STILLEN is offline   Reply With Quote
Old 06-29-2009, 05:26 PM   #189 (permalink)
A True Z Fanatic
 
wstar's Avatar
 
Join Date: Mar 2009
Location: Houston, TX
Posts: 4,024
Drives: too slow
Rep Power: 3594
wstar has a reputation beyond reputewstar has a reputation beyond reputewstar has a reputation beyond reputewstar has a reputation beyond reputewstar has a reputation beyond reputewstar has a reputation beyond reputewstar has a reputation beyond reputewstar has a reputation beyond reputewstar has a reputation beyond reputewstar has a reputation beyond reputewstar has a reputation beyond repute
Default

Did a quickie test drive for the pad bedding procedure, everything seems fine. I haven't gotten on them any harder than necessary for bedding yet, but it seems to be stopping at least as good as stock. Pedal's a little mushy at the top, but again I think that's the air bubbles I probably left in the lines , which will get sorted out later in the week with the new bleeders. Fluid level at the reservoir dropped very slightly after the test drive, I don't know if that means I left a small leak, or if the system just "took up slack" so to speak from being fully pressurized for the first time since bleeding. Going to top it off before I drive again and check it like crazy for the next several miles.
__________________
7AT Track Car!
Journal thread / Car setup details
wstar is offline   Reply With Quote
Old 06-29-2009, 10:18 PM   #190 (permalink)
A True Z Fanatic
 
wstar's Avatar
 
Join Date: Mar 2009
Location: Houston, TX
Posts: 4,024
Drives: too slow
Rep Power: 3594
wstar has a reputation beyond reputewstar has a reputation beyond reputewstar has a reputation beyond reputewstar has a reputation beyond reputewstar has a reputation beyond reputewstar has a reputation beyond reputewstar has a reputation beyond reputewstar has a reputation beyond reputewstar has a reputation beyond reputewstar has a reputation beyond reputewstar has a reputation beyond repute
Default

More testing this evening. Brakes work pretty well, the car is certainly safe, but there's also definitely a small leak under high pressure. Driving 10 miles or so and doing lots of hard-ish stops along the way drops the reservoir level about 1-2mm, which is about like what happened during the bedding-in drive. My bet is either I didn't sufficiently tighten one of the bleeder screws, or I over-tightened one of those damn flange connections from the factory hard lines to the braided lines.

I hate those damn flange connections, I over-tightened one on my last car too a few years back. It's not hard to do, and it splits the edge of the flange causing a slow leak under high pressure only. Fix is to cut a fraction of an inch off the end of the line and re-make the flange with a little tool, which I already have from last time. We'll see when I take the wheels off again later in the week for the re-bleed stuff.
__________________
7AT Track Car!
Journal thread / Car setup details
wstar is offline   Reply With Quote
Old 06-30-2009, 12:02 PM   #191 (permalink)
A True Z Fanatic
 
wstar's Avatar
 
Join Date: Mar 2009
Location: Houston, TX
Posts: 4,024
Drives: too slow
Rep Power: 3594
wstar has a reputation beyond reputewstar has a reputation beyond reputewstar has a reputation beyond reputewstar has a reputation beyond reputewstar has a reputation beyond reputewstar has a reputation beyond reputewstar has a reputation beyond reputewstar has a reputation beyond reputewstar has a reputation beyond reputewstar has a reputation beyond reputewstar has a reputation beyond repute
Default

Yay, the Stillen oil cooler came in today. That and the oil pan spacer are going in with my oil change / sampling this afternoon
__________________
7AT Track Car!
Journal thread / Car setup details
wstar is offline   Reply With Quote
Old 06-30-2009, 05:00 PM   #192 (permalink)
Enthusiast Member
 
miguez's Avatar
 
Join Date: Apr 2009
Location: Columbus, Ohio
Posts: 359
Drives: '04 Cavalier
Rep Power: 181
miguez has a reputation beyond reputemiguez has a reputation beyond reputemiguez has a reputation beyond reputemiguez has a reputation beyond reputemiguez has a reputation beyond reputemiguez has a reputation beyond reputemiguez has a reputation beyond reputemiguez has a reputation beyond reputemiguez has a reputation beyond reputemiguez has a reputation beyond reputemiguez has a reputation beyond repute
Default

Did you get the bigger core Stillen has been talking about releasing?
miguez is offline   Reply With Quote
Old 06-30-2009, 05:15 PM   #193 (permalink)
A True Z Fanatic
 
wstar's Avatar
 
Join Date: Mar 2009
Location: Houston, TX
Posts: 4,024
Drives: too slow
Rep Power: 3594
wstar has a reputation beyond reputewstar has a reputation beyond reputewstar has a reputation beyond reputewstar has a reputation beyond reputewstar has a reputation beyond reputewstar has a reputation beyond reputewstar has a reputation beyond reputewstar has a reputation beyond reputewstar has a reputation beyond reputewstar has a reputation beyond reputewstar has a reputation beyond repute
Default

Quote:
Originally Posted by miguez View Post
Did you get the bigger core Stillen has been talking about releasing?
No, this is the same kit they've been selling. I'm hoping the smaller core will suffice with the extra oil capacity from the spacer, but we'll see what happens in practice. I do want to upgrade to a thermo sandwich plate later though.

I've already started on the oil-related work today. I'm doing it in small chunks while I do other things, it will drag on all afternoon/evening Pics will come eventually.

The only really notable thing I've learned so far: I saw a mention of "gasket remover" (as in, a chemical) in either the Service Manual or the AAM install guide for the oil pan spacer, and figured I'd pick some up at the parts shop and give it a try, see if it makes it easier to completely remove the remains of the oil pan gasket.

Result: OMFG, I have never encountered such a nasty, volatile chemical for retail sale to the general public in my life. And I'm the kind of guy that doesn't mind cleaning my hands with Varsol. Even Birchwood Casey Gun Scrubber doesn't hold a candle to this stuff. The rather extensive and scary warning label should be re-written to simply say: "Warning: Do Not Use".

There was some jibber-jabber about keeping it away from painted surfaces, so I donned some nitrile gloves and tried to spray some lightly on the edge of the oil pan (where the gasket was) and shield the rest with some paper towels. This was totally insufficient protection for the paint, much less my hands. Nitrile gloves turn brown where it touches, and then your skin gets cold and then starts burning, had to go wash that off first. When I got back, anywhere it had touched/dripped onto the oil pan's paint, it began violently bubbling and boiling and krinkling up the paint and eating it. Pretty much it destroys anything that isn't metal, very quickly.

So having already destroyed some of the paint on my oil pan, I just went ahead and went all out for a "new look" and stripped the rest of the paint from the pan Now I just hope my hands don't fall off two days from now.
__________________
7AT Track Car!
Journal thread / Car setup details
wstar is offline   Reply With Quote
Old 06-30-2009, 05:17 PM   #194 (permalink)
The370Z.com Sponsor
 
Josh@STILLEN's Avatar
 
Join Date: Dec 2008
Location: Costa Mesa, CA
Posts: 1,197
Drives: 2004 G35 Coupe 6MT
Rep Power: 533
Josh@STILLEN has a reputation beyond reputeJosh@STILLEN has a reputation beyond reputeJosh@STILLEN has a reputation beyond reputeJosh@STILLEN has a reputation beyond reputeJosh@STILLEN has a reputation beyond reputeJosh@STILLEN has a reputation beyond reputeJosh@STILLEN has a reputation beyond reputeJosh@STILLEN has a reputation beyond reputeJosh@STILLEN has a reputation beyond reputeJosh@STILLEN has a reputation beyond reputeJosh@STILLEN has a reputation beyond repute
Default

Quote:
Originally Posted by wstar View Post
No, this is the same kit they've been selling. I'm hoping the smaller core will suffice with the extra oil capacity from the spacer, but we'll see what happens in practice. I do want to upgrade to a thermo sandwich plate later though.

I've already started on the oil-related work today. I'm doing it in small chunks while I do other things, it will drag on all afternoon/evening Pics will come eventually.

The only really notable thing I've learned so far: I saw a mention of "gasket remover" (as in, a chemical) in either the Service Manual or the AAM install guide for the oil pan spacer, and figured I'd pick some up at the parts shop and give it a try, see if it makes it easier to completely remove the remains of the oil pan gasket.

Result: OMFG, I have never encountered such a nasty, volatile chemical for retail sale to the general public in my life. And I'm the kind of guy that doesn't mind cleaning my hands with Varsol. Even Birchwood Casey Gun Scrubber doesn't hold a candle to this stuff. The rather extensive and scary warning label should be re-written to simply say: "Warning: Do Not Use".

There was some jibber-jabber about keeping it away from painted surfaces, so I donned some nitrile gloves and tried to spray some lightly on the edge of the oil pan (where the gasket was) and shield the rest with some paper towels. This was totally insufficient protection for the paint, much less my hands. Nitrile gloves turn brown where it touches, and then your skin gets cold and then starts burning, had to go wash that off first. When I got back, anywhere it had touched/dripped onto the oil pan's paint, it began violently bubbling and boiling and krinkling up the paint and eating it. Pretty much it destroys anything that isn't metal, very quickly.

So having already destroyed some of the paint on my oil pan, I just went ahead and went all out for a "new look" and stripped the rest of the paint from the pan Now I just hope my hands don't fall off two days from now.
Are the letters still on your keyboard.. or did the transfer zap them?
Josh@STILLEN is offline   Reply With Quote
Old 06-30-2009, 05:19 PM   #195 (permalink)
A True Z Fanatic
 
wstar's Avatar
 
Join Date: Mar 2009
Location: Houston, TX
Posts: 4,024
Drives: too slow
Rep Power: 3594
wstar has a reputation beyond reputewstar has a reputation beyond reputewstar has a reputation beyond reputewstar has a reputation beyond reputewstar has a reputation beyond reputewstar has a reputation beyond reputewstar has a reputation beyond reputewstar has a reputation beyond reputewstar has a reputation beyond reputewstar has a reputation beyond reputewstar has a reputation beyond repute
Default

Quote:
Originally Posted by Josh@STILLEN View Post
Are the letters still on your keyboard.. or did the transfer zap them?
I don't look at the keys when I type anyways.
__________________
7AT Track Car!
Journal thread / Car setup details
wstar is offline   Reply With Quote
Reply

Bookmarks


Posting Rules
You may not post new threads
You may not post replies
You may not post attachments
You may not edit your posts

BB code is On
Smilies are On
[IMG] code is On
HTML code is Off
Trackbacks are On
Pingbacks are On
Refbacks are On


Similar Threads
Thread Thread Starter Forum Replies Last Post
TravisJB Journal travisjb Member's 370Z Gallery 1977 11-03-2017 10:39 AM
DannyGT's Journal/Progress DannyGT Member's 370Z Gallery 174 10-17-2017 11:25 AM
RCZ's 370Z Journal. RCZ Member's 370Z Gallery 1743 08-10-2013 12:55 AM
Edmonton Journal Review of the 370Z BanningZ Nissan 370Z General Discussions 13 08-09-2009 06:44 PM
LiquidZ's Journal LiquidZ Member's 370Z Gallery 22 05-23-2009 12:42 AM


All times are GMT -5. The time now is 01:26 PM.


Powered by vBulletin® Version 3.8.4
Copyright ©2000 - 2024, Jelsoft Enterprises Ltd.
Search Engine Optimization by vBSEO 3.6.0 PL2