
|
Whats the rule on seat belt mounts? To me the mounts look higher than your shoulders. Thought they had to be lower at a 5-15 degree angle? And in the
|
|||||||
 |
|
|
LinkBack | Thread Tools | Display Modes |
|
|
 11-08-2013, 06:23 PM
|
#1 (permalink) |
|
A True Z Fanatic
Join Date: May 2013
Location: Columbus, OH
Posts: 5,051
Drives: 2013 Silver 370z
Rep Power: 3389   |
Whats the rule on seat belt mounts? To me the mounts look higher than your shoulders. Thought they had to be lower at a 5-15 degree angle?
And in the other thread you said "I didn't pay much more than those bolt ins," please tell me this wasn't a $2000+ cage!? It's ok, not my favorite, but price I hope isnt crazy like I think it is.
__________________
13 370z- Last edited by synolimit; 11-08-2013 at 06:27 PM. |

|

|
|
11-08-2013, 06:55 PM
|
#2 (permalink) | |
|
A True Z Fanatic
Join Date: Jun 2009
Location: Detroit
Posts: 1,294
Drives: 09 370Z Red Sport-MT
Rep Power: 18 |
Quote:
|
|
|
|
|
|
11-08-2013, 11:52 PM
|
#4 (permalink) |
|
A True Z Fanatic
 Join Date: Mar 2009
Location: Houston, TX
Posts: 4,024
Drives: too slow
Rep Power: 3595 |
Yeah, 0-20. In the current setup it works fine on me, I'm 5'11". Passengers will be of random height, obviously, not much can be done about that. And yeah, I'm really not looking forward to the painting, but it has to be done. And synolimit: yes the price topped $2K, and yes it's worth it.
|
|
|
|
|
11-09-2013, 12:59 AM
|
#5 (permalink) | |
|
A True Z Fanatic
Join Date: May 2013
Location: Columbus, OH
Posts: 5,051
Drives: 2013 Silver 370z
Rep Power: 3389 |
Quote:
__________________
13 370z- |
|
|
|
|
|
11-09-2013, 04:00 AM
|
#6 (permalink) |
|
A True Z Fanatic
Join Date: Mar 2009
Location: Houston, TX
Posts: 4,024
Drives: too slow
Rep Power: 3595 |
Well, it's impolite to be detailed on pricing publicly, but I think it was a fair price, and it definitely wasn't as much as $5K either. You're free to build your own, it's your car
 I paid for expertise and a job well done, and I'm happy with my purchase. I paid for expertise and a job well done, and I'm happy with my purchase.Just got back from my "late night after all the drunks are off the road" test drive out in the sticks. You can definitely feel the added weight, but that's the price of admission, I'm ok with it. The change in the car's stiffness and predictability was *really* nice. I think this may have been more of a cornering upgrade for the car than all my suspension work so far combined. It's just so... solid and predictable. I don't know how else to describe it, but it's a nice change I'm sure some of that isn't just the cage itself, but the fact that I'm locked down in real harnesses and rigidly-mounted seats for the first time in this car.
Last edited by wstar; 11-09-2013 at 04:07 AM. |
|
|
|
|
11-16-2013, 04:34 PM
|
#8 (permalink) |
|
A True Z Fanatic
Join Date: Mar 2009
Location: Houston, TX
Posts: 4,024
Drives: too slow
Rep Power: 3595 |
Paint's done, coolant leak(s) fixed up. I got the layout/mechanical/attachment stuff done on the custom center-dash panel (actually, most of the hard part of that was done by my friend Wence, but I stood around and consulted!). I still need to finish up the wiring behind it, but here's the dash (and some peripheral views of the painted cage):
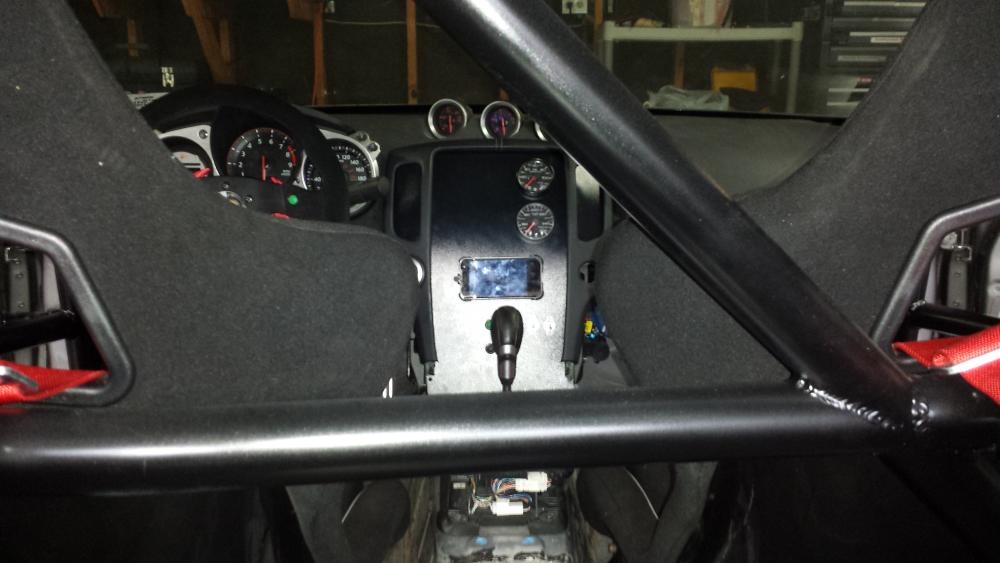 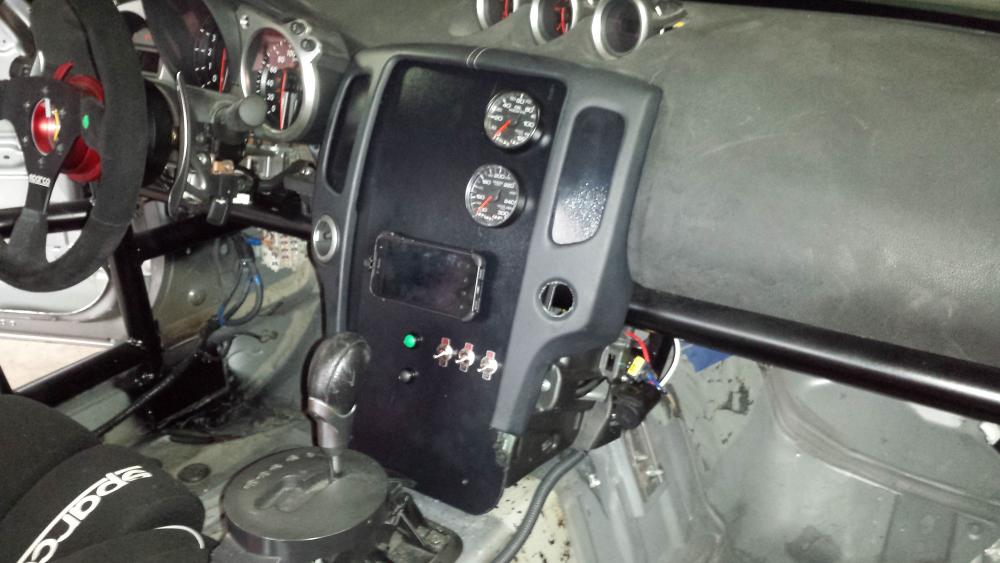 The small phone there is one of my old Android phones, re-purposed as the display unit for my datalogger. It'll run their "Predictive iDash" ( Race-Keeper Predictive iDash In-Car Lap Timing Display | Race-Keeper ) app and give me realtime lap info mostly. The switches are for the data system, USB power sockets (one of which runs that phone), and the gauges+alarm system. The pair of black and green pushbuttons are UpRev map switching. |
|
|
|
|
11-17-2013, 02:20 AM
|
#9 (permalink) |
|
A True Z Fanatic
Join Date: Mar 2009
Location: Houston, TX
Posts: 4,024
Drives: too slow
Rep Power: 3595 |
Finished up the dash wiring stuff. The important news is that the UpRev map-switch buttons work. Basic details for those looking for a similar solution lacking a stock steering wheel:
If you look in the 2009 Service Manual, section EC (Engine Control), the terminal pinouts for the 3 big connectors on the bottom of the main ECU starts on page EC-523. Way down that list on page EC-532, you'll see an entry for pins 101 (SB) and 108 (Y) as the "ASCD steering switch". These are the two wires that run to the cruise control button cluster on the stock steering wheel. SB is Sky Blue, and Y is Yellow. I didn't really try to map it from the pin numbers, I just looked for wires of the correct color in the correct sub-harness that were running over towards the steering wheel area and tried those and it worked, YMMV. Once you have those two wires, the way it works is the ECU expects a resistor across those wires. The exact amount of the resistance changes depending on which cruise control buttons are currently pressed, which is how it tells them all apart with only two wires. Back on page EC-437, you can see a diagnostic table of the expected resistance values when various cruise control buttons are pressed, which doesn't quite tell you everything you need to know, but it's part of the puzzle, and you can get the rest by using an ohm-meter to probe around on the stock cruise button cluster a bit. The bottom line is this pic, which just might be the ugliest drawing ever (but hey it took 5 minutes):  For those unfamiliar with basic circuit diagrams as drawn by 5-year-olds, the squiggly lines are resistors, and the two angly things crossing the center are the two pushbutton switches. The bottom switch is the one you hold down, and the upper one is the one you hit 1-5 times to select a map. If you can read my shitty diagram and assemble that correctly, it should give approx 3960 ohms with no buttons pressed, 250 ohms if the top button is pressed (or both), and 660 ohms with just the bottom button pressed. You can order very close resistor values online at mouser.com, but honestly it'll probably work if you find something within 10-15% or so at RadioShack, too. It doesn't matter which way around you hook up the SkyBlue and Yellow wires, there's no polarity to this sort of thing. Obviously, the little arrows at the top of the diagram are where those hook up at. |
|
|
|
|
11-17-2013, 02:41 AM
|
#10 (permalink) |
|
A True Z Fanatic
Join Date: Mar 2009
Location: Houston, TX
Posts: 4,024
Drives: too slow
Rep Power: 3595 |
Also, here's a pic of the back side of the center dash panel, which gives some idea how to construct one. Again, thanks to my friend Wence for doing most of the work there on all the plastic cutting and fitting. The main trick was the cotter pins through the holes in the little fins (originally for the vents), which holds the plate to the frame. The rest is just cutting the edges to lock around various other bits, and screw holes at the bottom to attach where the stock center console does.
If you squint, you can kinda see the resistors soldered to the pair of buttons as shown in the diagram above (except my "R3" is on the opposite leg from "R2", inside that red heat-shrink, which doesn't really change the circuit at all). The white junk is epoxy holding the wires to the back of the plate for strain relief (so that pulling on the wiring connector doesn't pull on my solder joints to the switches). The main panel material is part number 8650K12 at mcmaster.com (12x24 panel, 1/8" thick, "Formable Chemical-Resistant Kydex Acrylic/PVC") 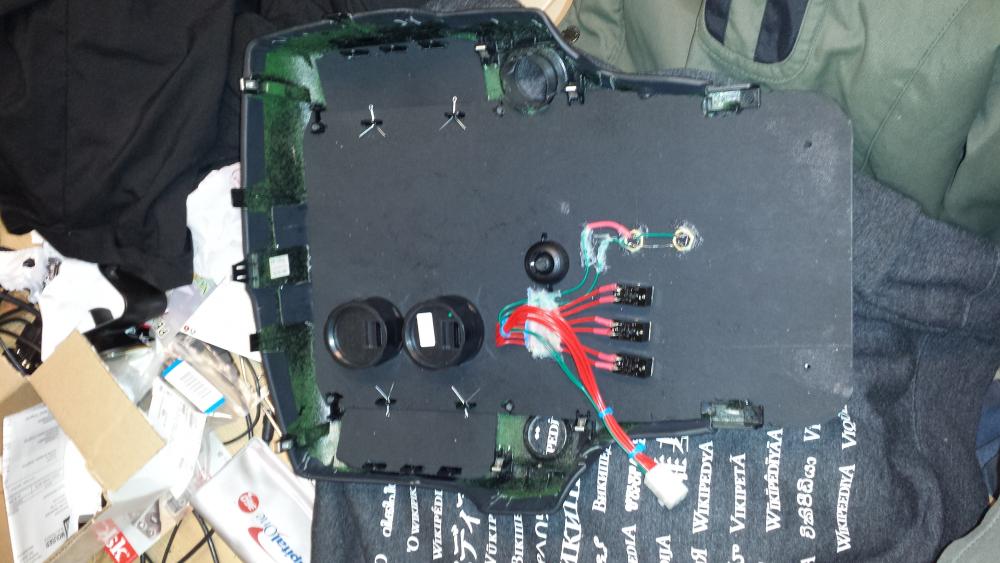
Last edited by wstar; 11-17-2013 at 08:09 AM. |
|
|
|
|
11-20-2013, 09:13 PM
|
#12 (permalink) |
|
A True Z Fanatic
Join Date: Mar 2009
Location: Houston, TX
Posts: 4,024
Drives: too slow
Rep Power: 3595 |
You mean two buttons? You need to two buttons to switch maps
If you mean why switch maps at all: to be able to experiment, mostly. e.g. having different throttle tables available that I've set up a few days before the track weekend. Eventually I may play with maps for race fuels and/or maps for different rev limits (if I beef up the engine, not the least part of which would be the oil pump).Also, I use one of my maps as a 3mph security map so I can leave the car idling somewhere and it can't drive off faster than I can walk. |
|
|
|
|
11-25-2013, 07:27 AM
|
#13 (permalink) |
|
A True Z Fanatic
Join Date: Mar 2009
Location: Houston, TX
Posts: 4,024
Drives: too slow
Rep Power: 3595 |
I made it to TWS this past weekend. It was cold and wet at the start Saturday and the end on Sunday, but we got in a few sessions of merely cold and dry runs in-between the rainy bits. I wasn't going for record times or anything. Mostly I was trying to avoid freezing to death
It was a good shakedown on all the car's changes though.I ended up setting the SPL front arms at roughly -2.5 Camber and +5 caster in the front (and slight toe-in), and I left my old Conti DW tire setup on the car (with plenty of tread) because it looked like the whole weekend would be wet, and I didn't want to try the brand-new RS3's for the first time in the wet. The first two sessions on Saturday were wet, then we had a mostly-dry and an even-more-dry session. Sunday started with two dry cold sessions, and then finished up with a ridiculously wet one as a storm system was moving in from the north. They cut the day short since a lot of instructors and drivers had to drive back in the direction the storm was coming from. Anyways, a couple of video clips via RaceKeeper. I'll just re-paste the YouTube description instead of trying to re-describe them w/ the embeds: ------------------------------------------------- Driver's Edge - Texas World Speedway - Sunday Nov 24, 2nd yellow Session.-------------------------------------------------
|
|
|
|
|
| Bookmarks |
|
|
 Similar Threads
|
||||
| Thread | Thread Starter | Forum | Replies | Last Post |
| TravisJB Journal | travisjb | Member's 370Z Gallery | 1977 | 11-03-2017 09:39 AM |
| DannyGT's Journal/Progress | DannyGT | Member's 370Z Gallery | 174 | 10-17-2017 10:25 AM |
| RCZ's 370Z Journal. | RCZ | Member's 370Z Gallery | 1743 | 08-09-2013 11:55 PM |
| Edmonton Journal Review of the 370Z | BanningZ | Nissan 370Z General Discussions | 13 | 08-09-2009 05:44 PM |
| LiquidZ's Journal | LiquidZ | Member's 370Z Gallery | 22 | 05-22-2009 11:42 PM |


 183Likes
 Hope to see it in action one day


 Hybrid Mode


