![]() |
I'm about to install my rep amuse sides, aerojacket fenders (looks like the ones UAM sells) and front bumper. Anyone that has these parts on their car. Can you give
|
![]() |
|
LinkBack | Thread Tools | Display Modes |
![]() |
#1 (permalink) |
A True Z Fanatic
Join Date: May 2009
Location: Maryland
Posts: 1,397
Drives: 09 Sports 6 Speed
Rep Power: 427 ![]() ![]() ![]() ![]() ![]() ![]() ![]() ![]() ![]() ![]() ![]() |
![]()
I'm about to install my rep amuse sides, aerojacket fenders (looks like the ones UAM sells) and front bumper. Anyone that has these parts on their car. Can you give me some heads-up on what I should be looking out and make these fit nicely? Thanks in advance
![]()
__________________
Evo-R CF fang | CF Mirror covers | 20/25 H&R spacers | RE-11 | TopSpeed exhaust + y-pipe | Stillen HFC | Carbon Fiber Amuse rear bumper + Amuse Spoiler | PWJDM |
![]() |
![]() |
![]() |
#2 (permalink) |
A True Z Fanatic
Join Date: May 2011
Location: Orange County, CA
Posts: 999
Drives: 2011 GM z34
Rep Power: 15 ![]() ![]() |
![]()
Not that i have any say in this but it is always better to have a bodyshop install the parts for you if you are inexperienced.
They will have to do minor mods and tweaks most of the time to have them fit nicely |
![]() |
![]() |
![]() |
#4 (permalink) |
A True Z Fanatic
![]() Join Date: May 2009
Location: Dededo, Guam
Posts: 6,642
Drives: solid red 370z 6mt
Rep Power: 405 ![]() ![]() ![]() ![]() ![]() ![]() ![]() ![]() ![]() ![]() ![]() |
![]()
for the amuse side .... i assume its from shine... if it is... then no mods needed... they fit really nice....
![]() ![]() as for the fenders.... from what ive seen... i would recommend bringing it to a body shop.... even if the fenders i got are carbon signals it seems that both carbon and uam has issues near the fender door gap..... its either a huge gap... or its so close you gotta really keep messing with it so you can get it to look factory for the front bumper.... you will have to CUT the oem splash guards so the bumper will fit.... you do this even with the real kit so no worries... now the hard part is that on the front diffuser part... the holes dont line up at all..... none of them do... so you will have to dremel new holes so that you can put the bolts in the factory parts
__________________
![]() ***TOP SECRET/POWERHOUSE AMUSE/ARC/DAYTONA RACING/VARIS/MINES/GANADOR/J-LINE/WORK EMOTION CR KAI/GT SPEC/CARBON SIGNAL/ZOOM ENGINEERING/ CARBON FIBER ELEMENT/STILLEN/***
Last edited by simota1; 06-19-2012 at 03:49 PM. |
![]() |
![]() |
![]() |
#5 (permalink) |
A True Z Fanatic
![]() Join Date: Aug 2011
Location: Ontario, Canada
Posts: 21,749
Drives: Varis Arising II
Rep Power: 51865 ![]() ![]() ![]() ![]() ![]() ![]() ![]() ![]() ![]() ![]() ![]() |
![]()
If you want gaps to look good (factory) in the door jams, well then, a body shop will need to do some work. Also, the side skirts, just behind the doors where it meets the body (the horizontal line) will need to be brought out a little to meet up nicely with the existing body. Other than that, the fitment is pretty good.
__________________
![]() |
![]() |
![]() |
![]() |
#6 (permalink) |
A True Z Fanatic
Join Date: May 2009
Location: Maryland
Posts: 1,397
Drives: 09 Sports 6 Speed
Rep Power: 427 ![]() ![]() ![]() ![]() ![]() ![]() ![]() ![]() ![]() ![]() ![]() |
![]()
Thanks guys, such a pain in the rear ...
__________________
Evo-R CF fang | CF Mirror covers | 20/25 H&R spacers | RE-11 | TopSpeed exhaust + y-pipe | Stillen HFC | Carbon Fiber Amuse rear bumper + Amuse Spoiler | PWJDM |
![]() |
![]() |
![]() |
#10 (permalink) |
A True Z Fanatic
Join Date: May 2010
Location: Tampa
Posts: 4,207
Drives: RZ34
Rep Power: 31940 ![]() ![]() ![]() ![]() ![]() ![]() ![]() ![]() ![]() ![]() ![]() |
![]()
Check out the link in my signature. I didnt go into great detail on the install but I have alot of pics of the parts you are asking about from my DIY install. If you have any questions let me know
![]()
__________________
Project Z <--Click - Check out the link too many mods to list! |
![]() |
![]() |
![]() |
#11 (permalink) | |
A True Z Fanatic
Join Date: May 2009
Location: Maryland
Posts: 1,397
Drives: 09 Sports 6 Speed
Rep Power: 427 ![]() ![]() ![]() ![]() ![]() ![]() ![]() ![]() ![]() ![]() ![]() |
![]() Quote:
![]()
__________________
Evo-R CF fang | CF Mirror covers | 20/25 H&R spacers | RE-11 | TopSpeed exhaust + y-pipe | Stillen HFC | Carbon Fiber Amuse rear bumper + Amuse Spoiler | PWJDM |
|
![]() |
![]() |
![]() |
#12 (permalink) |
A True Z Fanatic
Join Date: May 2009
Location: Maryland
Posts: 1,397
Drives: 09 Sports 6 Speed
Rep Power: 427 ![]() ![]() ![]() ![]() ![]() ![]() ![]() ![]() ![]() ![]() ![]() |
![]()
ImageUploadedByTapatalk1340807623.267854.jpg
Minor fitment issues, could have been better. Paint is off so the kit is getting repainted Sent from my iPhone using Tapatalk
__________________
Evo-R CF fang | CF Mirror covers | 20/25 H&R spacers | RE-11 | TopSpeed exhaust + y-pipe | Stillen HFC | Carbon Fiber Amuse rear bumper + Amuse Spoiler | PWJDM |
![]() |
![]() |
![]() |
#13 (permalink) |
A True Z Fanatic
Join Date: May 2009
Location: Maryland
Posts: 1,397
Drives: 09 Sports 6 Speed
Rep Power: 427 ![]() ![]() ![]() ![]() ![]() ![]() ![]() ![]() ![]() ![]() ![]() |
![]()
ImageUploadedByTapatalk1340807842.149691.jpg
ImageUploadedByTapatalk1340807864.581123.jpg *above* is prior to moving the fenders around and bolts to make it Sent from my iPhone using Tapatalk
__________________
Evo-R CF fang | CF Mirror covers | 20/25 H&R spacers | RE-11 | TopSpeed exhaust + y-pipe | Stillen HFC | Carbon Fiber Amuse rear bumper + Amuse Spoiler | PWJDM |
![]() |
![]() |
![]() |
#14 (permalink) |
A True Z Fanatic
Join Date: Oct 2009
Location: LA. not L.a.
Posts: 21,652
Drives: Z34 Tour/Sport
Rep Power: 178 ![]() ![]() ![]() ![]() ![]() ![]() ![]() ![]() ![]() ![]() ![]() |
![]()
From my bro simota...
AMUSE SIDE SKIRTS INSTALL!!!! alright man.... LOL its like 2am here but i gotta at least finish this one.... here is the fun part... your gonna have to drill.... reason being the side skirts that carbon signal provides you has no holes whatsoever but before you freak out.... its actually really easy step one... man i wish i took pictures lol ok... there are two screws phillip heads... in the front of the rear tire.... and one phillip head in the front... which is located in the back of the front tire..... i find it easier to jack up the car at its jack points so there is plenty of room to work with.... you have to remove the rear tire.... unscrew the two screws in the back and the one in the front step two un bolt all of the 10mm bolts located underneath the stock side skirt... there is maybe like 8 if im not mistaken.... and one pop in fastener.... remove all of that... here is the tricky part... when you open the door... the immediate curve where the body and side skirt meets in the door jam there is double stick tape there.... just pull on it and break the seal of the mounting tape....now you have to pull towards you until you hear a small snap... which means you unlocked the clips.... id say a good 4-5 inches around the mounting tape area..... thats how much you pull forward... no more than that or else youll snap the clips.... now once it is forward.... you have to push towards the front of your car... this will unlock the remainder of all the clips holding the side skirt ![]() step three get the carbon signal side skirts... and look at it.... you will see little places where there should have been a hole.... pay close attention to them you can easily tell because the finish on that part is rough and a circle outline is there... now you have to drill precisely all those holes out.... and youll never guess what... they bolt up precisely..... the clips that was on you stock side skirts are useless.... they wont mount on your amuse skirts.... all you have to do is add mounting tape where you removed it and bolt up all the 10mm underneath and your all set.... ![]() remount your rear tire unjack your z... and do it on the other side ![]() step four step back grab a beer and now sir you have the rear and side skirts mounted.... ![]()
__________________
"These Violent Delights Have Violent Ends" |
![]() |
![]() |
![]() |
#15 (permalink) |
A True Z Fanatic
Join Date: Oct 2009
Location: LA. not L.a.
Posts: 21,652
Drives: Z34 Tour/Sport
Rep Power: 178 ![]() ![]() ![]() ![]() ![]() ![]() ![]() ![]() ![]() ![]() ![]() |
![]()
REAR bumper
alright for the rear what you wanna do is remove the rear bumper first.... follow my diy on the fog install in the diy guides here and follow it to uninstall all the rear panels of the hatch.... once youve done that you have to remove your taillights.... pop off the black pieces that cover the bolts on the top side, remove the two 10mm bolts and dont forget the tiny nut on the inside of the car (thats why you had to take out the panels) slide the taillight STRAIGHT OUT do not pull it side ways one bit you will scratch your paint and probably break the guides on your taillights..... once youve done this.....unplug the harness..... then you can start unmounting the stock rear bumper.... there are 4 pop in fasteners on each side pop them up and pull them out.... now when you pull em out the head of the fastener has to be half way sunken in if its all the way out the fastener will NOT come out easily and it will break if you force it.... (i broke one of mine) LOL ok now all thats left is the bolts there are only 4 bolts 10mm holding it they are located in the corners of the z rear bumper start with the bottom unbolt left and right then the top ones.... the splash guards are covering em so just kinda pull and move aside the splash on the corner you dont have to unmount it.... the last thing you have to do is remove the one fastener on the bottom..... ![]() 
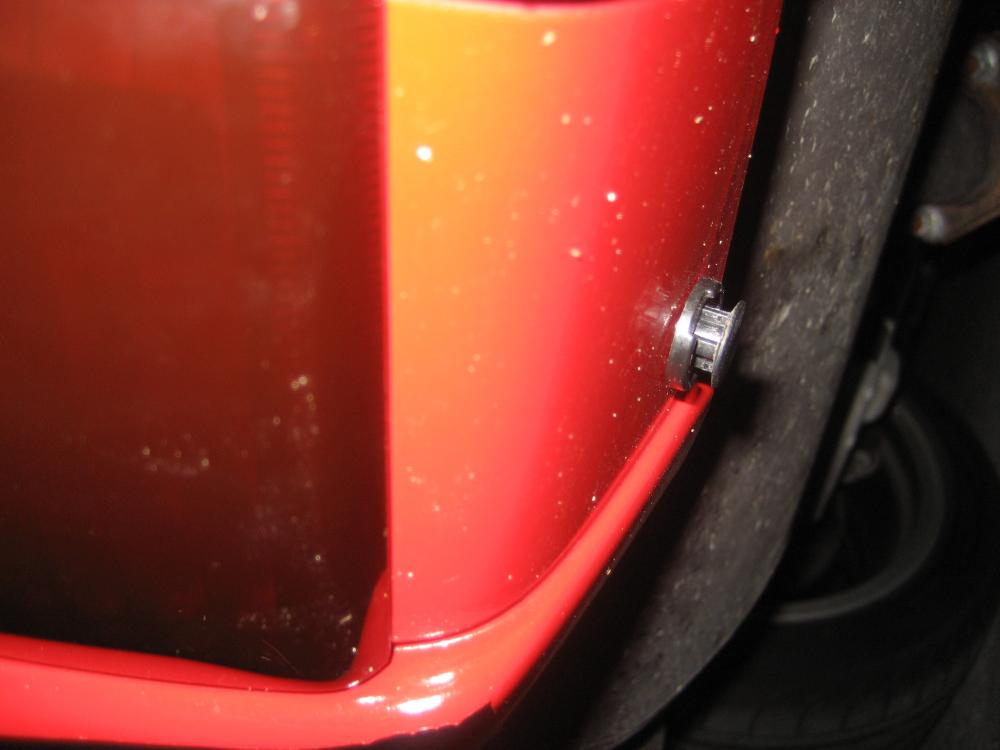
were the fog is.... same as the 4 fasteners earlier pop it half way up only and pull it out..... ![]() ![]() ![]() ![]() once you got it out throw it away lol now for the rear bumper all the holes are there.... so your pretty much set.... except where the fasteners used to be where the taillights are..... so what you wanna do is somehow mark the bumper..... i kinda just eye balled it.... and i drilled a small hole while the bumper was already on the car....now when i got the holes somewhat near the old fastener holes you wanna open up the pilot holes with a dremel ![]() ![]()
__________________
"These Violent Delights Have Violent Ends" |
![]() |
![]() |
![]() |
Bookmarks |
|
|
![]() |
||||
Thread | Thread Starter | Forum | Replies | Last Post |
[FOR SALE] UAM Amuse Replica full kit | InUrDreamZ | Parts for sale (Private Classifieds) | 20 | 09-05-2014 04:25 PM |
[FOR SALE] Amuse full replica kit | js0uth | Parts for sale (Private Classifieds) | 29 | 11-28-2011 10:13 AM |
Amuse replica wing question | dirTy_shoeZ | Exterior & Interior | 6 | 08-16-2011 09:02 PM |
Amuse Replica for the 350z | shoopajae10 | Exterior & Interior | 27 | 01-09-2011 01:50 PM |