 |
Originally Posted by Jayhovah now if only someone would start making cheap mine's add-on knock offs. Isnít that the spoiler powetrix replicated?
|
|||||||
 |
|
|
LinkBack | Thread Tools | Display Modes |
|
|
#17 (permalink) | |
|
Premium Member
 Join Date: May 2013
Location: St. Pete, FL
Posts: 3,848
Drives: 520whp Fire Breather
Rep Power: 86951            |
Yup.. but at $400 FRP/$500 CF I'm not ready to put it in the cheap category ike the ebay spoilers...
__________________
2013 Gun Metallic Sport - Gamma V3 Twin Turbogized DIY Gamma V3 TT Install * Jayhovah's Gamma V3 TT Install Pic'Z and Vid'Z * DIY: Washer Reservoir for the Boosted Quote:
|
|
|
|

|
|
|
#18 (permalink) | |
|
Base Member
Join Date: Feb 2014
Location: ct
Posts: 247
Drives: 09 370z 6spd
Rep Power: 12       |
Quote:
Sent from my Pixel 2 XL using Tapatalk |
|
|
|

|
|
|
#19 (permalink) |
|
A True Z Fanatic
Join Date: Jan 2016
Location: Atlantic SE
Posts: 1,326
Drives: '10 K23 ST 7AT
Rep Power: 30526            |
Who cares what strangers think!! Have you seen what you're surrounded by lately? Their comments/opinions carry zero weight with me. (Not here on forum, life in general).
__________________
Toys Not Tots |
|
|

|
|
|
#20 (permalink) |
|
Enthusiast Member
Join Date: Jan 2018
Location: Tampa, FL
Posts: 310
Drives: 17 370z
Rep Power: 6296            |
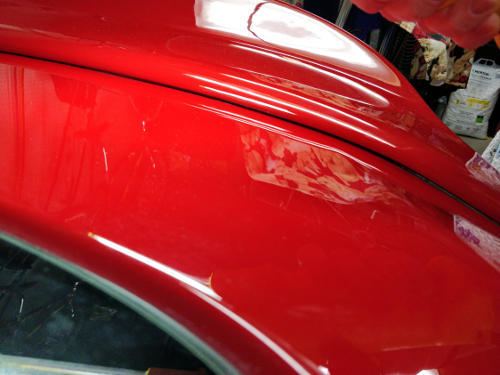
My spoiler arrived from DAR and the color is an exact match (Black Cherry, NAG). My only gripe so far is that there is a small scratch/paint missing from the top of the lip.
|
|
|

|
|
|
#22 (permalink) |
|
Enthusiast Member
Join Date: Jan 2018
Location: Tampa, FL
Posts: 310
Drives: 17 370z
Rep Power: 6296            |
Installation:
This install was somewhat of a pain. Dar gives you strips of paper with holes in them you line up and tape to the spoiler. I then adjusted the spoiler to the right position on my hatch and taped the strips to the body slowly lifting the spoiler away. Dar recommended starting the hole with 1/8 which worked well. The outside holes have to go through two sheets of metal. Then they recommended a huge drill bit to widen the hole and I went smaller because you can go bigger as needed as a safer method. The bit I chose was closer to the screw size and it worked out. Next I drilled 4 holes underneath for the 4 outer screws as they were not able to be reached from inside. I drilled them probably bigger than necessary as I was using a ratchet over a screw driver. The screws in the center sank easily. I then tighted the outer screws, but they werent sinking enough so I bought longer screws. This was how I got the spoiler to sit closer against the car. The upper outer rounded corners do not sit exactly flush to the hatch but fairly close. I'm seeing if the spoiler will settle after sitting in the sun for a few + the screws holding it down already. I will then go ahead and see if i can tighten them anymore then put a sealant around the screw areas. Complaints: My main complaint was that the screws just sank into the fiberglass/insulation type material. I wish they would of either had mollies inside the spoiler you sink the bolt into or had the bolts inside the spoiler and you tighten a nut to it. After: As this was my second main project and a huge one that's easy to mess up, i hope it holds up. This was just a nerve wracking project as I poked holes into the body that's irreparable. I love the look of it and it compliments the curves of the body exceptionally well. It does block the lower half of the back window but who drives a 370z for visibility to begin with? Will post pics soon! Also any words of wisdom or guidance would be splendid if you have any to add! Last edited by ColtronZ; 03-24-2018 at 09:21 PM. |
|
|

|
|
|
#24 (permalink) |
|
Enthusiast Member
Join Date: Jan 2018
Location: Tampa, FL
Posts: 310
Drives: 17 370z
Rep Power: 6296            |
Anyone who has put on a custom spoiler ever have noise from the spoiler/bolts at times, or from that general area? Is this normal? The bolts wouldn't tighten anymore but seem like they have some movement and the spoiler is probably as close to the hatch as possible.
Last edited by ColtronZ; 04-16-2018 at 03:51 PM. |
|
|

|
|
|
#25 (permalink) | |
|
Enthusiast Member
Join Date: Nov 2016
Location: Ohio
Posts: 261
Drives: 2016 370Z
Rep Power: 953            |
Quote:
Pictures here. If these fit the contour of the body I'd be happy. My install with the more expensive spoiler definitely did not save me any headache. |
|
|
|

|
|
|
#26 (permalink) | |
|
Enthusiast Member
Join Date: Nov 2016
Location: Ohio
Posts: 261
Drives: 2016 370Z
Rep Power: 953            |
Quote:
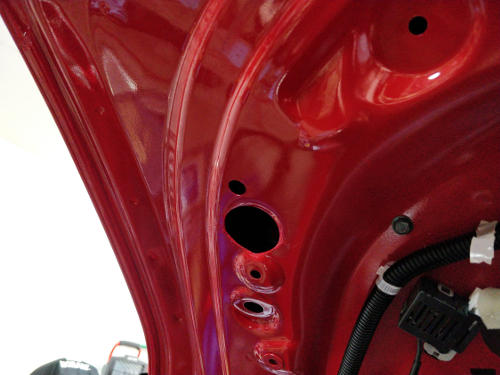
Below is a picture from my install. You'll notice my access hole from is off to the side of the gasket surface. It made getting to the bolts / nuts on the other edge a little more difficult, but chance for leaks or wind noise, or damaging the seal in this manner. Also the hole is entirely covered once the interior panel is re-installed.  Just a tip if you go this route, tie fishing line onto the bolts before you try and install them, just so you can't drop them into the hatch. They will fall back out after a few hard corners if you leave the panel off (ask me how I know) but it is frustrating to drop them and lose bolts. |
|
|
|

|
|
|
#27 (permalink) | |
|
Enthusiast Member
Join Date: Jan 2018
Location: Tampa, FL
Posts: 310
Drives: 17 370z
Rep Power: 6296            |
Quote:
I pushed slightly on the spoiler and it seemed like the little popping noise was coming from the top two middle screws. It doesn't occur enough to redo it I suppose, I am also hoping putting the panel back on will reduce the noise slightly. I wish I had thought of fishing wire too, I did this install about a month ago now iirc. I lost two and just recovered one the other day. One still is bouncing around back there but its wayyyyy in there. Hoping one day I get lucky and am able to get it out so I can put my car back together lol |
|
|
|

|
|
|
#28 (permalink) | |
|
Enthusiast Member
Join Date: Nov 2016
Location: Ohio
Posts: 261
Drives: 2016 370Z
Rep Power: 953            |
Quote:
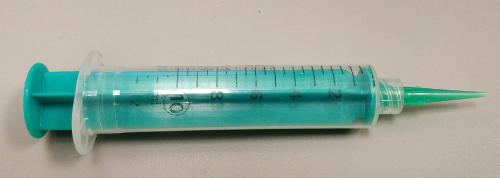
That is why I used a syringe filled with silicone to get silicone under the tape where I had gaps. However, again mine was the Fly1 version, and mine did not line up with the body very well. So perhaps yours fits better.  I know how it sounds, as mentioned in my link above, it's why I used such a fine pointed syringe, you can't see any of the silicone when done. It's all under everything.  Don't feel bad, the fishing line idea didn't come up at first... I lost two bolts, three nuts before we came up with that plan. Worse yet, I was using stainless hardware so a magnet wouldn't help. Luckily at this point I've gotten everything back out so I'm now rattle free. Just waiting for a little warmer weather to put the interior panel back on. Don't like snapping plastic pieces back in when it's ~30 degrees out (It was 70 degrees out just the other week). |
|
|
|

|
|
|
#29 (permalink) |
|
Base Member
Join Date: Feb 2014
Location: ct
Posts: 247
Drives: 09 370z 6spd
Rep Power: 12       |
I get compliments all the time. Love my bill. Again few bashed it because its a knock off. But people gotta build their rep way or another. If I could do it again id have DAR color paint it and pay the extra. BUT i love the way it looks!
  Sent from my Pixel 2 XL using Tapatalk |
|
|

|
 |
| Bookmarks |
|
|
 Similar Threads
|
||||
| Thread | Thread Starter | Forum | Replies | Last Post |
| Mines Style Spoiler Add On (Revisited / Revised) POWERTRIX Sport Spoiler Enhancement | Charles@POWERTRIX | Exterior & Interior | 75 | 04-11-2020 12:11 AM |
| [WTB] Nismo Spoiler Evo-R Style | nosam1g | Parts for sale (Private Classifieds) | 5 | 10-22-2017 12:45 PM |
| Oem style new spoiler for sale, toronto GTA | Zeetah | Parts for sale (Private Classifieds) | 12 | 05-10-2017 08:01 PM |
| WRC style spoiler? | shirokenkami | Exterior & Interior | 1 | 12-05-2016 09:48 AM |
| Anyone has the Seibon GT style spoiler? | dudesky | Exterior & Interior | 0 | 11-26-2013 06:26 PM |