
 |
EDIT (10/25/2013): Finally had a chance to update this post. TL;DR: All is well! Good news everyone! As you may know, I had my second clutch master cylinder fail, and
|
|||||||
 |
|
|
LinkBack | Thread Tools | Display Modes |
|
|
#1 (permalink) |
|
Track Member
 Join Date: Oct 2011
Location: South Florida
Posts: 882
Drives: 12 PW 370z 6MT Sport
Rep Power: 15       |
EDIT (10/25/2013): Finally had a chance to update this post. TL;DR: All is well!
Good news everyone! As you may know, I had my second clutch master cylinder fail, and I was tired of replacing them with OEM clutch master cylinders. Since I drive my car harder than most people, I was recommended by Joe@ZSpeed to use a Southbend Stage 3+ Drag clutch setup, and it took a heavy toll on the OEM clutch master cylinder. I began my research and development into finding a suitable aftermarket replacement. I searched far and wide and called a few companies, including looking for a direct fit replacement, but it was uncharted waters for the 370Z. That research was culminated in this thread: Possible solutions to aftermarket clutch master cylinder However! I am honestly very proud to announce, barring any race teams or race cars I know of, I am the first person to successfully install an aftermarket clutch master cylinder AND keep the ABS: (thanks Megan370z.) 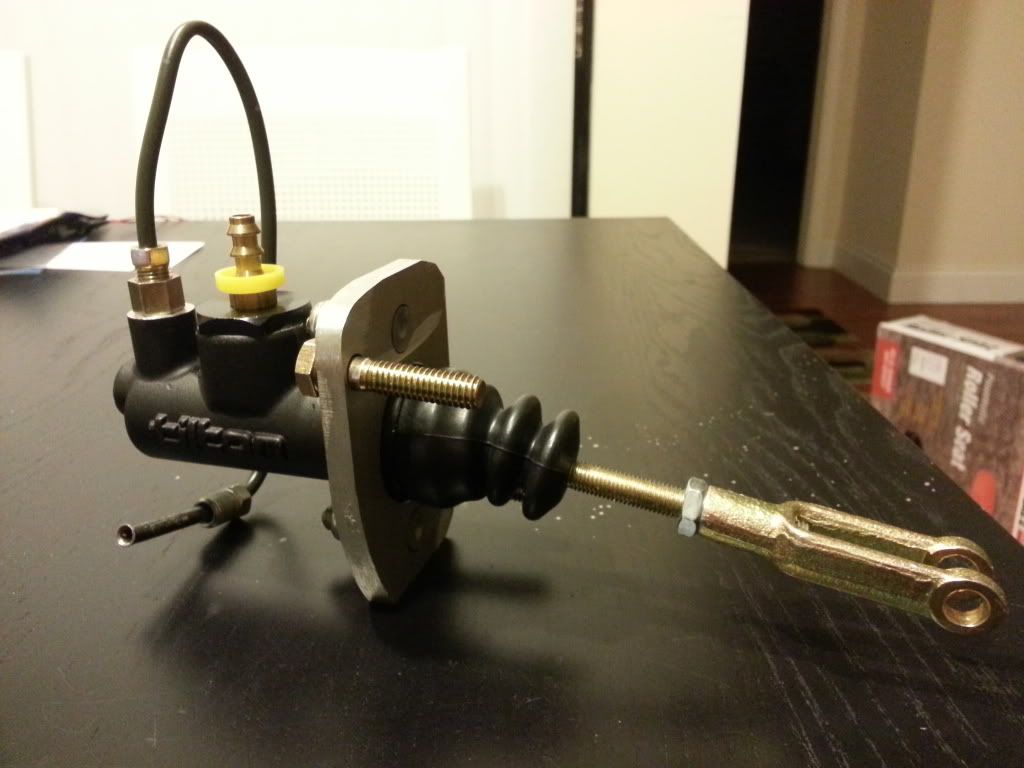 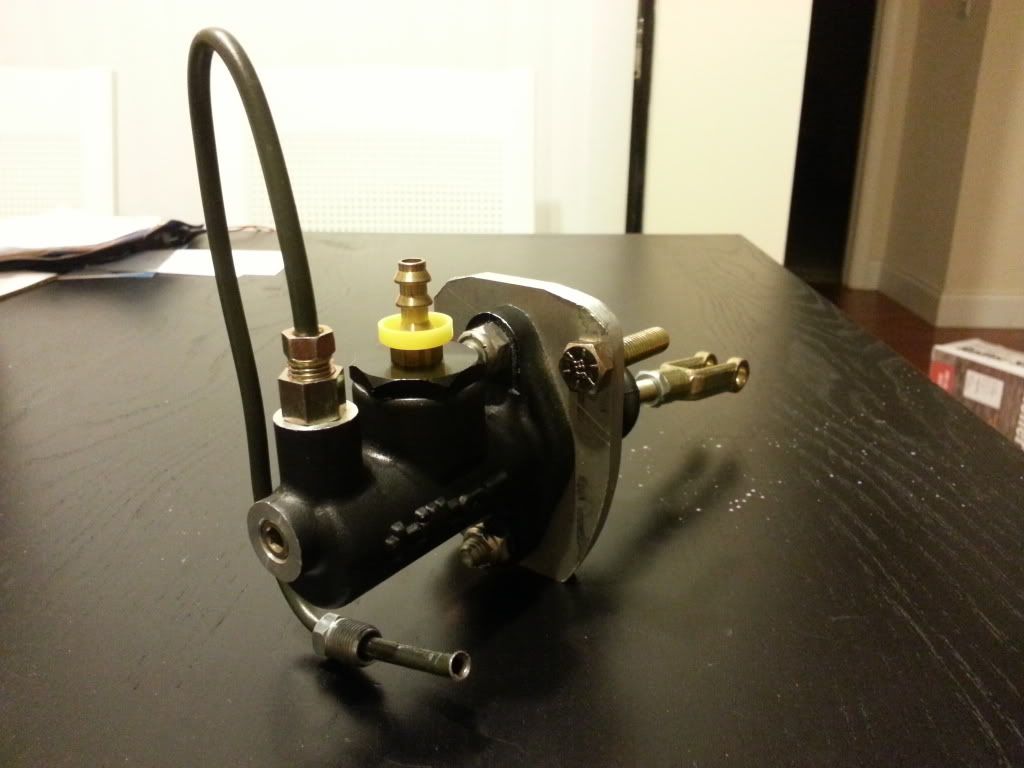 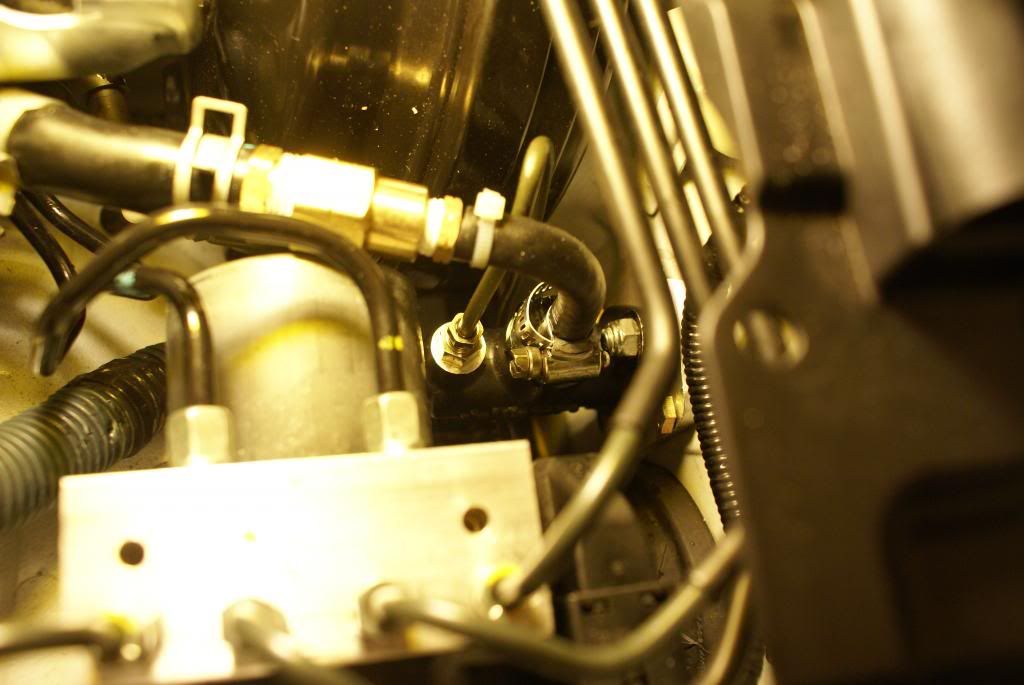 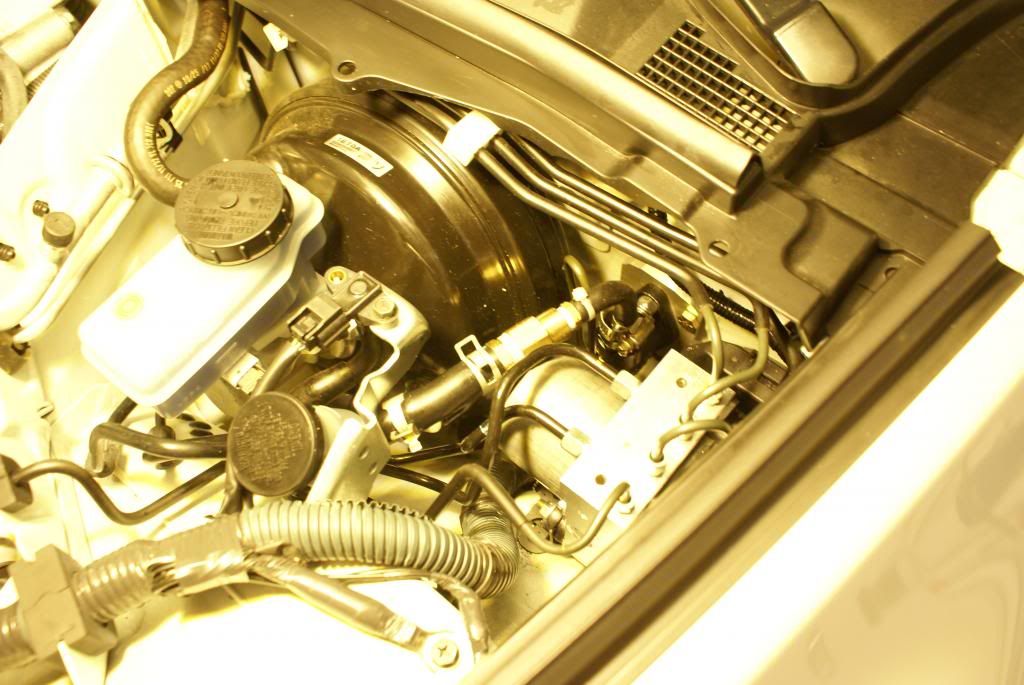 This is a Tilton Racing 76-Series Racing master cylinder with Grade-8 steel mounting hardware for durability and strength and a custom 6061-Aluminium mounting bracket I machined myself. The brake line is a special alloy brake line that allows high resistance to kinking and vibration and allows hand-bending. All bore sizing and stroke compared to OEM was considered, and this was designed to fit in place exactly like OEM, with grinding of the ABS module bracket as the only modification. Needless to say, I finished the installation just prior to this post, and barring minor setbacks with parts, fitment, and tools, and bleeding with a friend, it works!  The master cylinder holds perfect line pressure with less dead play than OEM, as well as having no harder rebound or change in engagement point compared to OEM! I just went for a drive, and it feels exactly how it should always feel - strong and firm, but easy to modulate and predictable in its behavior. The master cylinder holds perfect line pressure with less dead play than OEM, as well as having no harder rebound or change in engagement point compared to OEM! I just went for a drive, and it feels exactly how it should always feel - strong and firm, but easy to modulate and predictable in its behavior.I'd also like to note that what you see is what I consider my prototype - if I were to go about it again, I would have parts professionally water-jetted, sourced custom parts to make a cleaner install, and also simple fixes such as found a new clutch fluid reservoir to fit cleanly. Having the OEM reservoir sitting funky is just temporary! When I started this project, I hoped that it would be simpler to do, that it could become a forum DIY. As I progressed with the install, it became apparent that this was not a simple DIY, but a laborious task. Tracking down fittings, lines, hoses, and nuts and bolts to convert a Japanese master cylinder to an American-made master cylinder was INSANE. I wish I could say that it was simple to do, but that would be somewhat far from the truth. Also, a visit to the dealer might be required, since the ABS module had to be removed from the car. I'm going to hold my words regarding reliability of this master cylinder until I get lots of more miles and heat cycles through it. I'll be updating every so often to give you guys more news and whatnot! Also, I appreciate the support in the people pushing me to do this project. I'm glad I was able to successfully develop and install an aftermarket master cylinder into the 370Z. Fingers crossed, but this is hopefully the last time I will EVER deal with the master cylinder! I'll also be updating the thread with more detail in my part choices, master cylinder places, driving experiences, pictures, etc. when I have more time. ----------------------------------------------------------------------------------------------------------------------------------- ----------------------------------------------------------------------------------------------------------------------------------- Alright! Finally had a moment to post some pictures! First off, I'll take some time to eventually post up a step-by-step on how to remove the ABS module, and subsequently, the OEM CMC. This is mainly because if anyone was to do this install, grinding of the ABS module mounting bracket is necessary. But for now, here are some interim pictures so you fellas can get an idea of my thought process. Here is the main culprit which halts the installation of an aftermarket master cylinder: 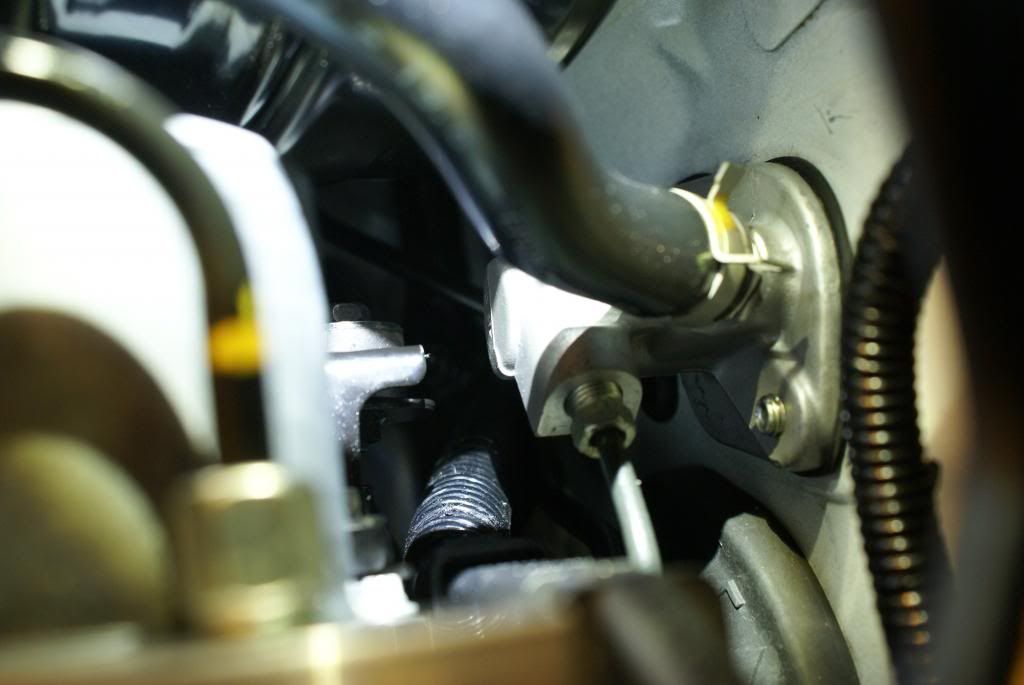 As you can see, the OEM CMC is already very close to the ABS module bracket (both illuminated by the camera flash). In this picture, the gap is about a little less than half an inch. To help explain the issue, here is the OEM CMC: 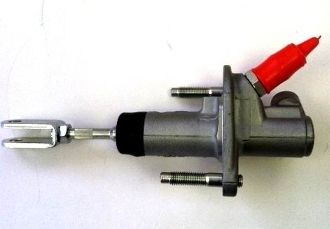 Nissan made a very interesting CMC - where half the body is INSIDE of the interior of the car. Most CMCs, including the Tilton CMC I bought as you can see, has the body of the CMC on the outside, and only the threaded rod to the piston into the car. Naturally, this is quite an issue. Here is a picture of the ABS mounting bracket, removed from the car: 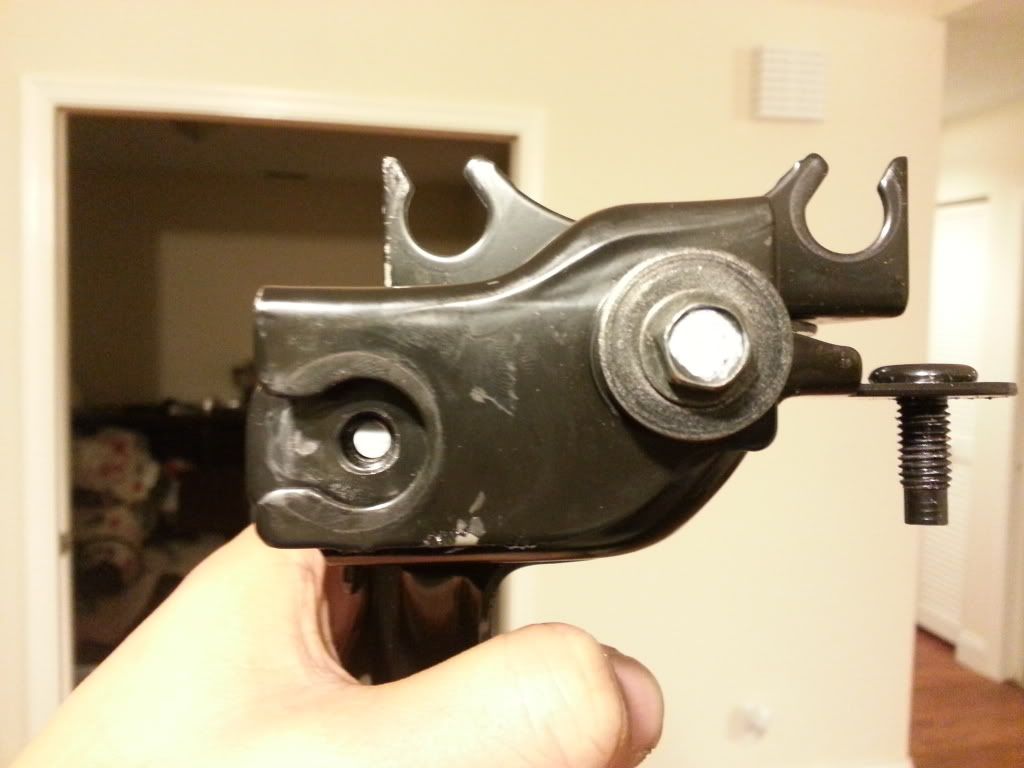 And here is an isometric view of the bracket (note - this bracket is trimmed already, so it's missing a corner. I wanted to show the other two rubber bushing mounts you couldn't see on the first one.) 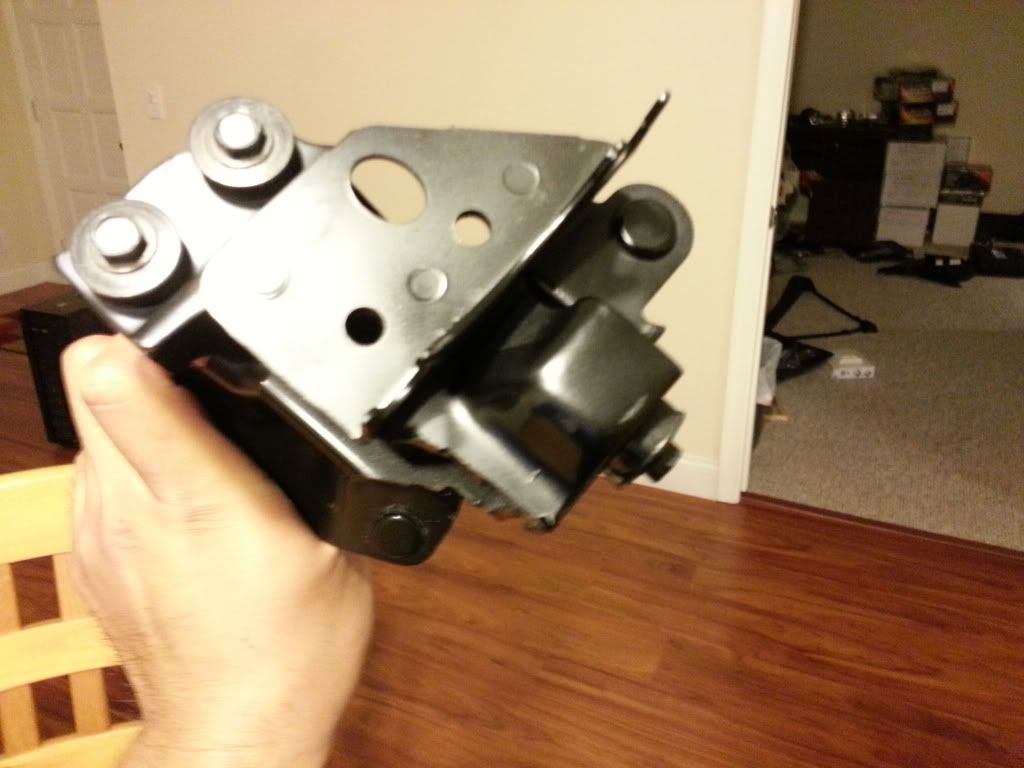 In the first picture, you are looking at the corner of the ABS bracket that would be closest to the OEM CMC, and with the rubber bushing removed. Upon inspection after removal, the bracket has 4 rubber bushings that hold the top piece of the bracket to the lower, and the top piece holds the actual ABS module in place. The point of the rubber bushings is to absorb vibrations and to dampen them. Since there were 4 bushings, if I trimmed down one of them and only had 3, the ABS module would still be kinematically stable - i.e., it will still absorb vibrations and not move. Here is that bracket, trimmed down: 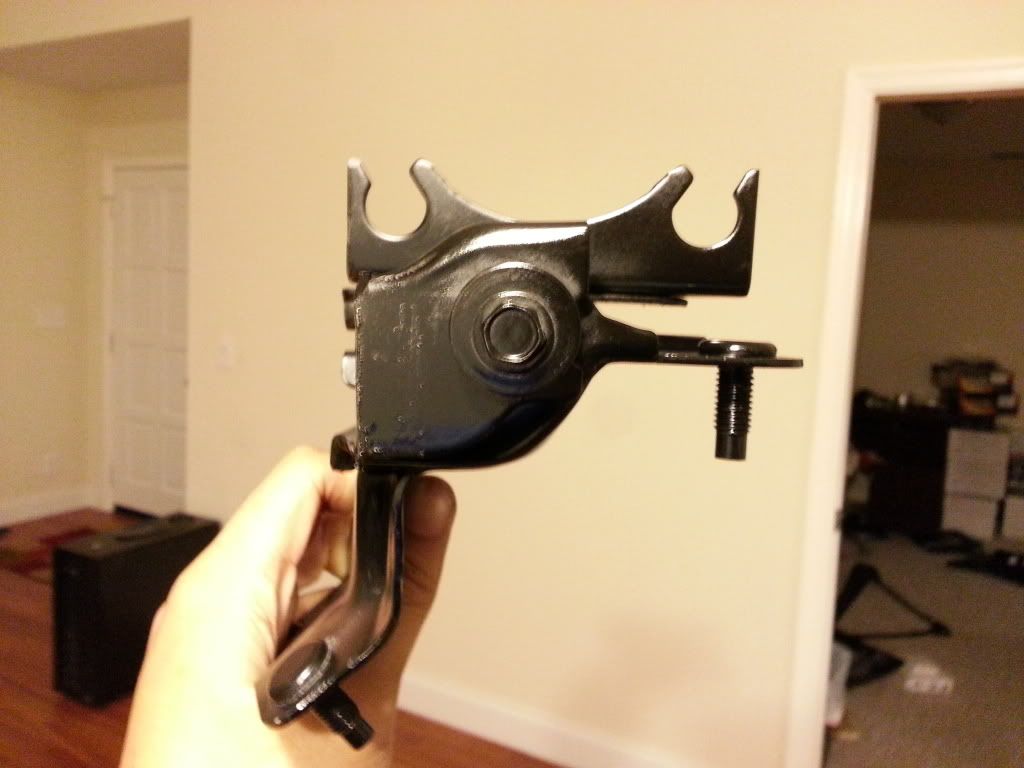 As you can see, I removed quite a bit from the original. I took it to my bench grinder and worked it until I removed what I thought was necessary. I trimmed about a quarter inch past the last remnant of the area for the rubber bushing. It wasn't hard to do, just time consuming because I didn't have gloves and it got REAL HOT.  Even with all this removal, after installing my prototype CMC, I only had about a quarter-inch of clearance! Very tight fit, but I knew it was possible.  There is still room to grind more, but hey, don't fix what ain't broke at this point. There is still room to grind more, but hey, don't fix what ain't broke at this point.That's the main thing I wanted to share at this point, since it was the crucial step to making an aftermarket CMC work. Like I said, I'll try to get a step-by-step up later to let you guys determine if it's DIY for you guys. ^^ Also! I'll be doing the mileage updates in the second post as well.
__________________
2012 Pearl White 370Z GReddy Twin Turbo  Last edited by Alstann; 10-25-2013 at 11:45 AM. |
|
|

|
|
|
#5 (permalink) |
|
A True Z Fanatic
 Join Date: Feb 2010
Location: Covington, GA
Age: 46
Posts: 14,844
Drives: Waiting on next Z
Rep Power: 222            |
Glad you got this solved. DIY mod of the year IMO. Can't wait to see more pics. With my car being down I just might take on this just cause.
__________________
 |
|
|

|
|
|
#6 (permalink) | |
|
A True Z Fanatic
Join Date: Oct 2009
Location: Canada
Posts: 1,156
Drives: 370z
Rep Power: 24            |
Quote:
Since I installed the Wilwood CMC last winter and ditched the ABS module for a proportional valve. good job on that work  
|
|
|
|

|
|
|
#8 (permalink) |
|
A True Z Fanatic
Join Date: Aug 2011
Location: palmdale, ca
Posts: 1,299
Drives: 2010 nissan 370z
Rep Power: 16  |
I would change out the resevoir to a size for a autobleeder cap.....easy clutch flush! Maybe put another brake resevoir inside? Just an idea...none the less sub'd for more info. Congrats bro on a awesome thread!
__________________
https://www.youtube.com/watch?v=RtvG...data_playerARK HFC'S-ARK Grip-Stillen G3-M370-UPREV-Kinetix upper control arm-WC Latheworks-Stage2 Bad@$$ Driver(318whp/268tq)- |
|
|

|
|
|
#10 (permalink) |
|
Track Member
 Join Date: Oct 2011
Location: South Florida
Posts: 882
Drives: 12 PW 370z 6MT Sport
Rep Power: 15       |
Hey guys, just a quick peep!
I plan on getting some pictures and stuff up and to update on the driving experience with you all, but something quick to report - I've been driving my car for the past week, including some very spirited driving as well, and it's been holding up FLAWLESSLY. No leaks or funny feeling in the drivetrain at all! At first, I found myself driving very hesitantly, since I felt that due to the OEM CMC was so fragile, I was scared to slam gears and push the car. Over the past week, my confidence in my car is returning. It's a great feeling. I just finished taking 4 midterm exams at school, so that's been my recent priority. I definitely want to get back to my love of cars though. 
__________________
2012 Pearl White 370Z GReddy Twin Turbo  Last edited by Alstann; 10-16-2013 at 12:16 PM. |
|
|

|
|
|
#11 (permalink) |
|
Track Member
Join Date: Dec 2008
Location: Safest Town In America
Posts: 987
Drives: TT-370Z and 2.5RS
Rep Power: 18       |
This is soooooo great to hear!! You know I am going to be down to get one of these. I STILL am having that weary feeling every time I try to slam a gear. Engagement just doesn't feel right. You da man!
__________________
2010 - PG - M6 - 370zTT 453/409 6lbs  IG @TRbal10
TEAM FLY1 MOTORSPORTS Last edited by tibal; 10-16-2013 at 11:47 AM. |
|
|

|
|
|
#12 (permalink) |
|
A True Z Fanatic
Join Date: May 2013
Location: Columbus, OH
Posts: 5,051
Drives: 2013 Silver 370z
Rep Power: 3389            |
Is that hose clamp under a lot of pressure? If it is, always use fuel injection hose clamps. They are much better suited for high pressure, holding firm, and they don't eat and dig into rubber hose when over tightened. They also provide 360 degrees of equal tightness where a worm clamp can see gaps around the screw area.
__________________
13 370z- |
|
|

|
|
|
#14 (permalink) | |
|
Ronin Samurai - Assassin
 Join Date: Dec 2011
Location: Fayettenam,Pennsyltucky
Age: 68
Posts: 35,293
Drives: 2011 Nismo GM 6M
Rep Power: 2684438            |
Quote:

__________________
 浪人 - 殺し屋 "The Difficult Anytime, The Impossible By Appointment Only" http://www.the370z.com/members-370z-...o-journal.html |
|
|
|

|
|
|
#15 (permalink) |
|
A True Z Fanatic
Join Date: May 2009
Location: FL
Posts: 1,337
Drives: 2011 Nismo
Rep Power: 19         |
I was just looking a this very CMC last night. The Tilton 76-Series.
Very cool. I am getting ready to replace my OEM CMC for a second time. Seems they only last me about three track days before the on on the floor.
__________________
2011 Brilliant Silver NISMO 370z. #: 0046. PPE LTH | MillSpec Cats | F.I Exhaust | Akuma Intakes | Rotora 6/4 Brakes Last edited by cdoxp800; 10-16-2013 at 08:50 PM. |
|
|

|
 |
| Bookmarks |
|
|
 Similar Threads
|
||||
| Thread | Thread Starter | Forum | Replies | Last Post |
| Possible solutions to aftermarket clutch master cylinder | Alstann | Engine & Drivetrain | 32 | 03-26-2015 09:59 PM |
| Wilwood Heavy-Duty Clutch Master Cylinder | djrelic | Engine & Drivetrain | 25 | 08-29-2014 08:59 AM |
| Replacing the clutch line and clutch master cylinder | djrelic | DIY Section (Do-It-Yourself) | 1 | 05-12-2014 02:46 PM |
| cluth master cylinder out?!?!?!?!?! | lllll210lllll | Engine & Drivetrain | 59 | 05-09-2014 02:39 PM |
| Clutch master cylinder went out again | Zenmaster | Engine & Drivetrain | 4 | 03-26-2013 01:54 AM |