Nissan 370Z Forum  

DIY: GT Spec Rear Strut Cross Brace

If you find this thread helpful, give me some rep. How to install a GT Spec Rear Strut Cross Brace Tools required: Metric Socket Set (12mm, 14mm, 17mm, 19mm -

Go Back   Nissan 370Z Forum > Nissan 370Z Tech Area > DIY Section (Do-It-Yourself)


Like Tree2Likes

Reply
 
LinkBack Thread Tools Display Modes
Old 02-08-2012, 06:50 PM   #1 (permalink)
A True Z Fanatic
 
TypeOne's Avatar
 
Join Date: Jul 2010
Location: Baton Rouge, LA
Posts: 2,682
Drives: BSM 370
Rep Power: 1851
TypeOne has a reputation beyond reputeTypeOne has a reputation beyond reputeTypeOne has a reputation beyond reputeTypeOne has a reputation beyond reputeTypeOne has a reputation beyond reputeTypeOne has a reputation beyond reputeTypeOne has a reputation beyond reputeTypeOne has a reputation beyond reputeTypeOne has a reputation beyond reputeTypeOne has a reputation beyond reputeTypeOne has a reputation beyond repute
Send a message via AIM to TypeOne
Default DIY: GT Spec Rear Strut Cross Brace

If you find this thread helpful, give me some rep.

How to install a GT Spec Rear Strut Cross Brace

Tools required:
  • Metric Socket Set (12mm, 14mm, 17mm, 19mm - 21mm)
  • Breaker bar
  • Ratchets
  • Metric Wrenches
  • Jack and Jack Stands
  • Adjustable Wrench

Recommended:
  • Car Lift
  • Air tools
  • Pizza, Beer and cheerleaders

Install time (with all of the right tools and a lift): 2.5 hrs
Difficulty scale 1-10: 2 (because of the plastic panel mod required)
Camera: Cannon T3i with Speedlight

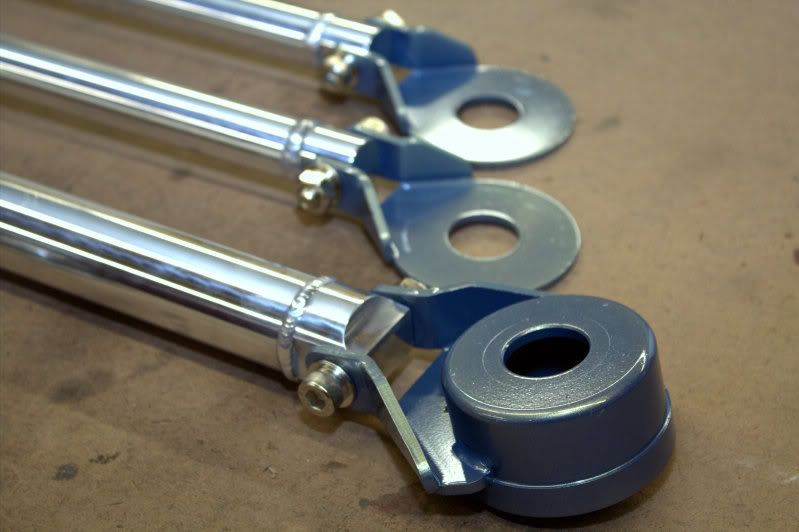
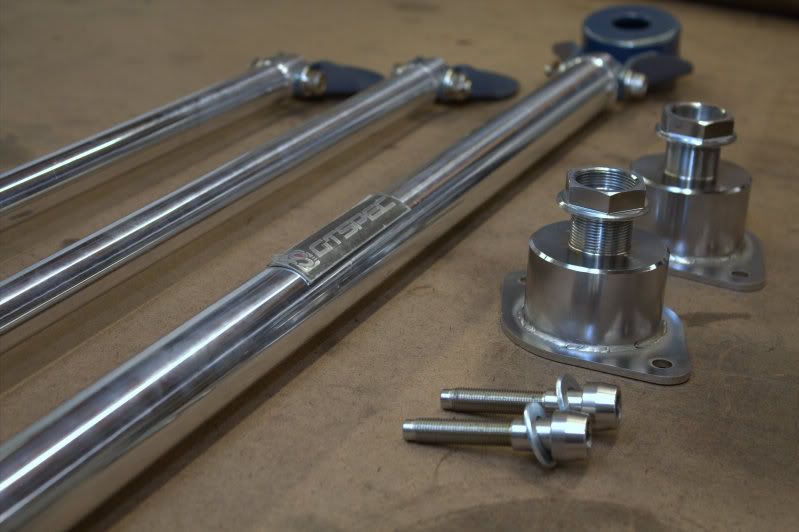
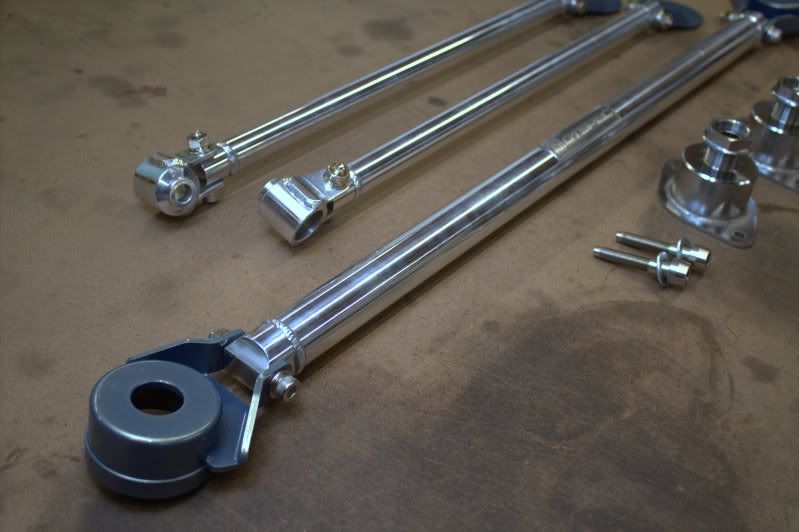
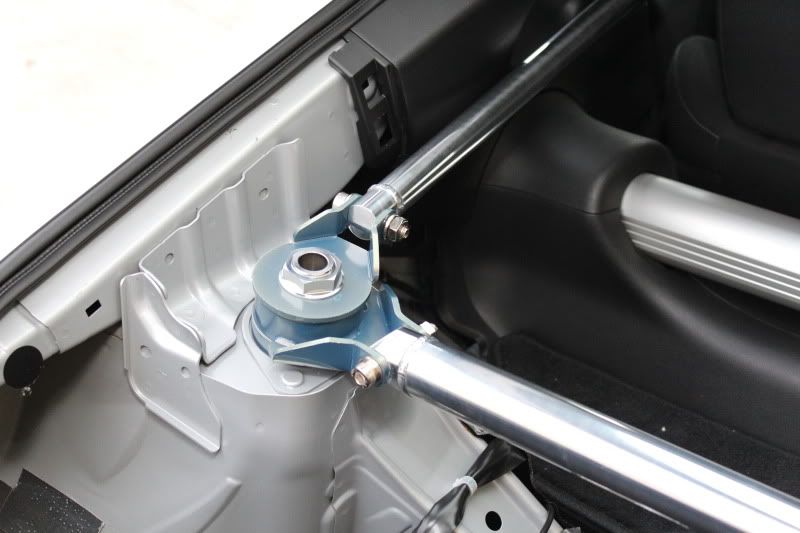
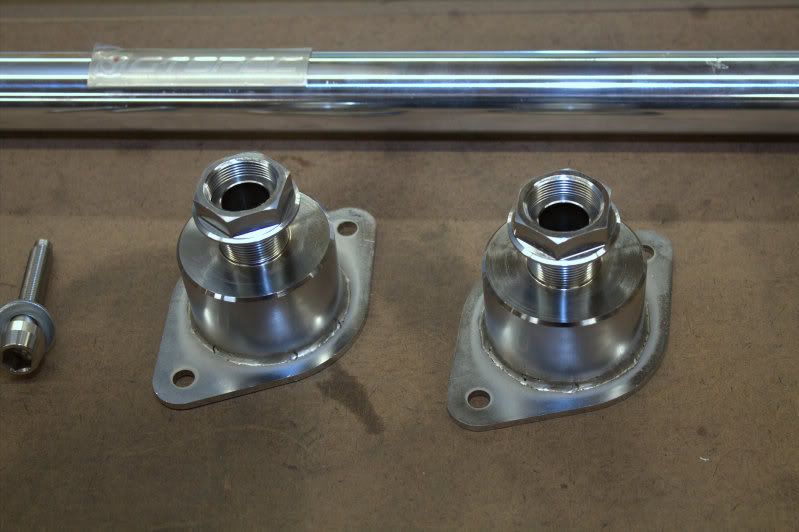
Because the brace can't be bolted in from the top, the kit gives you cups to mount to the top of the rear strut area. These will poke through the top rear section and allow you to bolt on the rear braces.

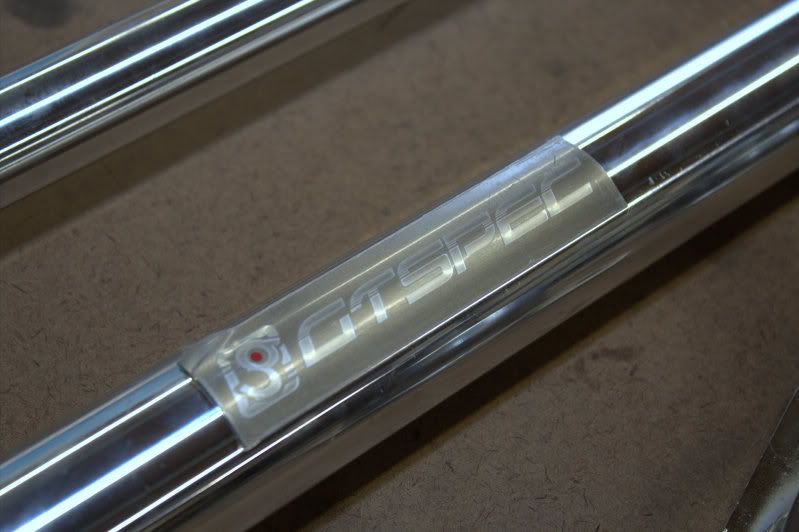
**What is getting installed**


**Removing the factory interior panels**

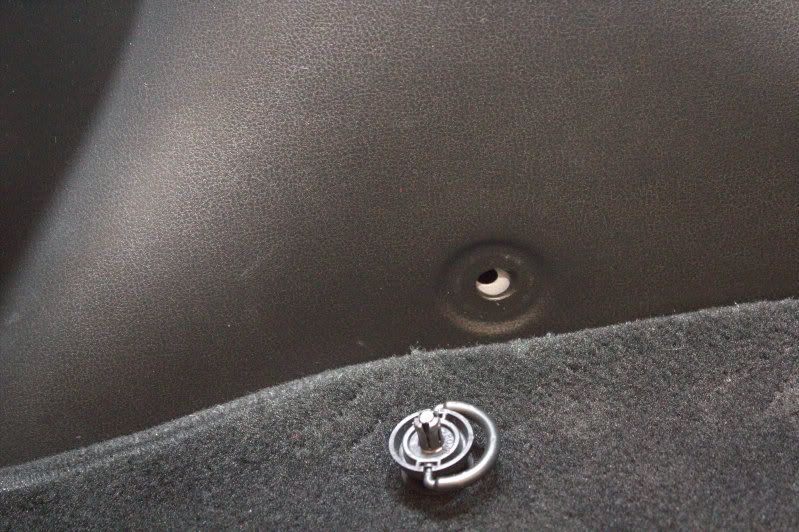
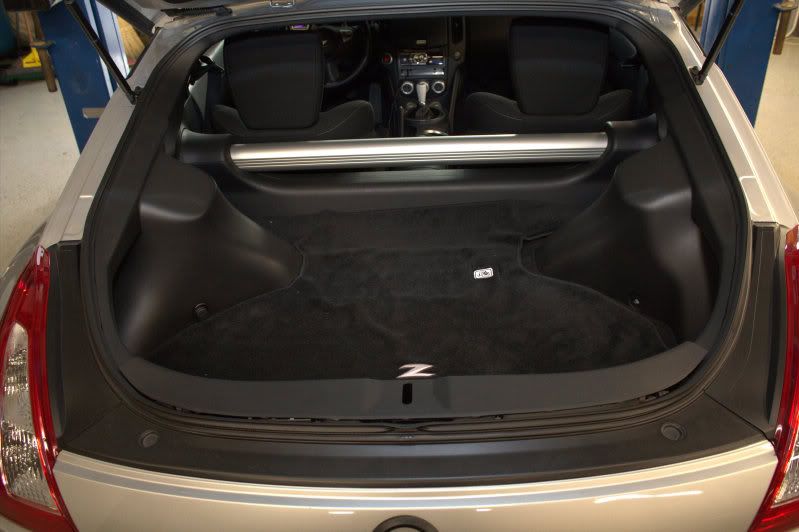
1. There are 4 clips that must be removed before you can unsnap the plastic panels. There is 1 on each side of the strut panels, and 2 on the rear. Use a flat tip screw driver and carefully pop them open. Once they pop, just pull them out.


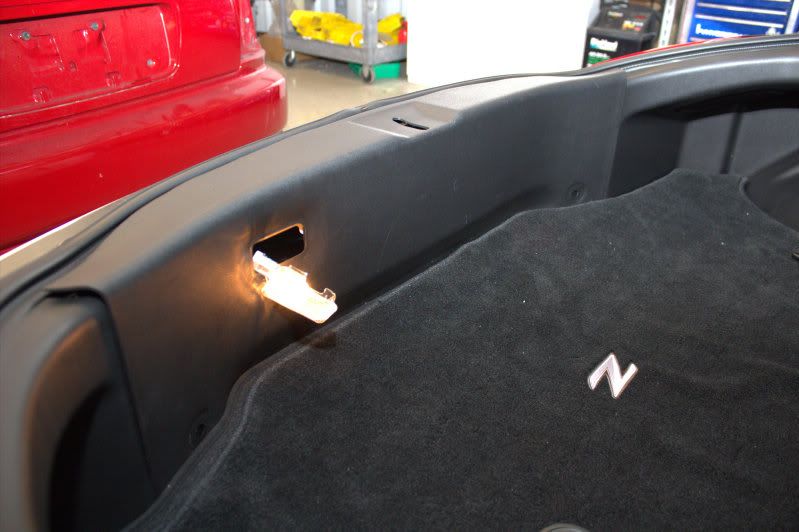
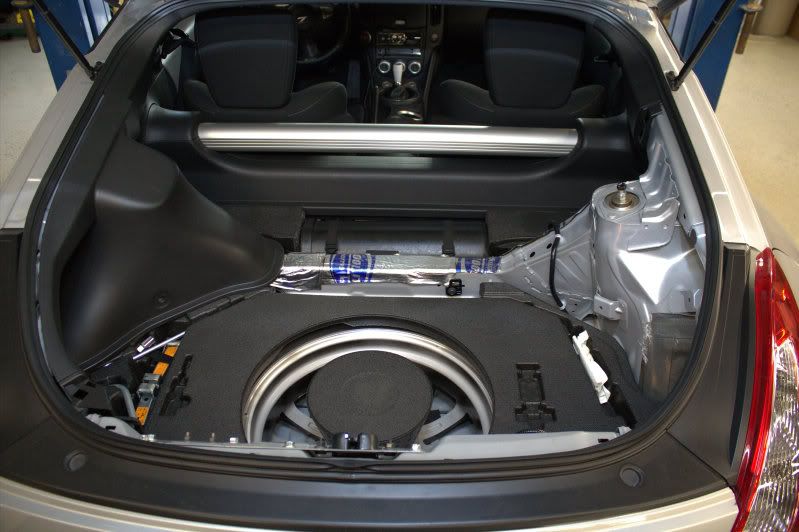
2. Pull out the trunk liner, carpet and base. Pull up on the rear panel first, make sure the cargo light is not clipped in. There are no screws or bolts holding the panels in, so a good yank and they should pop free. Remove all of them to expose the rear strut area.


**Installing the strut mounting cups**

1. Start by removing your wheels. Obviously a jack and jack stands are going to be needed.
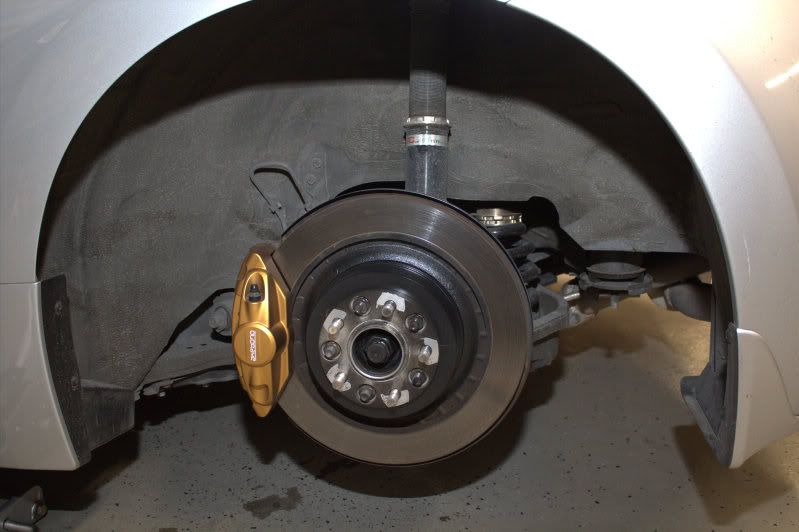

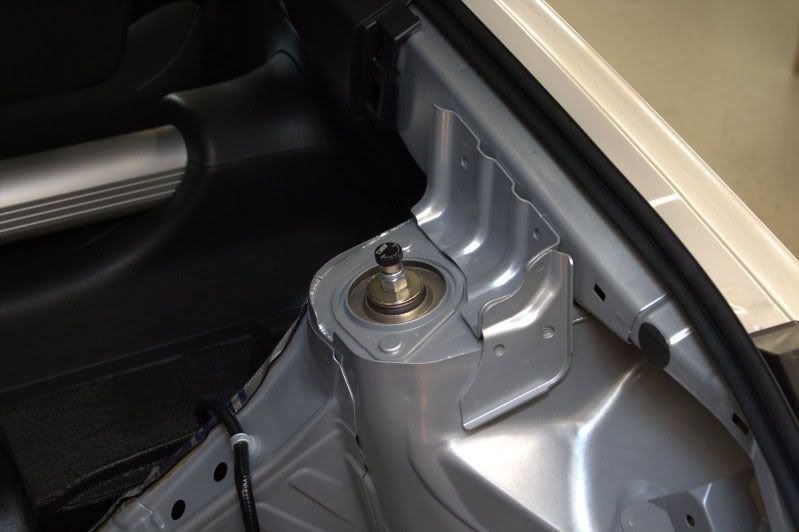
2. Once the wheel is removed, locate the top strut mount. These are 2, 12mm nuts. Remove them.
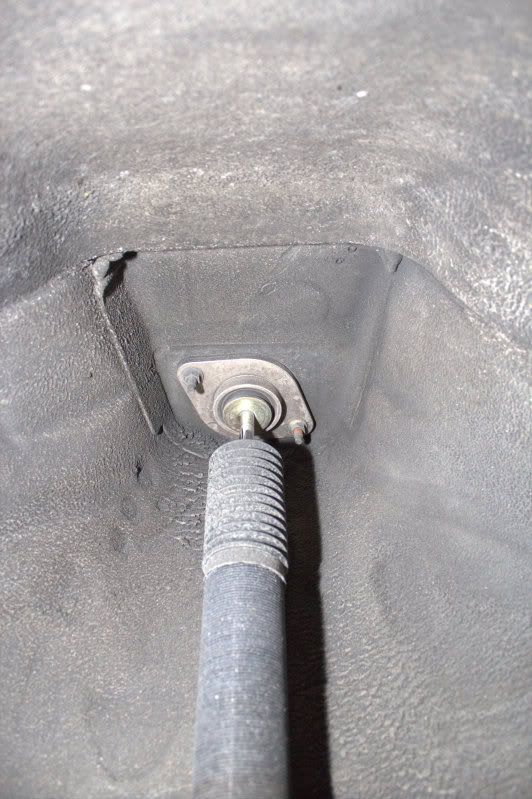

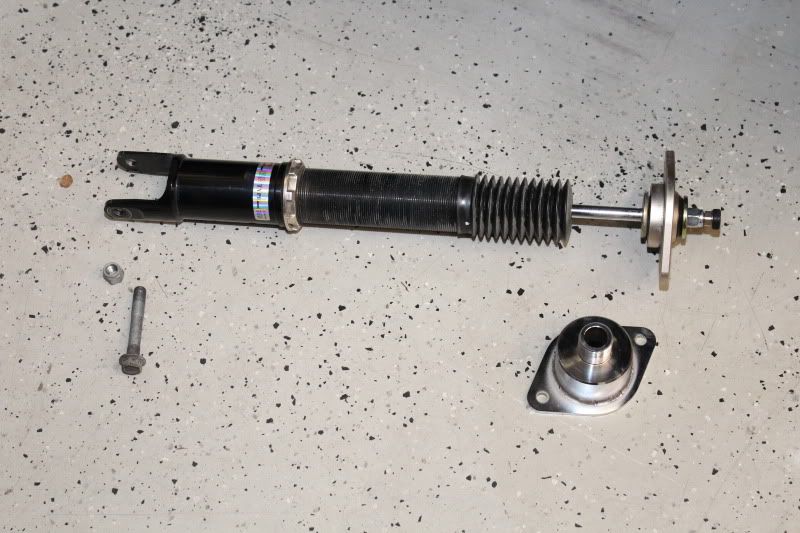
3. Locate the bottom strut mount. This is a 17mm bolt, with a 17mm nut. Remove these and pull the strut out.
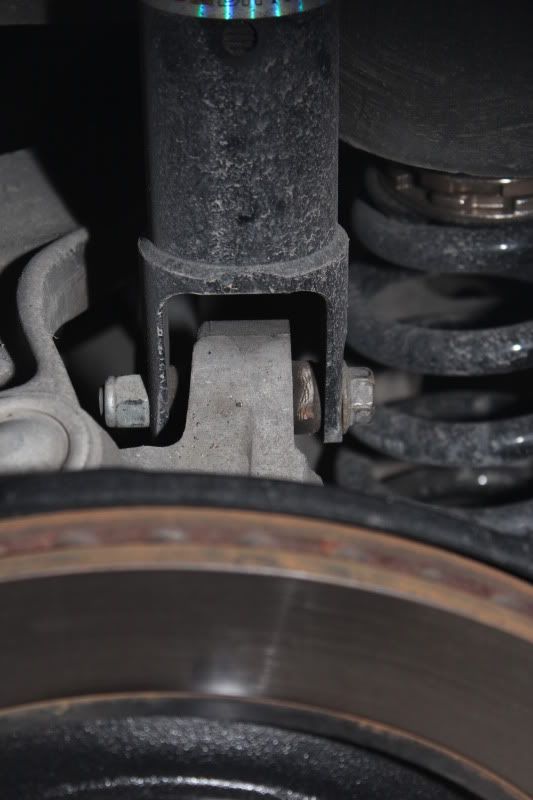


4. Take the GT Spec cup and place it on the top of the strut mount.
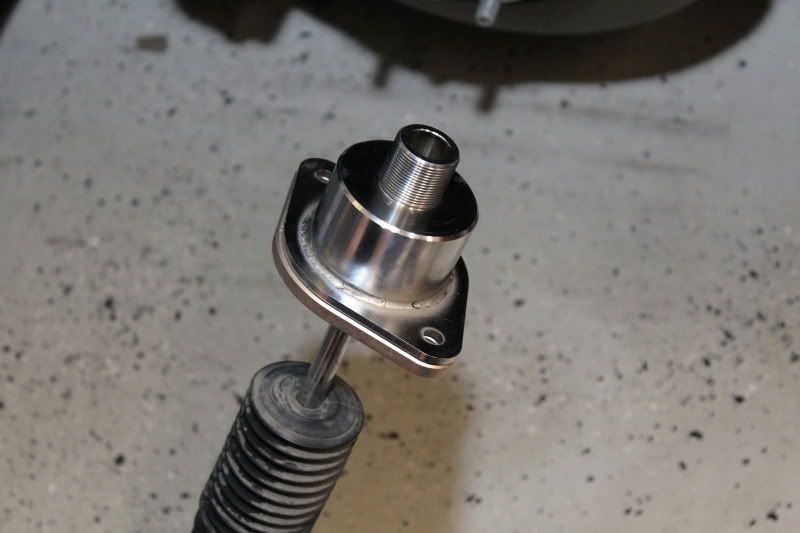

5. Bolt the strut back in, installation is the reverse of removal.
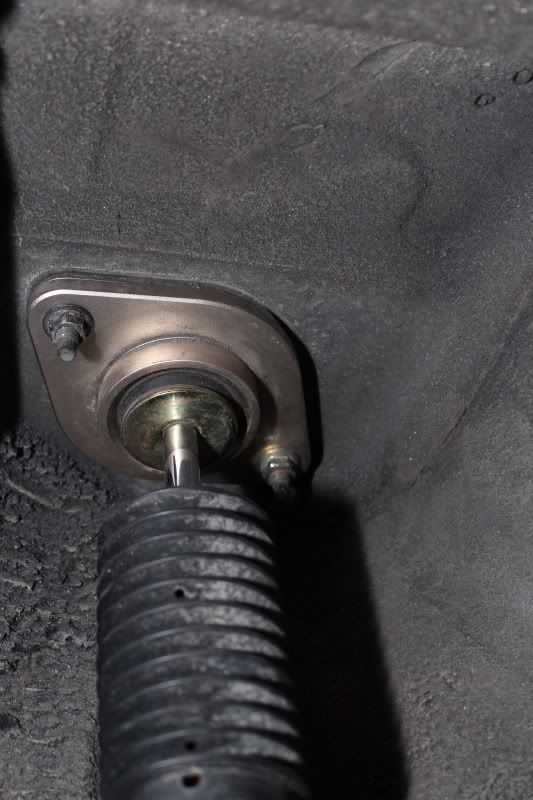

6. Once the cup is strut is bolted back on, you should see this.
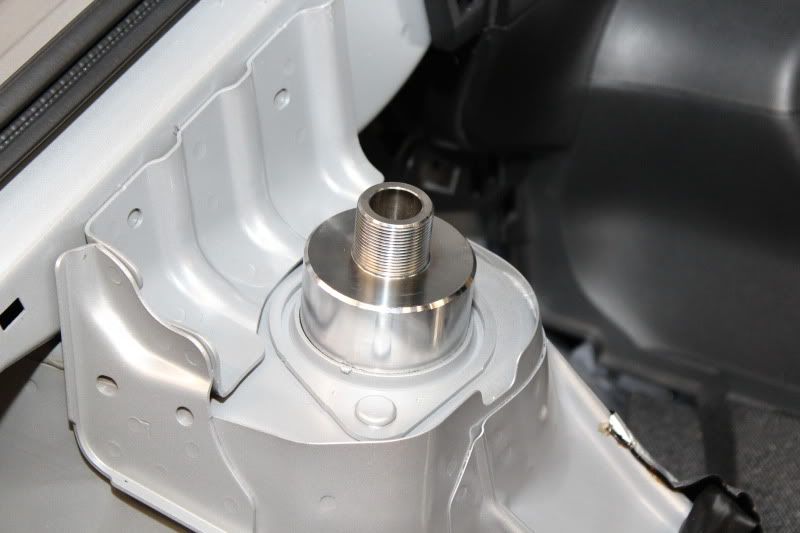

7. Do both sides, exactly the same. Make sure to tighten all suspension and wheel bolts to spec.
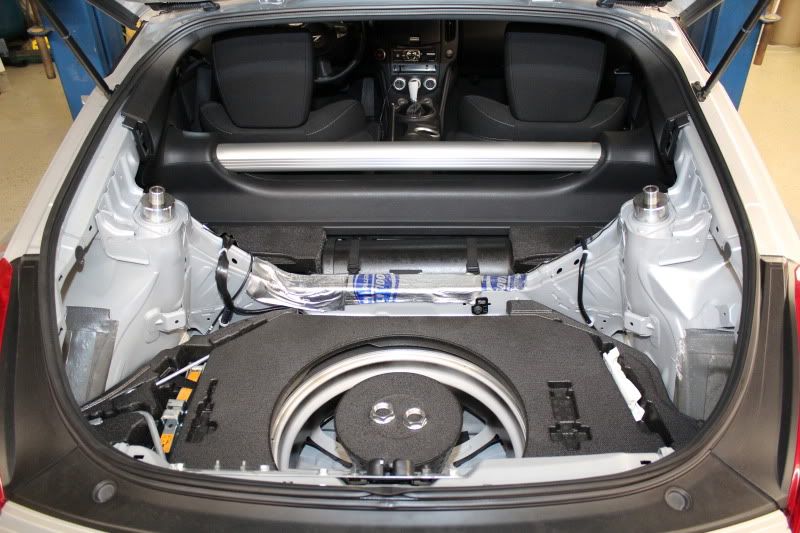

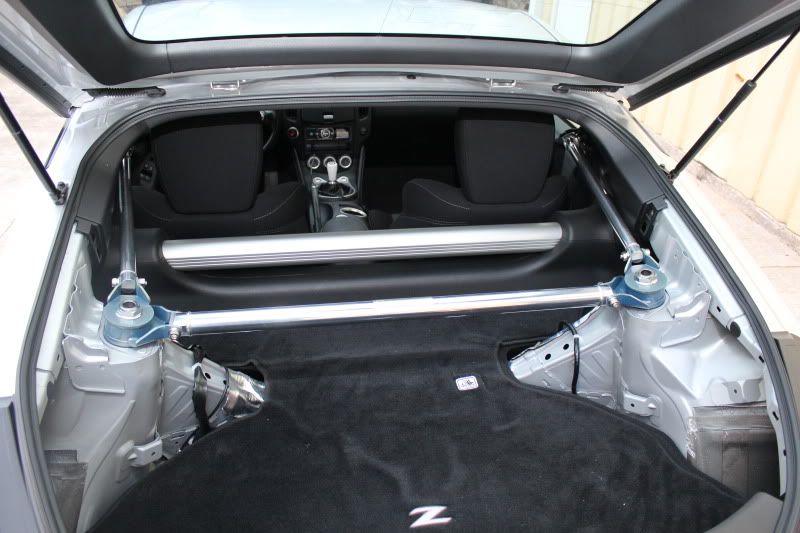
8. Now install the braces!
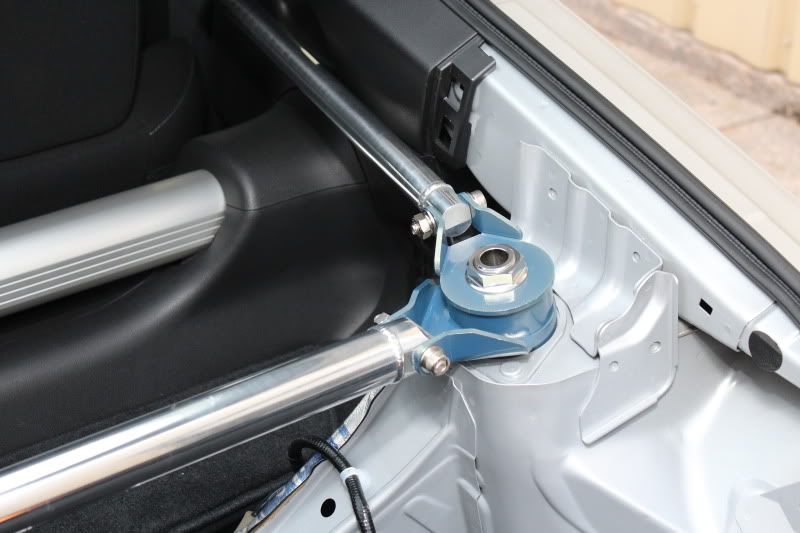


9. If you want to be a no interior thug, then you are done... just make sure you tighten all of the bolts. However, I'm not very hard, so I have to install my interior, which means.. I gotta cut it.
Go ahead and remove the braces and put the stock sides back in.
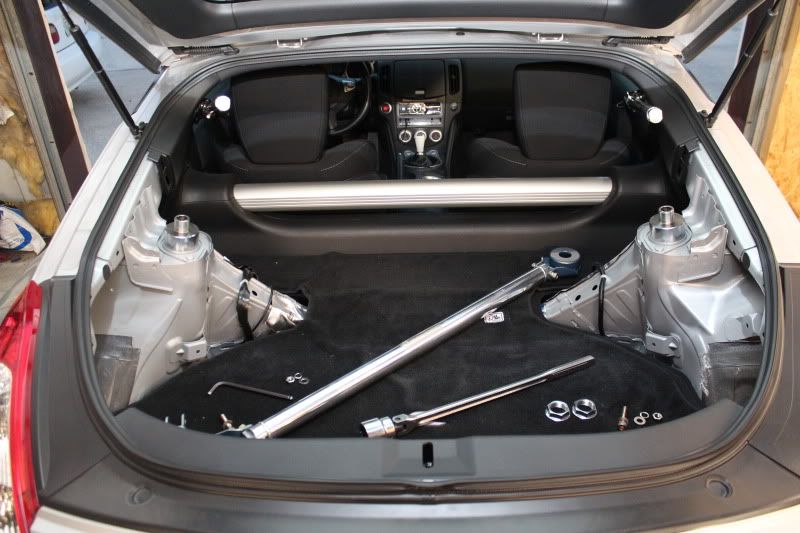

10. This is the hardest part of the install.. mainly because I'm not very good at cutting things that are important. So, I used as much tape as possible. I began by putting the panel on and tapping the plastic with a mallet, it will show where the mount hit. I then tapped it with a punch to mark where I would drill.
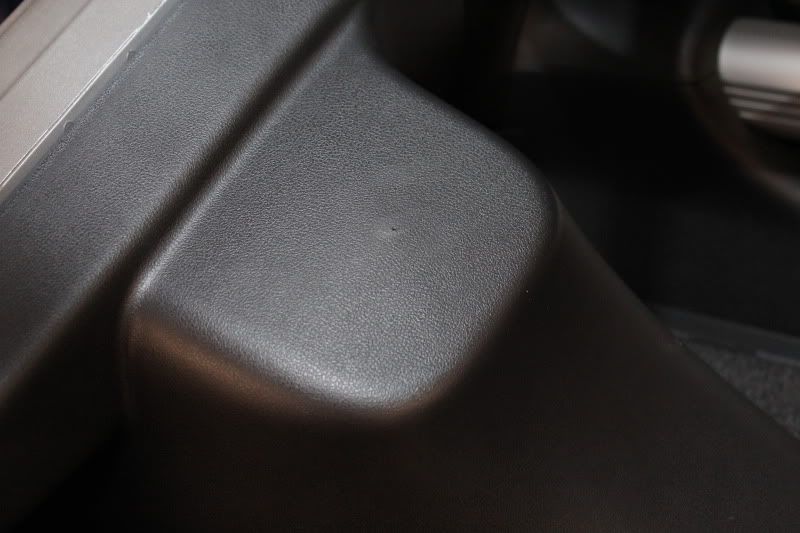

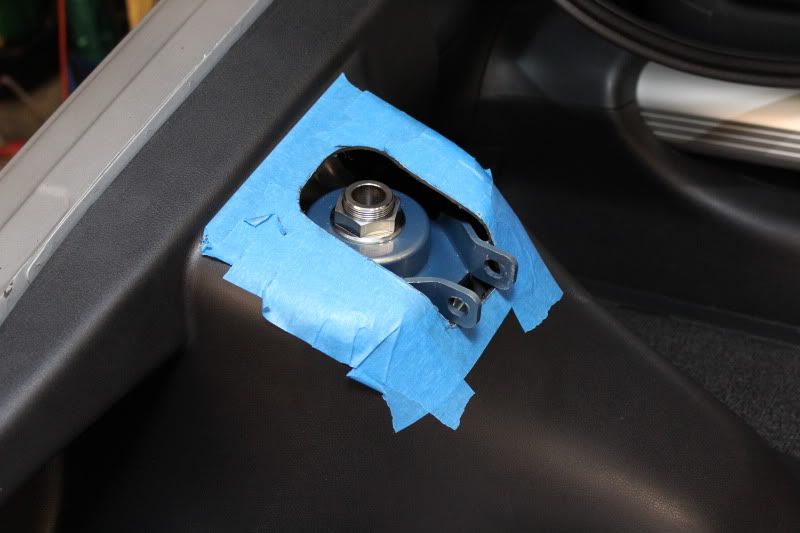
11. Time to cut, so I covered in blue painters tape.
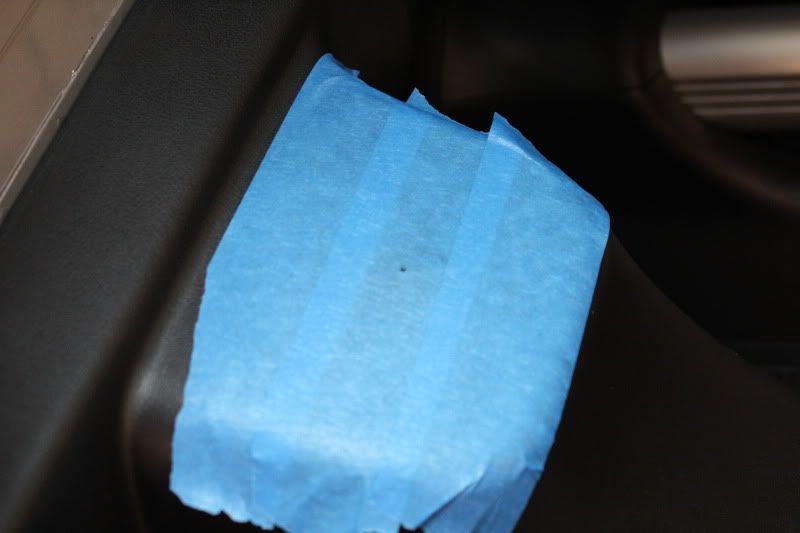

12. Since everyone likes to do things their own way... feel free to cut how you see fit. I tried to cut AS LITTLE as possible, so it took a while, but this is necessary, otherwise you won't be able to put the bolts in.
I took a hole saw and went to town.
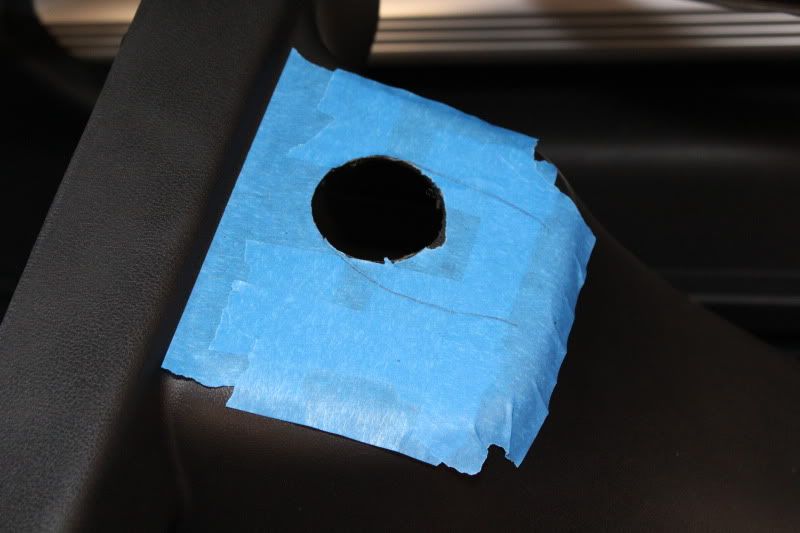

13. I measured it out and traced where I wanted to cut. YOU CAN ALWAYS CUT MORE, BUT YOU CAN'T PUT IT BACK!
Go as fast or as slow as you wish. I went slow and took my time.
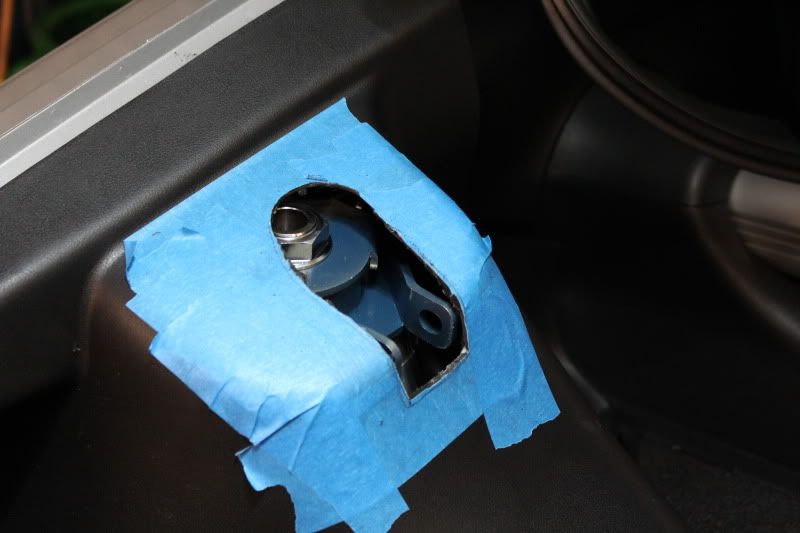


14. Once you can put the bar on, do the same thing for the seat belt brace.
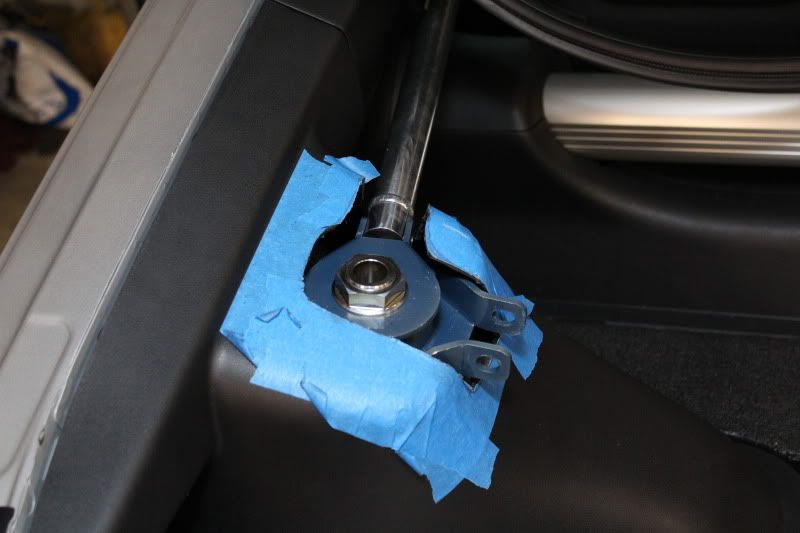

15. When you are happy with the way it looks, take a piece of paper and trace out the inside hole. You will use this as a negative for the other side. Measure it out, tape it on and trace with a marker.
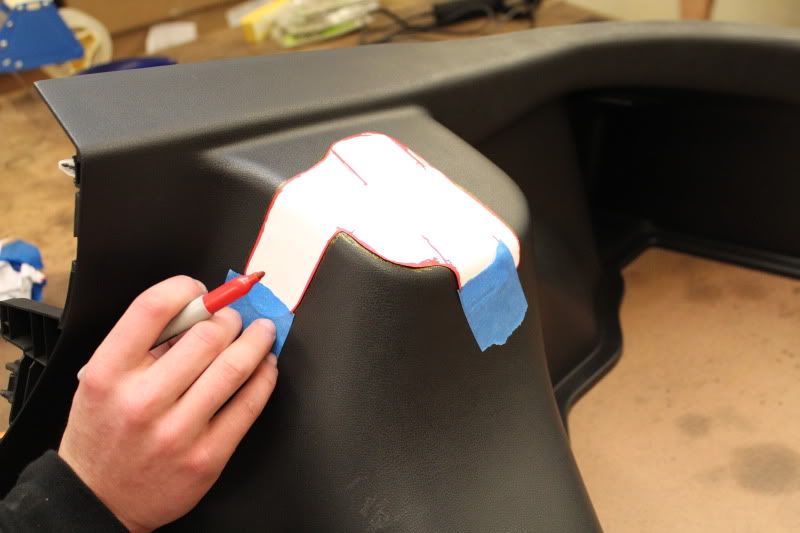

16. Match it, cut it out and install it. You will have to get creative as to how to tighten all of the bolts, but it's possible. You can also remove the braces without taking the panels out.
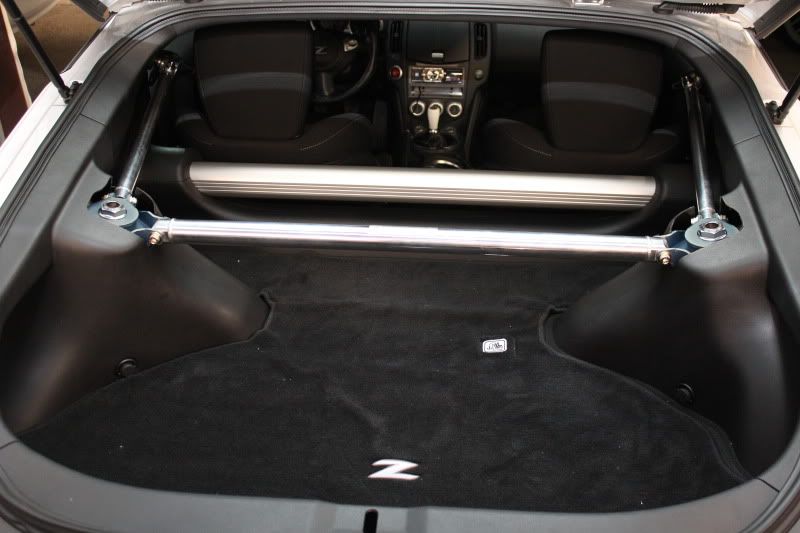

Thanks for looking! I'll have more pics once the weather clears up!

-David
joshadaniels likes this.

Last edited by TypeOne; 02-16-2012 at 02:57 PM.
TypeOne is offline   Reply With Quote
Old 02-08-2012, 06:50 PM   #2 (permalink)
A True Z Fanatic
 
TypeOne's Avatar
 
Join Date: Jul 2010
Location: Baton Rouge, LA
Posts: 2,682
Drives: BSM 370
Rep Power: 1851
TypeOne has a reputation beyond reputeTypeOne has a reputation beyond reputeTypeOne has a reputation beyond reputeTypeOne has a reputation beyond reputeTypeOne has a reputation beyond reputeTypeOne has a reputation beyond reputeTypeOne has a reputation beyond reputeTypeOne has a reputation beyond reputeTypeOne has a reputation beyond reputeTypeOne has a reputation beyond reputeTypeOne has a reputation beyond repute
Send a message via AIM to TypeOne
Default

Overall the rear of the car does feel stiffer... The fitment and quality of this kit was spot on. All of the custom hardware looks great, the finish is outstanding. I couldn't be happier!

GT Spec FTW!!
1cleanZ likes this.

Last edited by TypeOne; 02-16-2012 at 02:59 PM.
TypeOne is offline   Reply With Quote
Old 02-08-2012, 07:14 PM   #3 (permalink)
A True Z Fanatic
 
somatic's Avatar
 
Join Date: Aug 2011
Location: Grapevine, TX
Posts: 1,767
Drives: 2013 GS350
Rep Power: 17
somatic is a jewel in the roughsomatic is a jewel in the roughsomatic is a jewel in the rough
Default

Subd
__________________

Passport 9500i HW|Short Tail Exhaust|Evo-r CF Fangs & Fog|Blacked Out Roof|Status Elite Intake 19/22|AUTO Shift Boot DIY|GTR Button|Rear Limo Tint|S2carbonworks hood dampeners|Falken Rt-7m 20"s w/Jade Project Mu Tuner Lugs|P:JDM Oil Cap|Tow Hook|SOLD
somatic is offline   Reply With Quote
Old 02-08-2012, 08:33 PM   #4 (permalink)
Premium Member
 
Join Date: Oct 2010
Location: Miami,FL
Posts: 647
Drives: 2010 370z NISMO
Rep Power: 16
whoLEEoh is on a distinguished road
Default

sooo i will not be able to adjust rear damper unless i take off my suspension?
__________________
2013 Boss 302
whoLEEoh is offline   Reply With Quote
Old 02-08-2012, 09:18 PM   #5 (permalink)
A True Z Fanatic
 
Unique_Z's Avatar
 
Join Date: Dec 2010
Location: Brunei
Posts: 1,515
Drives: 370Z, 180SX
Rep Power: 17
Unique_Z is a splendid one to beholdUnique_Z is a splendid one to beholdUnique_Z is a splendid one to beholdUnique_Z is a splendid one to beholdUnique_Z is a splendid one to beholdUnique_Z is a splendid one to behold
Default

Quote:
Originally Posted by whoLEEoh View Post
sooo i will not be able to adjust rear damper unless i take off my suspension?
it looks that way..
__________________
My Z Build
UniqueZ
Unique_Z is offline   Reply With Quote
Old 02-08-2012, 09:23 PM   #6 (permalink)
A True Z Fanatic
 
martin82's Avatar
 
Join Date: Nov 2011
Location: los angeles
Posts: 2,636
Drives: 12 Nissan 370Z MB M6
Rep Power: 20
martin82 has much to be proud ofmartin82 has much to be proud ofmartin82 has much to be proud ofmartin82 has much to be proud ofmartin82 has much to be proud ofmartin82 has much to be proud ofmartin82 has much to be proud ofmartin82 has much to be proud ofmartin82 has much to be proud of
Send a message via AIM to martin82
Default

you should still be able to adjust if your coilovers etc have the long allen wrench
martin82 is offline   Reply With Quote
Old 02-08-2012, 09:31 PM   #7 (permalink)
Track Member
 
Mandingo's Avatar
 
Join Date: Nov 2010
Location: Dallas
Posts: 625
Drives: '10 370z 6spd
Rep Power: 3371
Mandingo has a reputation beyond reputeMandingo has a reputation beyond reputeMandingo has a reputation beyond reputeMandingo has a reputation beyond reputeMandingo has a reputation beyond reputeMandingo has a reputation beyond reputeMandingo has a reputation beyond reputeMandingo has a reputation beyond reputeMandingo has a reputation beyond reputeMandingo has a reputation beyond reputeMandingo has a reputation beyond repute
Default

Did you weigh it? I can't find the weight anywhere. Looks good though
__________________
some mods
Mandingo is offline   Reply With Quote
Old 02-08-2012, 11:40 PM   #8 (permalink)
A True Z Fanatic
 
TypeOne's Avatar
 
Join Date: Jul 2010
Location: Baton Rouge, LA
Posts: 2,682
Drives: BSM 370
Rep Power: 1851
TypeOne has a reputation beyond reputeTypeOne has a reputation beyond reputeTypeOne has a reputation beyond reputeTypeOne has a reputation beyond reputeTypeOne has a reputation beyond reputeTypeOne has a reputation beyond reputeTypeOne has a reputation beyond reputeTypeOne has a reputation beyond reputeTypeOne has a reputation beyond reputeTypeOne has a reputation beyond reputeTypeOne has a reputation beyond repute
Send a message via AIM to TypeOne
Default

At this time, you wont be able to adjust the coilovers with this brace, however the guys at GT Spec say they are working on a solution.

As mentioned above, if you have coilovers that have extended Allen wrenches, it won't be a problem.

Total weight is about 8lbs.

I should have the finished install tomorrow! Thanks for looking!
TypeOne is offline   Reply With Quote
Old 02-11-2012, 08:20 AM   #9 (permalink)
A True Z Fanatic
 
sixpax's Avatar
 
Join Date: Dec 2011
Location: Maryland
Posts: 1,112
Drives: 2010 370Z NAG 7AT
Rep Power: 16
sixpax is a glorious beacon of lightsixpax is a glorious beacon of lightsixpax is a glorious beacon of lightsixpax is a glorious beacon of lightsixpax is a glorious beacon of light
Default

Quote:
Originally Posted by whoLEEoh View Post
sooo i will not be able to adjust rear damper unless i take off my suspension?
Add the extensions available for 30 bucks on BC BR ...
__________________
|| Build Journal || Follow Us: Web Site || Facebook ||
Quote:
"I got lapped by the pace car at Summit Point. Not many can say that." -- sixpax
sixpax is offline   Reply With Quote
Old 02-11-2012, 08:22 AM   #10 (permalink)
A True Z Fanatic
 
sixpax's Avatar
 
Join Date: Dec 2011
Location: Maryland
Posts: 1,112
Drives: 2010 370Z NAG 7AT
Rep Power: 16
sixpax is a glorious beacon of lightsixpax is a glorious beacon of lightsixpax is a glorious beacon of lightsixpax is a glorious beacon of lightsixpax is a glorious beacon of light
Default

Looks great .... in for progress.

Just curious if the removed interior pieces are going to go back in somehow when done ? Or is the plan to leave them all out.
__________________
|| Build Journal || Follow Us: Web Site || Facebook ||
Quote:
"I got lapped by the pace car at Summit Point. Not many can say that." -- sixpax
sixpax is offline   Reply With Quote
Old 02-11-2012, 08:48 AM   #11 (permalink)
A True Z Fanatic
 
wstar's Avatar
 
Join Date: Mar 2009
Location: Houston, TX
Posts: 4,024
Drives: too slow
Rep Power: 3594
wstar has a reputation beyond reputewstar has a reputation beyond reputewstar has a reputation beyond reputewstar has a reputation beyond reputewstar has a reputation beyond reputewstar has a reputation beyond reputewstar has a reputation beyond reputewstar has a reputation beyond reputewstar has a reputation beyond reputewstar has a reputation beyond reputewstar has a reputation beyond repute
Default

Sounds like he intends to cut holes in the plastic to put them back (which I think a lot of people do for adjustable suspension anyways).
__________________
7AT Track Car!
Journal thread / Car setup details
wstar is offline   Reply With Quote
Old 02-11-2012, 08:55 AM   #12 (permalink)
A True Z Fanatic
 
wstar's Avatar
 
Join Date: Mar 2009
Location: Houston, TX
Posts: 4,024
Drives: too slow
Rep Power: 3594
wstar has a reputation beyond reputewstar has a reputation beyond reputewstar has a reputation beyond reputewstar has a reputation beyond reputewstar has a reputation beyond reputewstar has a reputation beyond reputewstar has a reputation beyond reputewstar has a reputation beyond reputewstar has a reputation beyond reputewstar has a reputation beyond reputewstar has a reputation beyond repute
Default

Any product link for this kit? gtspec.com doesn't seem to have it. Curious about where the two smaller bars are going...
__________________
7AT Track Car!
Journal thread / Car setup details
wstar is offline   Reply With Quote
Old 02-11-2012, 11:30 AM   #13 (permalink)
Premium Member
 
Join Date: Oct 2010
Location: Miami,FL
Posts: 647
Drives: 2010 370z NISMO
Rep Power: 16
whoLEEoh is on a distinguished road
Default

Quote:
Originally Posted by sixpax View Post
Add the extensions available for 30 bucks on BC BR ...
that wouldnt make a diff...it covers the whole completely..maybe they have to make a whole in the actual piece so the extension could atleast fit
__________________
2013 Boss 302
whoLEEoh is offline   Reply With Quote
Old 02-11-2012, 05:25 PM   #14 (permalink)
A True Z Fanatic
 
sixpax's Avatar
 
Join Date: Dec 2011
Location: Maryland
Posts: 1,112
Drives: 2010 370Z NAG 7AT
Rep Power: 16
sixpax is a glorious beacon of lightsixpax is a glorious beacon of lightsixpax is a glorious beacon of lightsixpax is a glorious beacon of lightsixpax is a glorious beacon of light
Default

Quote:
Originally Posted by whoLEEoh View Post
that wouldnt make a diff...it covers the whole completely..maybe they have to make a whole in the actual piece so the extension could atleast fit
Sorry about that, I didn't look at the pictures close enough and assumed it still allowed access to the top of the strut.
__________________
|| Build Journal || Follow Us: Web Site || Facebook ||
Quote:
"I got lapped by the pace car at Summit Point. Not many can say that." -- sixpax
sixpax is offline   Reply With Quote
Old 02-11-2012, 07:05 PM   #15 (permalink)
Ron
A True Z Fanatic
 
Ron's Avatar
 
Join Date: Oct 2010
Location: Houston, TX
Posts: 3,009
Drives: TT '11 PW Nismo #113
Rep Power: 22
Ron has much to be proud ofRon has much to be proud ofRon has much to be proud ofRon has much to be proud ofRon has much to be proud ofRon has much to be proud ofRon has much to be proud ofRon has much to be proud of
Default

sub'd, brace looks mean!
__________________
2011 Twin Turbo PW nismo #113 - My Journal - My TT Build Thread
[ GTM GTX Stg2 TT || HKS EVC6 || Custom CarPC || F.I 3'' TDX CBE || SB 6puck clutch/ZSpeed CSC || BC BR Coilovers || SPC camber arms || Work VSS-X || Custom Headlights || PW:JDM CF Covers || Seibon CF Engine Cover ]
Ron is offline   Reply With Quote
Reply

Bookmarks


Posting Rules
You may not post new threads
You may not post replies
You may not post attachments
You may not edit your posts

BB code is On
Smilies are On
[IMG] code is On
HTML code is Off
Trackbacks are On
Pingbacks are On
Refbacks are On


Similar Threads
Thread Thread Starter Forum Replies Last Post
DIY: JADE performance rear lower brace install (gt spec, lazer_z) lazer_Z DIY Section (Do-It-Yourself) 5 12-16-2013 05:45 AM
New GT-Spec Rear Brace! TypeOne Brakes & Suspension 31 02-17-2012 05:25 AM
[FOR SALE] Carbon Fiber Rear strut Brace by CFElement Carbon Fiber Element Parts for sale (Private Classifieds) 39 01-01-2012 05:45 PM
Carbon Fiber Rear Strut Brace by CF Element Carbon Fiber Element Exterior & Interior 55 09-11-2011 03:11 PM
GT Spec Rear Lower Tie Brace Z1Performance Suspension/Brakes 2 12-18-2009 06:33 PM


All times are GMT -5. The time now is 04:32 AM.


Powered by vBulletin® Version 3.8.4
Copyright ©2000 - 2024, Jelsoft Enterprises Ltd.
Search Engine Optimization by vBSEO 3.6.0 PL2