Special Tools Required: Torque Wrench 22mm socket (most DIY sets only go to 21mm) 10mm hex-key socket that will fit your torque wrench (for 12mm bolts) Jack Jack stands Optional
|
|
LinkBack | Thread Tools | Display Modes |
01-25-2010, 10:44 PM | #1 (permalink) |
A True Z Fanatic
Join Date: Mar 2009
Location: North East
Posts: 6,203
Drives: 09 370Z Sport M6
Rep Power: 653 |
DIY: AP Racing Install
Special Tools Required:
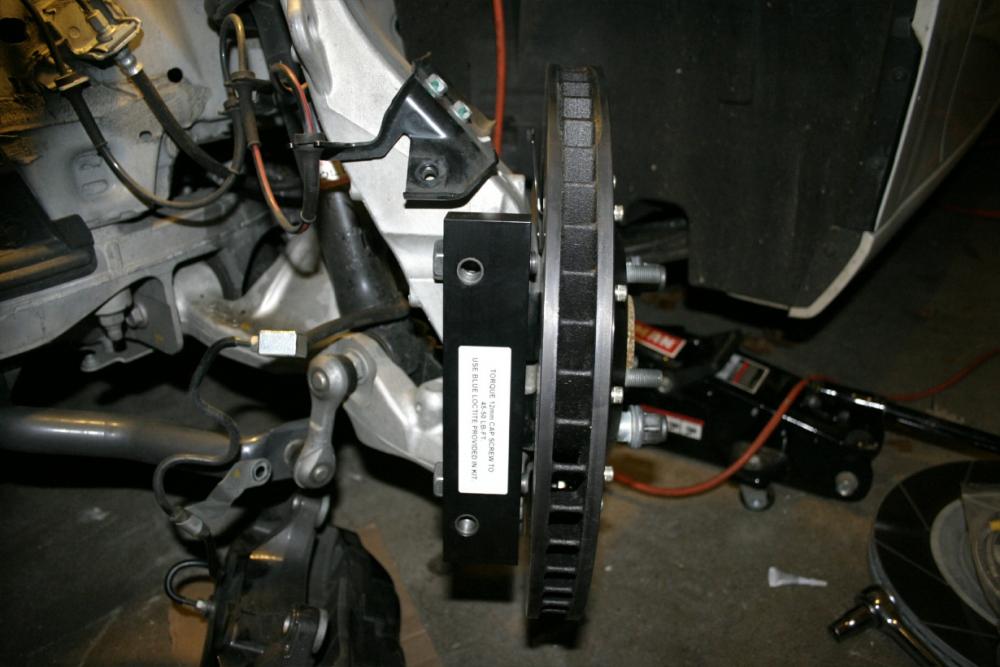
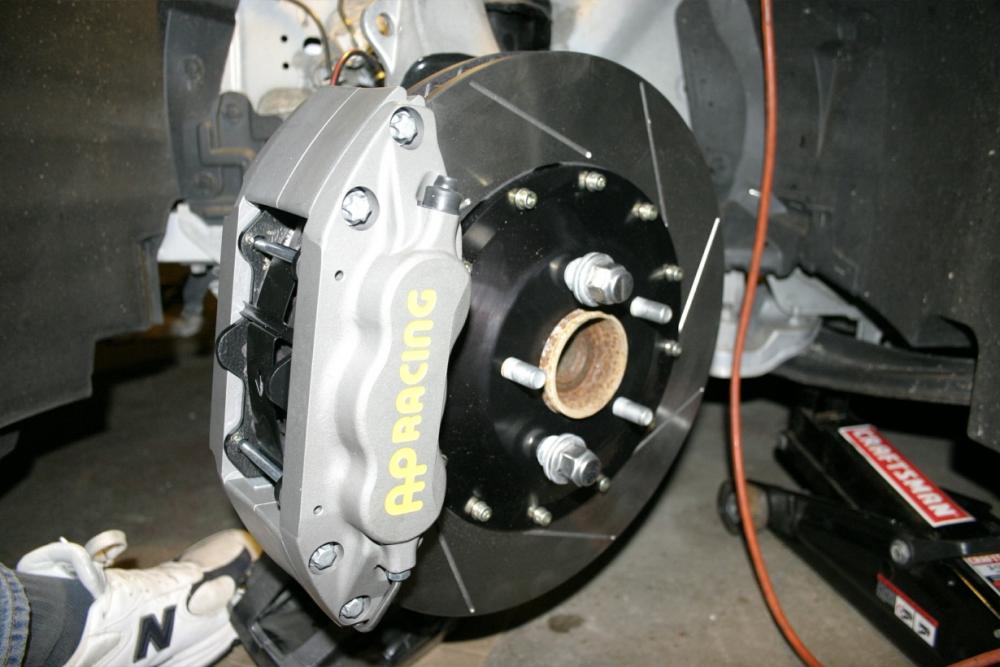
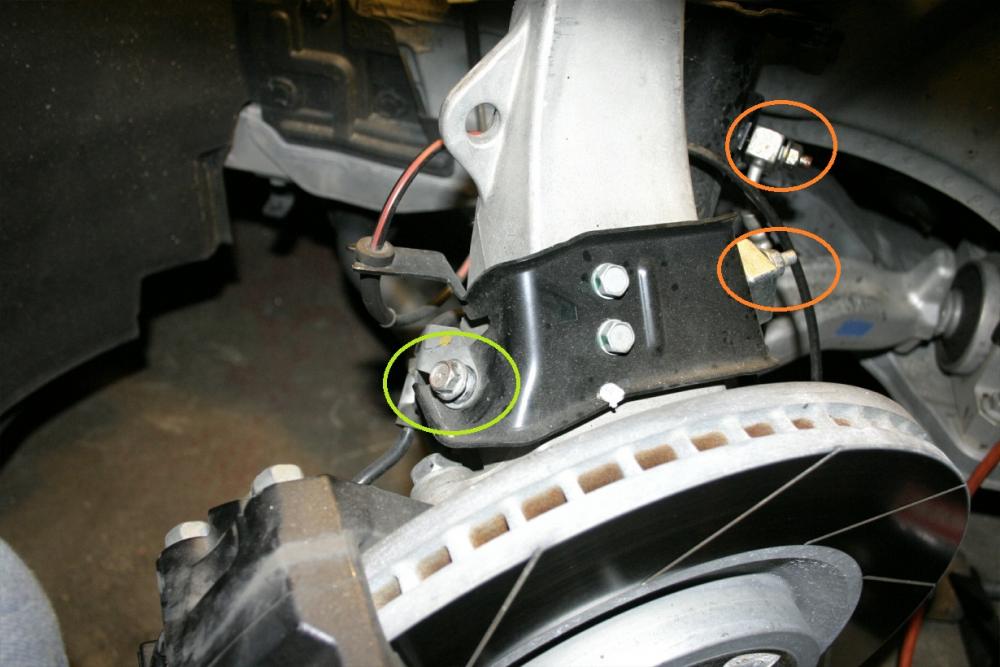
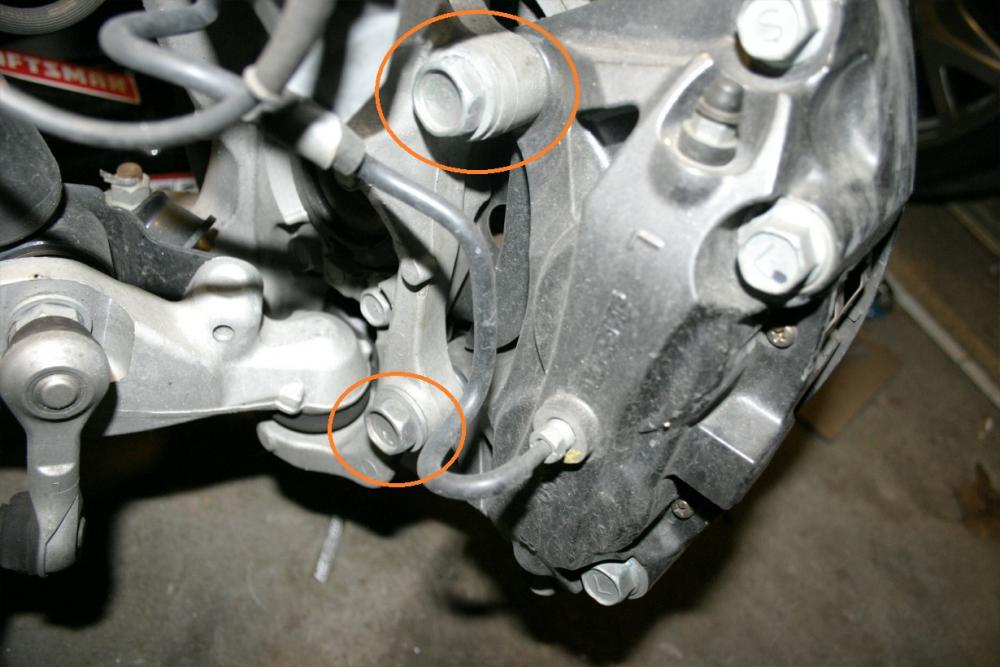
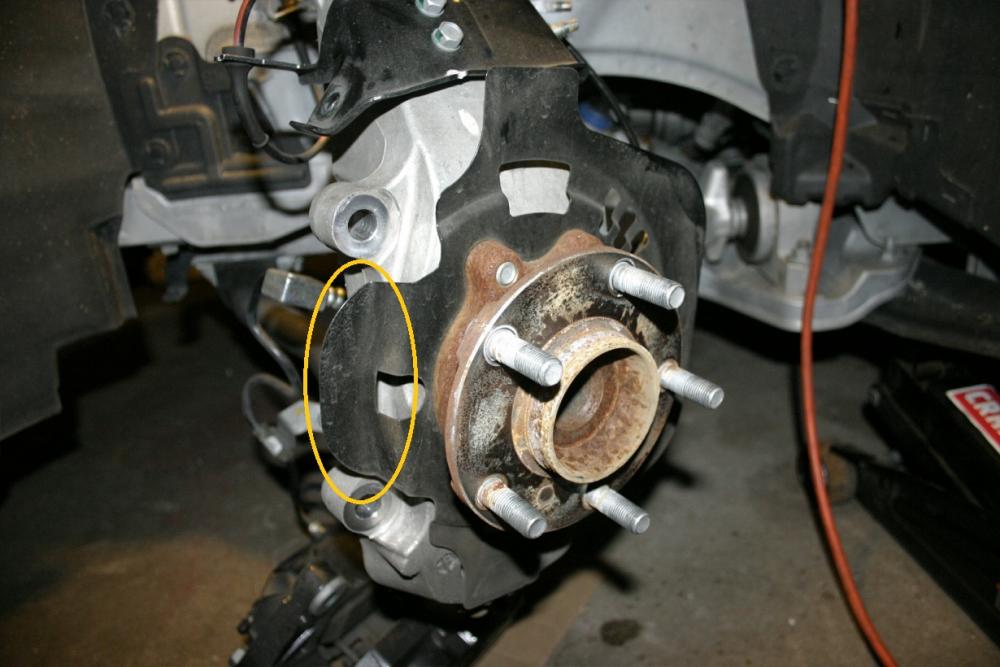
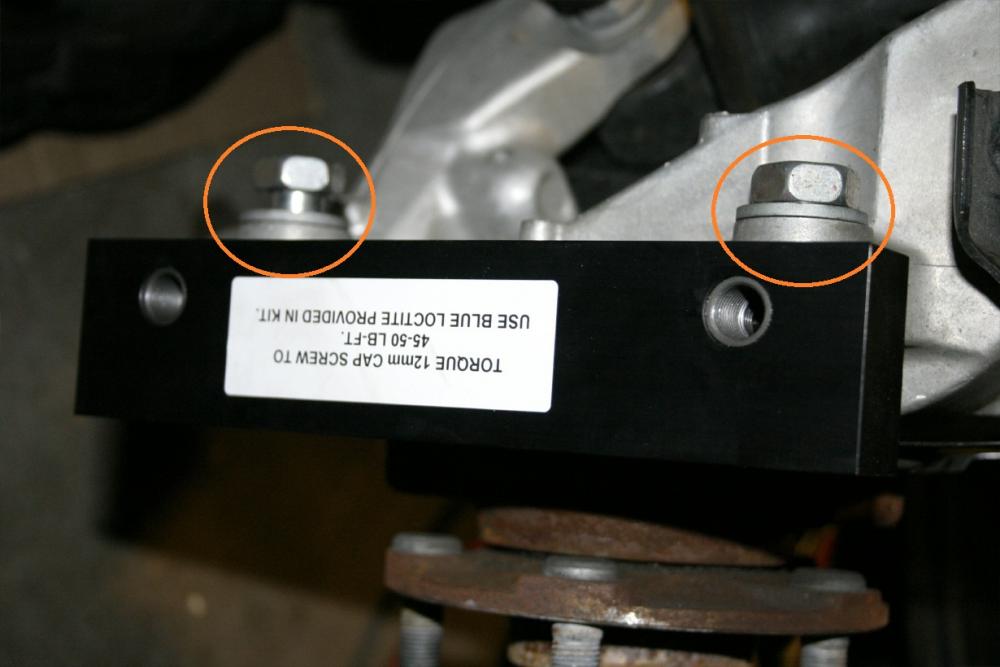
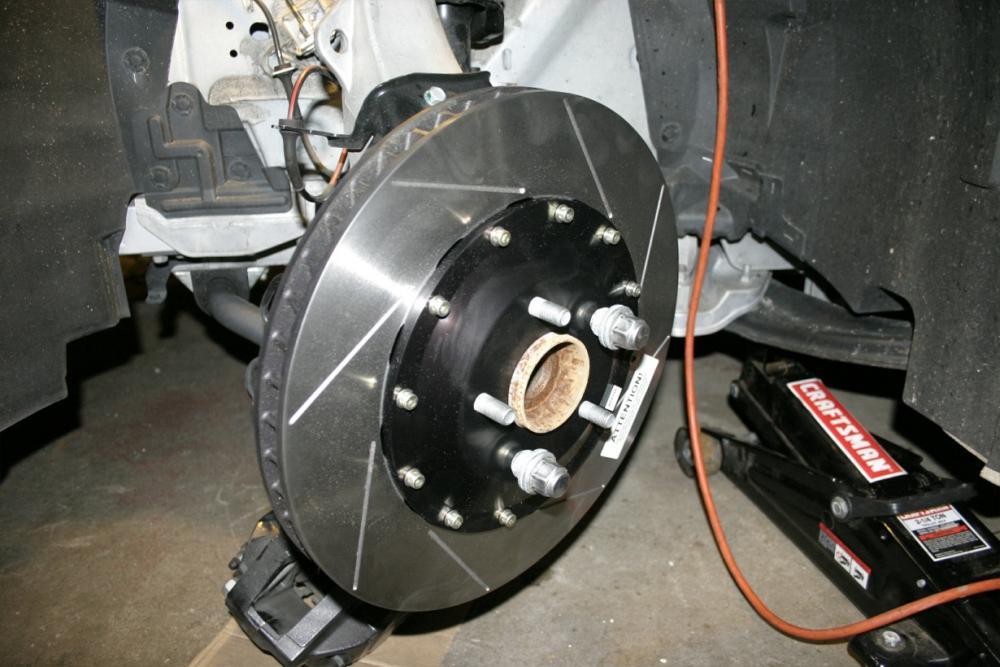
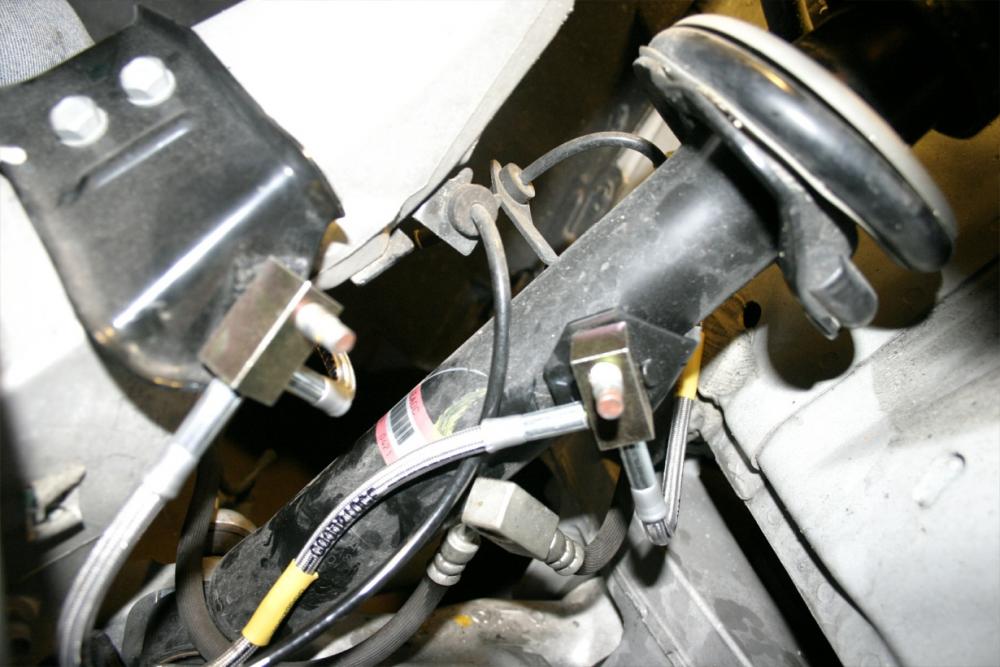
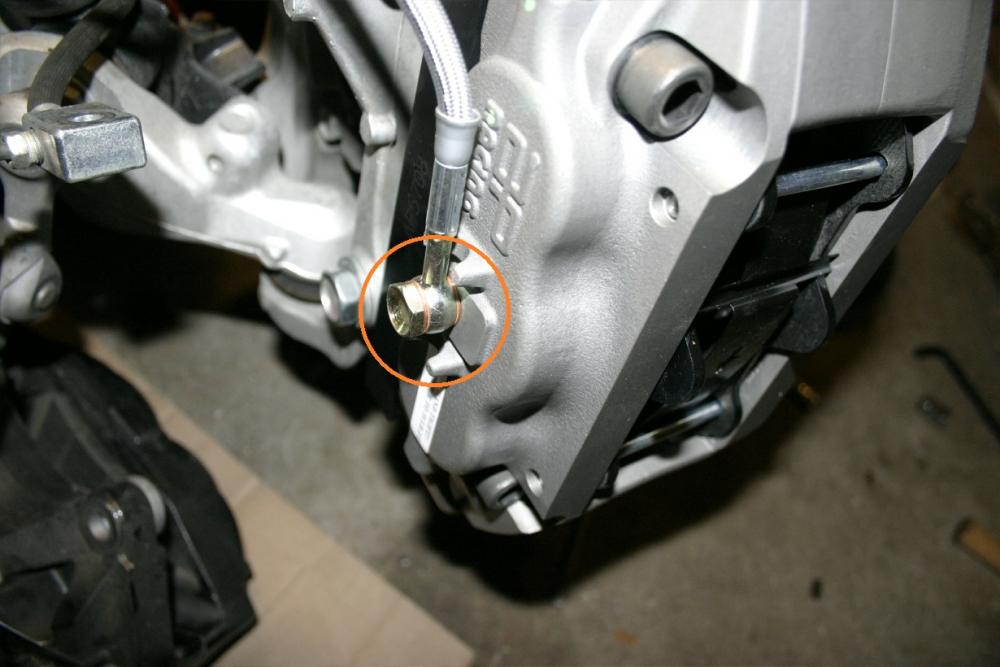
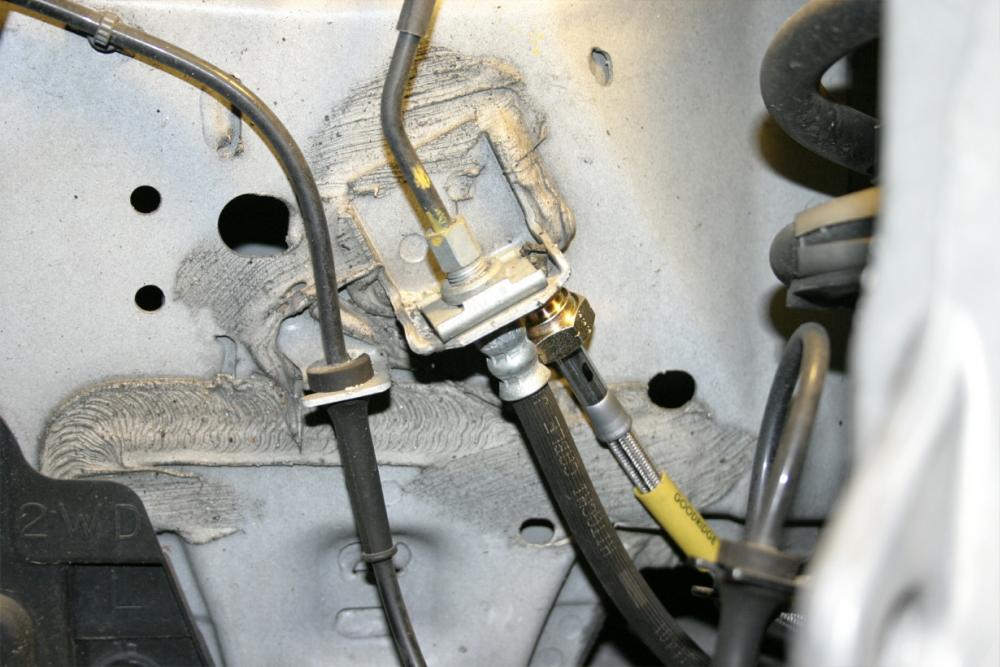
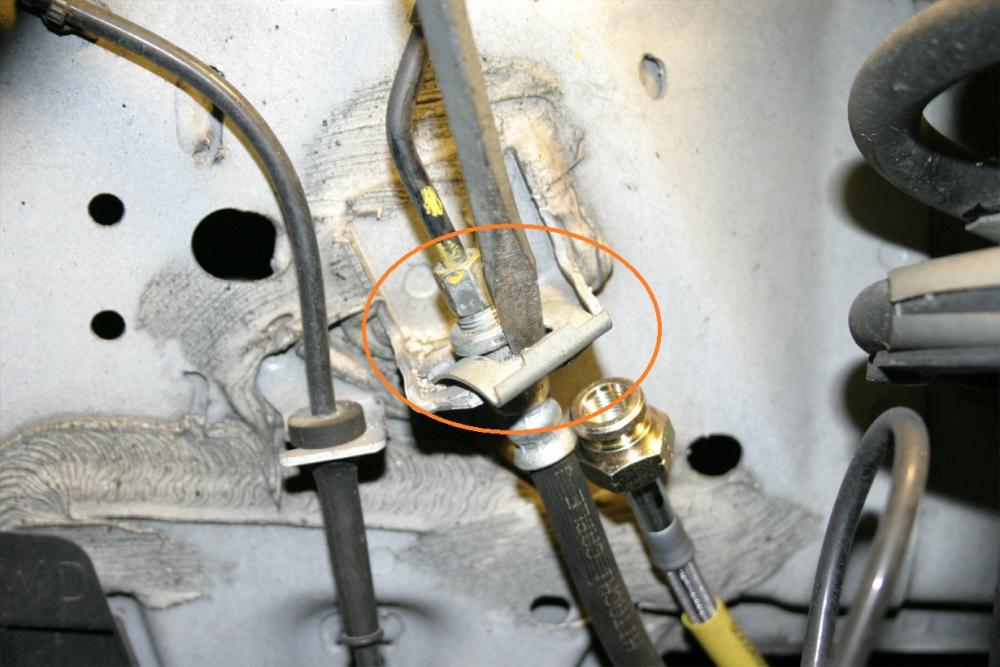
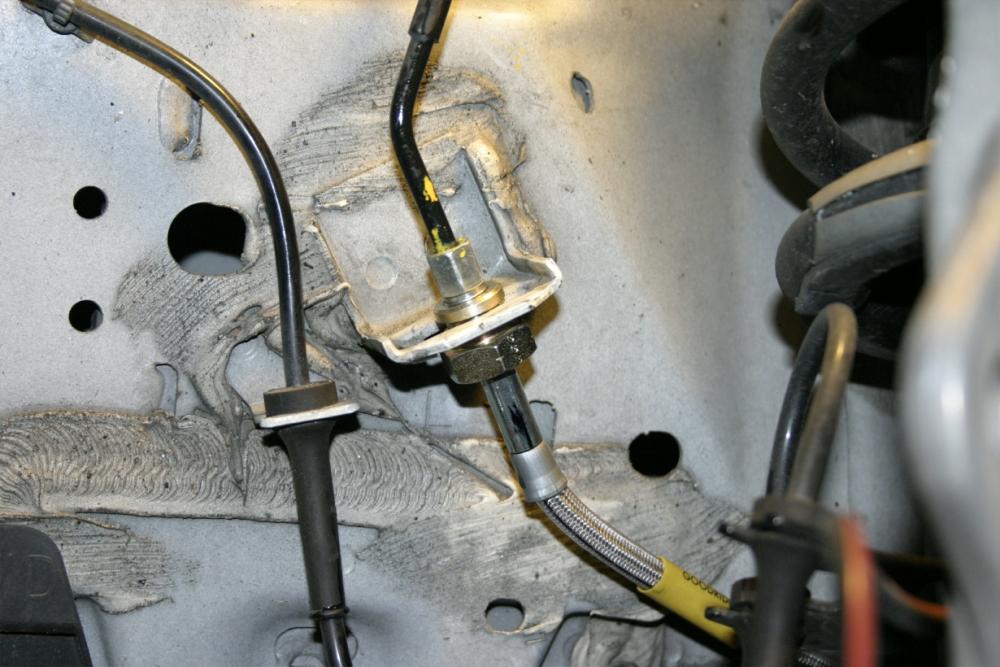
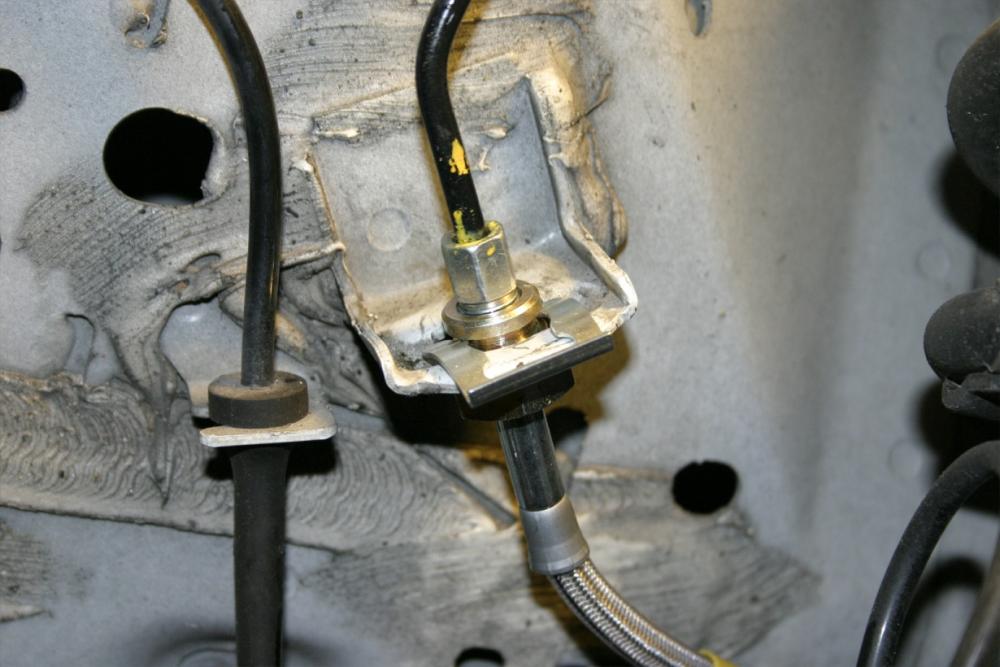
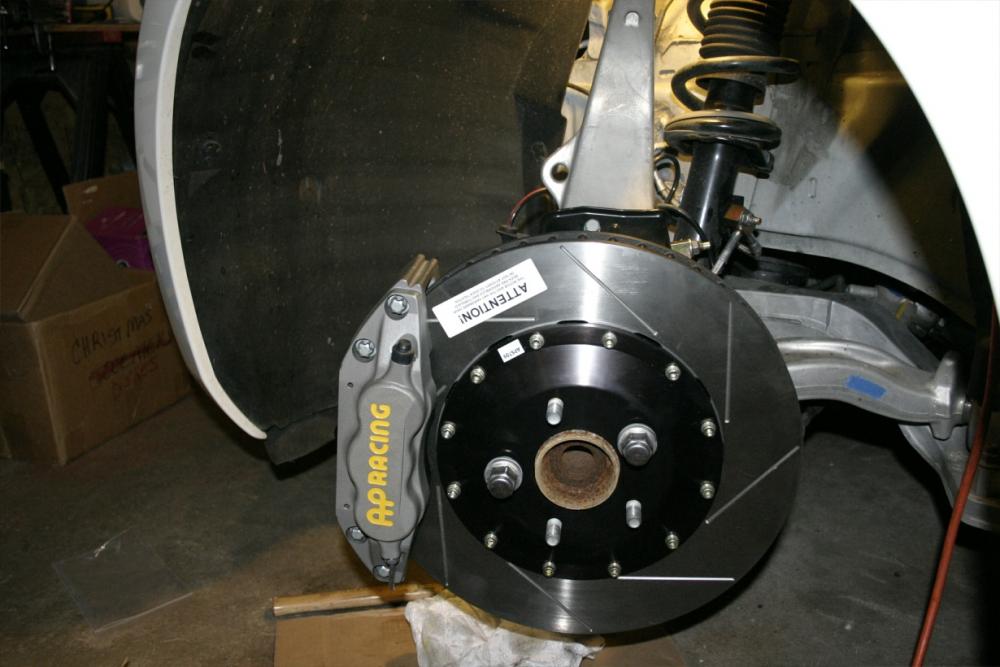
Torque Wrench 22mm socket (most DIY sets only go to 21mm) 10mm hex-key socket that will fit your torque wrench (for 12mm bolts) Jack Jack stands Optional Special Tools: 10mm flare nut wrench Removal Front Start by jacking up the corner, supporting with a jack stand and removing the front wheel. Loosen the lugs before you get the wheel completely in the air, especially if you are doing this by hand. You should be starting with something like this. I have the Akebono sport calipers, but the base procedure should be similar. Remove the 12mm bolt (in green) and discard. Remove the 12mm nuts holding the brake line blocks and set aside (orange). Pull the rear block off the post now if you can. Take the steering lock off so that you can turn the caliper out towards you for easy access. Locate the 2 caliper bolts and remove with a 22mm socket or wrench. Keep the brake line attached for now, and while holding the caliper remove the front brake line block from the post. Set the caliper on the ground resting on some cardboard or similar. Installation Front Before starting make sure you have the correct kit box for the side you are working on. The left and right kits are distinct and should be marked on the box. First step is to install the aluminum caliper adapter bracket. But before you can you will notice that the factory dust shield is in the way. You could trim this, but it bends very easily and can be bent out of the way by hand. Don't worry if it touches the bracket. Install the bracket reusing the 22mm bolts from the factory caliper with some red loctite on the threads. Torque to between 70-80 lb/ft. Install the new rotor, make sure it is pushed all the way flush. Temporarily support with a couple of lug nuts. Turn the rotor and check for any rubbing on the dust shield. Grab your new caliper and a 12mm hex cap screw from the bag of goodies and loosely tighten the caliper to hold it in place. Grab your 2nd 12mm cap screw and apply some blue loctite and torque to 45-50 lb/ft. Remove the temporary cap screw and apply loctite to the threads and reinstall this time torquing to final specs. Next install the SS brake line, route it around the back of the steering knuckle and to the mounting point on the shock absorber. Slide the block adapters over the posts and attach with the 12mm nuts removed previously. Attach the caliper end of the brake line with the banjo bolt and copper crush washers already attached to the caliper. Torque the banjo bolt to 18 lb/ft. Route the other end of the brake line to the hard line fitting. Crack the old line but don't loosen too much yet or it will leak. Pry out the old brake hose clip using a large flat screw driver. Attach new SS brake hose to line through hole and tighten snug but not tight. Attach new brake hose clip using small hammer or mallet. You can now torque the brake line fitting down to around 10 lb/ft. Not too tight as you can damage the fitting causing a leak. Double check the routing of your lines, and your done! Bleed brakes, clean off fingerprints with brake cleaner, remount wheel. Last edited by ChrisSlicks; 02-02-2010 at 05:44 PM. |
01-25-2010, 11:13 PM | #2 (permalink) |
A True Z Fanatic
Join Date: Mar 2009
Location: North East
Posts: 6,203
Drives: 09 370Z Sport M6
Rep Power: 653 |
Rear AP Racing Caliper Installation
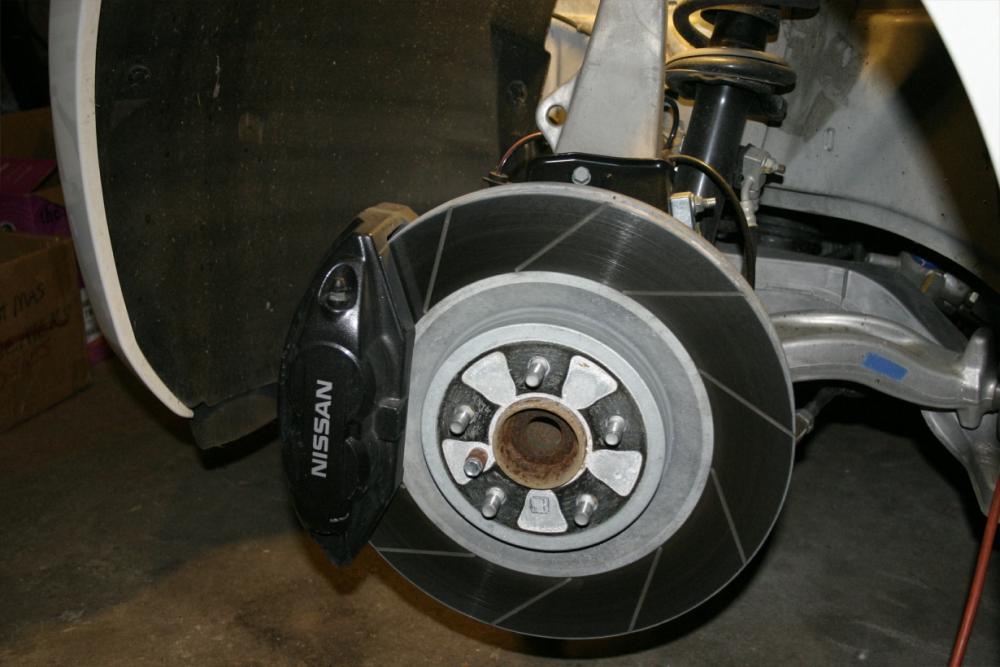
Special tools required: 8mm hex socket that will fit your torque wrench Torque Wrench 10mm flare nut wrench (for brake line, optional) 4"" hand held angle grinder or dremel to trim backing plate Sharpie Jack Jack stand Other tools required: 19mm box wrench 19mm socket (optional) Flat tip screwdriver Removal Rear Jack and support the vehicle, and remove the rear wheel. You'll be presented with something like this. Look behind the caliper to locate the 2 19mm bolts. The lower one is somewhat space restricted so you will not be able to use a socket. I used a box wrench to get it halfway out and then removed it by hand. Hold onto the caliper as you remove the last bolt so that it doesn't drop suddenly. Rest the caliper on top of the control arm for now, and you should be left looking at the rotor. The rotor should pull right off without too much resistance. If it appears to be jammed, then it is possibly because of the e-brake shoes being pressed against the inner drum. This isn't normally the case but if necessary rotate the rotor so that the rubber access hole grommet is on top. Remove the grommet and push the top side of the adjustor away from you to loosen. Installation Rear With the rotor off, temporarily mount the adapter bracket to the stock mounting holes using stock bolts. Hold the new caliper with bleeders facing upwards against the caliper bracket and backing plate such that the recesses in the caliper line up with the bracket. Use a marker to mark around the edges of the caliper against the backing plate, leaving a few millimeters for clearance. Remove the caliper bracket and trim the backing plate using an angle grinder with cut-off disc or dremel with cut off wheel. Debur the edges with emory cloth or grinding stone on a dremel. Hold bracket and caliper in place to confirm clearance. Remount caliper bracket, torque to between 53-71 lb/ft. Test fit new AP Racing rotor. Important! If you find that the rotor doesn't fit over the e-brake shoes or is extremely tight, you will have to adjust the e-brake setting by a few clicks. To loosen the shoes use a screwdriver to retract the spring and push the top teeth away from you with another screwdriver. Retest fitment after every 4 or 5 clicks. Make sure rotor slides all the way onto the hub, hold in place temporarily with 2 lug nuts. Mount the caliper to the caliper bracket using supplied M10 stud bolts and washer with an 8mm hex driver. Apply blue locktite to end of threads, torque to 35 ft/lbs. Attach new SS brake hose to caliper using supplied banjo bolt and the 2 copper crush washers, torque to 18 lb/ft. Crack brake line open using 10mm flare nut wrench but keep loosely closed to prevent leaking. Use flat-tip screwdriver to pry brake hose clip free. Once removed blow off any excess dirt from the area to prevent it contaminating your new brake hose. Disconnect stock hose from brake line and connect new SS hose to line snugly but don't tighten yet. Reinstall brake hose clip. Tap it home with a small hammer. With clip in place tighten brake hose to line, to approximately 12 lb/ft. Don't over tighten! Stand back and admire your work. Bleed brakes, clean off greasy fingerprints with brake cleaner, remount wheel, you are done! Last edited by ChrisSlicks; 02-08-2010 at 01:39 PM. |
02-02-2010, 05:47 PM | #3 (permalink) |
A True Z Fanatic
Join Date: Mar 2009
Location: North East
Posts: 6,203
Drives: 09 370Z Sport M6
Rep Power: 653 |
Rear install procedure added. The rear is a little bit harder than the front as it involves trimming the backing plate and more than likely adjusting the e-brake.
|
02-02-2010, 09:27 PM | #4 (permalink) |
Enthusiast Member
Join Date: Sep 2009
Location: Hawaii
Posts: 351
Drives: STI, MDX, Titan
Rep Power: 305 |
How hard did you find it to loosen the OEM hard brake line from the brake hose?
This is what I find the most difficult even in a new car if I do a brake or BBK swap (ie Subaru).... |
02-02-2010, 11:04 PM | #7 (permalink) |
A True Z Fanatic
Join Date: Mar 2009
Location: North East
Posts: 6,203
Drives: 09 370Z Sport M6
Rep Power: 653 |
Yes, my notes are I'm still looking for higher spec pad option, something the equivilant of the Carbotech XP12. If I'm not mistaken the pad profile is D61 for the front, but the rears I haven't figured out yet.
|
02-02-2010, 11:16 PM | #8 (permalink) |
A True Z Fanatic
Join Date: Jan 2009
Location: GSO
Posts: 2,803
Drives: VIR
Rep Power: 188 |
Recommendation I got from a reliable source for this kit
Front: Ferodo DS3000 Raybestos ST44 Mintex F3R Rear: Ferodo DS3000 Pagid R4-2 I haven't tried anyting yet except the mintex extreme that came with them... those are definitely street pads. There should be friction/dyno curves with the pads I mention above - I haven't had time to study them yet... but I'm looking for pads that I can drive to track with (so at least some low temp performance), have a linear response, and hold up really well under heat... As I get more cooling to the front brakes, I may sacrifice on high heat performance to pick up a higher friction coefficient etc In any event, all talk, really need to start testing pads |
02-02-2010, 11:33 PM | #9 (permalink) |
A True Z Fanatic
Join Date: Mar 2009
Location: North East
Posts: 6,203
Drives: 09 370Z Sport M6
Rep Power: 653 |
Unfortunately doesn't look like any of those pads have a higher MOT than the Mintex Extremes. At least the DS3000 should have nice consistent bight, with some ducting they could work well.
|
02-02-2010, 11:39 PM | #10 (permalink) |
A True Z Fanatic
Join Date: Jan 2009
Location: GSO
Posts: 2,803
Drives: VIR
Rep Power: 188 |
do you have any data to indicate the we need a certain max operating temp? i won't know until I get some temp paint on and test it... I know it gets too hot for the agbs sensors is all at this point... i'm more concerned about getting the right friction and response curve right now than a super high mot...
|
02-02-2010, 11:54 PM | #11 (permalink) |
A True Z Fanatic
Join Date: Mar 2009
Location: North East
Posts: 6,203
Drives: 09 370Z Sport M6
Rep Power: 653 |
I think a 1300 MOT will be acceptable for 90% of the tracks out there, but there are some that are known for punishing brakes that may require something slightly higher.
Sintered race pads are tempting, they're not the most streetable but if you were just using them to drive to the track I think they would do fine. They have a incredibly flat friction curve from 200 - 2000F, require no bed-in and work well in the rain. Only real downside is they are expensive. CL Brakes in the UK has a few compounds available, RC8 being the most aggressive but RC6 perhaps being the most suitable for me. |
06-30-2011, 12:28 AM | #12 (permalink) |
Base Member
Join Date: Aug 2010
Location: East Bay
Posts: 123
Drives: 09 370z BS 6s
Rep Power: 15 |
Thanks for the write up Chris, I installed my kit yesterday and it was very helpful.
Just a heads up, the rear kit has been changed slightly to accommodate smaller wheels. The process is more or less the same but the new caliper bracket must bolted on the inside of the stock caliper bracket instead of on the outside. Also the backing plate must be trimmed significantly to accommodate the new rotor. |
06-30-2011, 07:13 AM | #13 (permalink) |
A True Z Fanatic
Join Date: Mar 2009
Location: North East
Posts: 6,203
Drives: 09 370Z Sport M6
Rep Power: 653 |
Actually it is mounted on the inside, it's just hard to tell on the pics.
Do you have the specs on the new rear setup? In my setup the rear rotor is actually smaller than stock, 13.25" but the pad swept area is similar.
__________________
Hotchkis ARB | Stillen CAI | Art Pipes | Berk CBE | Stillen AP Racing Brakes | AE Performance Oil Cooler | BC Racing ER Coilovers | Doran Control Arms |
04-22-2015, 10:49 PM | #15 (permalink) | |
Base Member
Join Date: Oct 2010
Location: Billings, Montana
Posts: 164
Drives: 370Z Touring 6MT
Rep Power: 15 |
Quote:
|
|
Bookmarks |
|
|
Similar Threads | ||||
Thread | Thread Starter | Forum | Replies | Last Post |
Megan Racing Coilover shock install and first impressions | Phimosis | Brakes & Suspension | 88 | 07-14-2016 04:26 PM |
Racing stripes? | Darkstar87695 | Nissan 370Z Photos / Spyshots / Video / Media Gallery | 170 | 09-19-2014 03:15 AM |
ECSpeed: Megan Racing | KSport Kontrol Pro | D2 Racing RS | IN STOCK SALE FREE S&H!!! | AJ@ECSMotorsports | Suspension/Brakes | 65 | 03-10-2014 12:44 PM |
Drag racing anyone? | rednek01 | Texas | 25 | 09-24-2009 01:17 PM |
It's not a racing hen, it's a racing duck!! | Sonic370Z | Member's 370Z Gallery | 6 | 08-14-2009 07:51 AM |