Review & Pics
My mechanic and I completed the installation of the F.I. LTHs this morning. Let me start by saying that this thread is
not intended as a DIY, and I have no plans to do a DIY on these headers as I already did one for the install I did on the Stillen headers (which can be found in the DIY section) and the steps are all basically the same. That being said, I will relay my installation experience on the LTHs.
The LTHs arrived very nicely packaged and without any damage. I was very impressed with what I received:


The actual LTHs, of course, were even better:


When it was finally time to do the installation, however, we immediately ran into a small issue. As you can see from this picture, all of the mounting hardware, instructions, etc., come sealed in a little packet:

Well, my packet was missing two of the bolts and nuts you see on the right, as well as a 6mm nut for the small clamp next to the bolts:

It wasn't a big deal or anything. We went and found the bolts/nuts we needed at Lowe's. And we decided to have lunch at Hooters. So that was all win.
The next two pictures are a bit of an aside. When we pulled the O2 sensors out of my Berk HFCs, I couldn't help but notice how clean they were. So in case any of you are wondering how effective Berk's integrated non-fouler design is, here you go:


This next pic is just a quick side by side of the Stillen shorty header and the F.I. LTH:

We got the driver's side LTH installed without any problem. These pictures show how perfectly the LTH lines up with Stillen's CBE. And I do mean perfectly! I don't think it gets much better than this! (Of course, the fact that Tony used my stock manifold as a model probably doesn't hurt either.

)


Okay, this is when things came to a grinding halt. Let me say right up front that the issue I'm about to describe has
nothing to do with F.I. It can in no way be attributed to any kind of design or fitment issue with the LTHs.
The problem came when we were trying to remove the Stillen header on the passenger side. We were able to remove all the nuts except for one -- the bottom middle one. It was as though the nut had bonded to the header; it simply refused to break loose. And it didn't help that this particular nut is extremely difficult to get to. It is surrounded on both sides by the header piping. You can barely get a wrench in there. There isn't enough room for a full socket and ratchet either. Anyway, to make a long story short, the nut became rounded. Altogether we spent about 5 hours trying to remove this one single nut, and we finally gave up at 9:30pm and called it a night.
Well, you know how sometimes it really helps to just walk away from a problem and come back to it later? It was certainly true in this case. We got started again at 8am this morning, and had the nut off by about 8:30.
This is what ultimately enabled us to remove the nut:

And here are some pics of my damaged, mangled, troublesome nut:

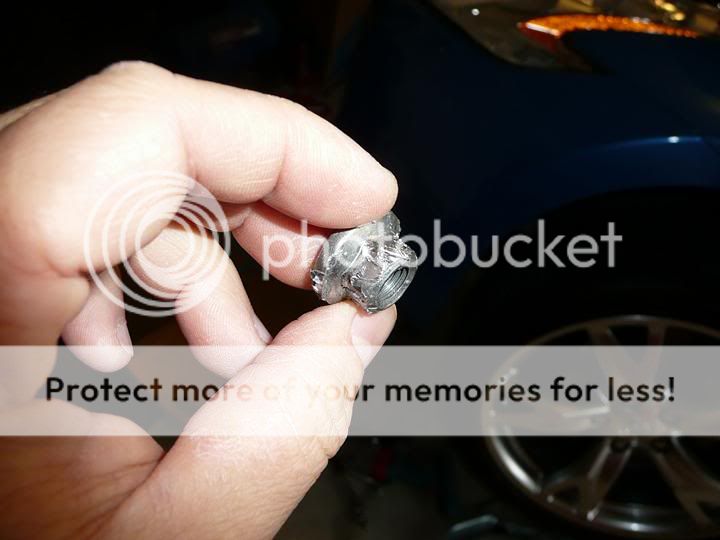

And this glorious picture shows the passenger side with no header attached. (If you spent 6 hours trying to get it off, you'd think it's glorious too!)

After we finally got the nut off and the old header out, I spent the next 10 minutes doing this:

These next two pictures show the O2 sensor wires being extended. Kinda random, but I took the pics, so I figure I'll share them.


Again, it should be obvious but I want to be absolutely clear. None of this 'mangled sticky nut' fiasco can be attributed to F.I. It was just one of those situations that sometimes happen. It was simply my turn to have a little bad luck.
Having had a chance to drive around some after the install, my initial impressions are positive. The ECU is still adjusting, but I already notice a gain in torque, especially at the low end. And keep in mind my point of comparative reference, i.e., I was already running the Stillen headers and Berk HFCs prior to this, not stock. I would thus imagine that had I started from a stock setup, the gains would be even more drastic/noticeable. Sound-wise, there's definitely a little more hiss compared to my prior setup. There might even be just a touch of rasp. But I need to emphasize the
little in "little more." Again, as I already had HFCs and was used to the hiss, the increase is quite minor and doesn't phase me one bit. But someone going straight from stock to this might be taken aback by the change in tone. I also noticed that at WOT, there's a bit of resonance coming through my dash. Not a big deal, but it's there. Maybe it'll settle down with time. Smell-wise, thus far I have not noticed any exhaust smell in the cabin (other than the normal burn-off scent you get when new headers are breaking in). However, my wife was following me in her Murano tonight (she helped me make some vids), and she told me that the smell coming from my car is pretty bad. So basically, people are going to hate following behind me, which suits me just fine. Maybe this will discourage people from tailgating. And just in time for Earth Day too!
 Vids:
Vids:
I made three videos for you guys. First up is a stationary revving video:
YouTube - 370Z with Fast Intentions Long-Tube headers and Stillen CBE
Next up is an interior driving/sound vid:
YouTube - 370Z w/ F.I. LTHs and Stillen CBE - Interior Driving/Sound Clip
Lastly, a launch and drive-by vid:
YouTube - 370Z w/ F.I. LTHs and Stillen CBE - Launch and Drive-By
Dyno:
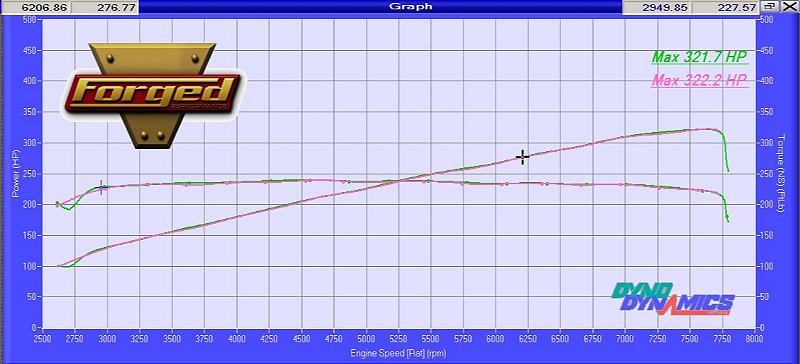
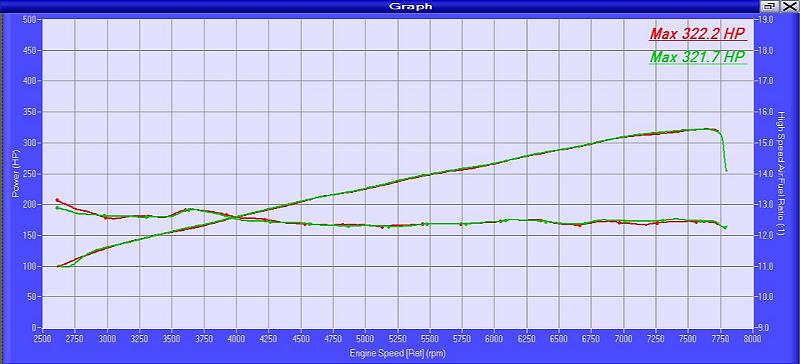
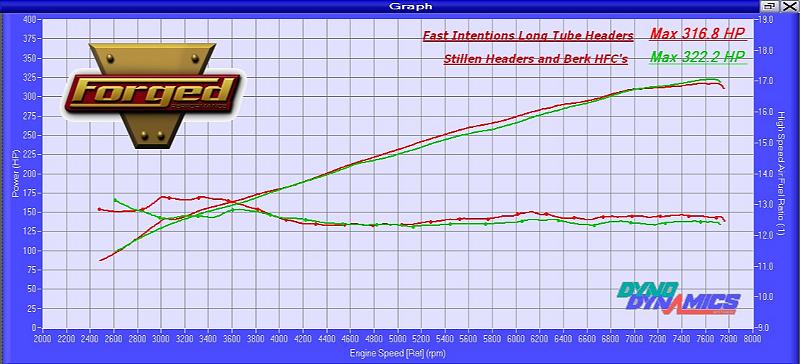
Here is the baseline dyno I obtained on 4/7/10.
HP and TQ:
HP and AFR:
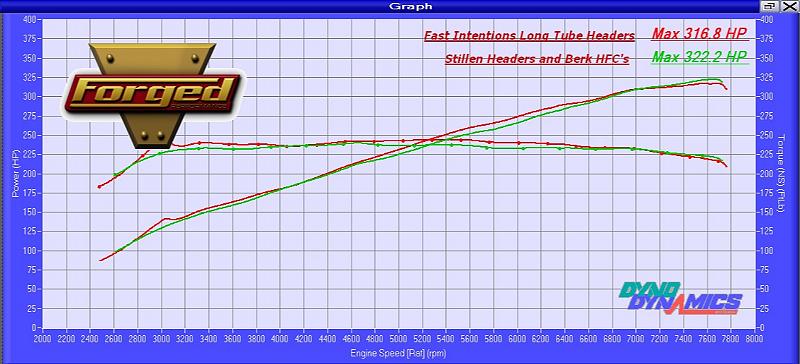
Here are the post-installation results.
HP and TQ:
HP and AFR:
This is a scan of the paper printout of HP and TQ. It's a little easier to read. The lines are thinner so you can see the differences better.
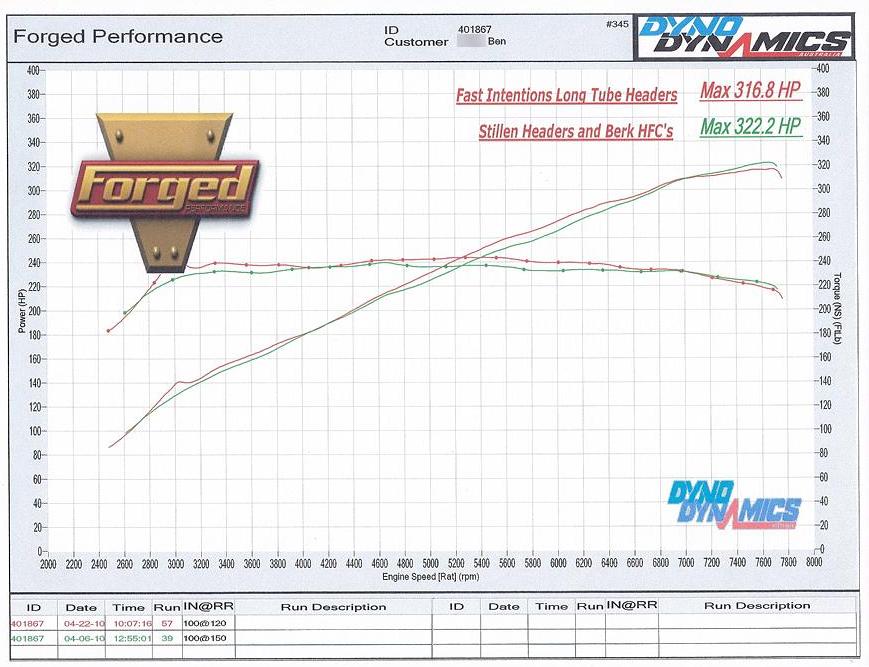
As you can see, I
lost peak power (the green line is my baseline, the red line is the new one from this morning). My peak dropped from 322.2whp to 316.8whp.
However,
before anyone gets their undies in a knot, take a close look at the graph. I lost power only at the very top starting at around 7300rpm. I either matched or gained everywhere else; there were no losses anywhere else in the powerband. In fact, from 2800-4000rpm, then again from 4600-6700rpm, I gained both power and torque. Also, notice the unit scale of the graph -- even though the lines look pretty close together, it's kinda misleading because of how the graph moves up in such tight increments. In my opinion, this is a positive result. I gained power where it's actually usable. If it's at the expense of a few hp from 7300rpm up, fine with me. I hardly take it all the way to redline anyway, and even when I do it's just for a brief moment before I shift up to the next gear. Indeed, the dyno results confirm what I've been feeling through the seat of my pants (or "in the butt" as Sharif put it to me this morning, lol). I made a point of putting a good 140 miles on before doing the dyno because I wanted to make sure the ECU had a good chance to adapt. I can tell you that after about 40-50 miles, I could feel things open up. The increase in power and torque is something that I can noticeably feel just driving around in the usable rev range. Also keep in mind that as my starting point for this before and after, I already had aftermarket headers and HFCs. So I was already making a good bit of power. If my baseline was stock headers and stock cats, the magnitude of the gains would be far greater.
Regarding the AFR graph, you might notice that it's running a little leaner from 5200rpm on up. That is not a direct result of the LTHs. It is the result of Sharif doing a minor re-tune this morning. You see, my AFR actually got a little richer on its own since my original tune, so I asked Sharif to adjust it back. Specifically, I asked him to adjust it right to the edge of being too lean, figuring that over time, it'll enrichen itself again.
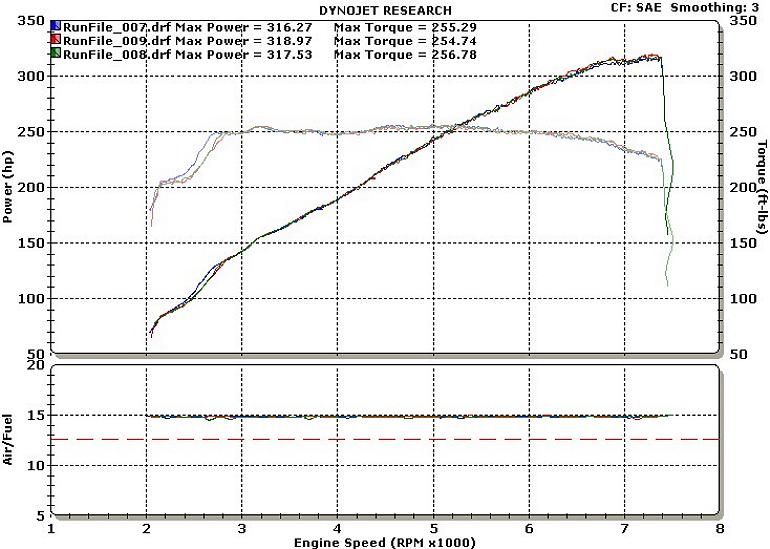
Finally, after all this, I went and did some pulls on a DynoJet, just for the sake of comparison. As you can see, the numbers aren't much different. But by doing two different dynos, I guess one could say that they corroborate one another.
And that's it for my review. Don't forget to rep!
