View Single Post
Old 01-04-2016, 05:43 PM   #5 (permalink)
scope22
A True Z Fanatic
 
scope22's Avatar
 
Join Date: Apr 2012
Location: Roswell, GA
Posts: 1,179
Drives: wife crazy
Rep Power: 55
scope22 has a reputation beyond reputescope22 has a reputation beyond reputescope22 has a reputation beyond reputescope22 has a reputation beyond reputescope22 has a reputation beyond reputescope22 has a reputation beyond reputescope22 has a reputation beyond reputescope22 has a reputation beyond reputescope22 has a reputation beyond reputescope22 has a reputation beyond reputescope22 has a reputation beyond repute
Default

me love you long time

Quote:
Originally Posted by VABAM View Post
Posted this in Tokugawa's other NAV conversion thread. Figured I would post it here too. Same info just presented differently.

( Click to show/hide )

Disclaimers:
I pulled this info from the 2009 370Z Service manual. Might be different for other model years. Down load you own copy of the 370Z Service manual for your year 370Z and verify the below info. (link: Nissan 370Z Owners Manual / Service Manuals - Nissan 370Z Forum)

This is not a beginners DIY! If you are not comfortable with/know how to; read pin outs, read wiring diagrams, splicing into wiring harnesses, adding pins to connectors, locating pins on connectors, then this is not the DIY for you. If wired improperly you could damage the HVAC system.

I feel the need to add this due to the Society we live in: Any attempt to do this NAV system Conversion DIY is at the risk of the person attempting it. I will not be held responsible for any damage caused by attempting this DIY. It is the responsibility of the person attempting this to verify the below information and/or consult with a mechanic/expert before attempting this DIY.

( Click to show/hide )

Some basic info: Both the NAV and Non-NAV have the same A/C settings; auto mode, temp range, blower speed, etc. The A/C Auto Amp is the brains of the A/C system in the 370Z and is differnt between NAV and Non-NAV model 370Zs. The other difference between the NAV and Non-NAV is how the controller for each system talks to the A/C Auto Amp. The Non-NAV has a direct connection vice the NAV talks to it via the CAN Bus.

Here is the wiring diagram for the Non-NAV system including where the NAV system would tie in:
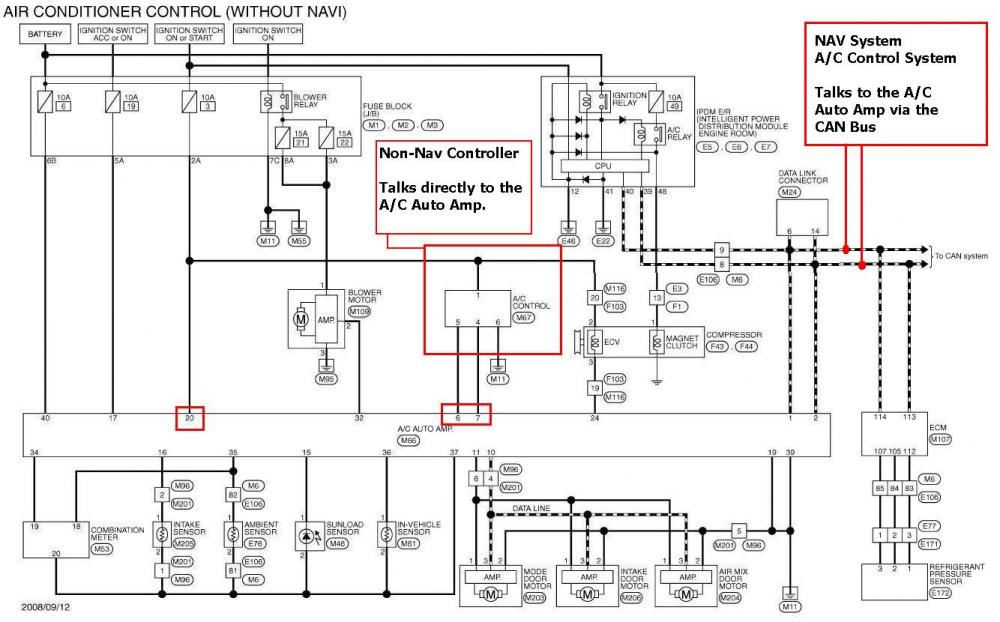


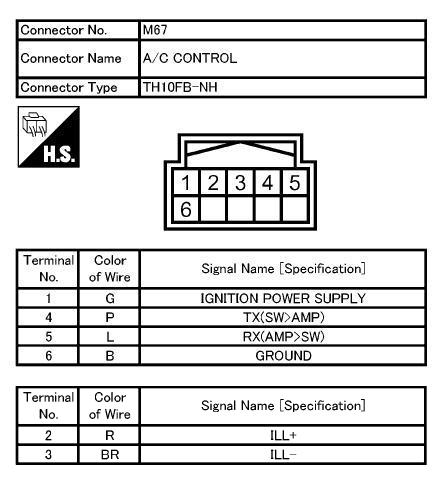
Here are the pin outs for the two plugs/connectors you would need to work with.
On the diagram H.S. means harness (wire) side of the connector.

M67 is the connector going into the back of the Non-NAV Controller.
(you'll need to source this connector to complete this)

M66 is the connector going into the A/C Auto Amp.
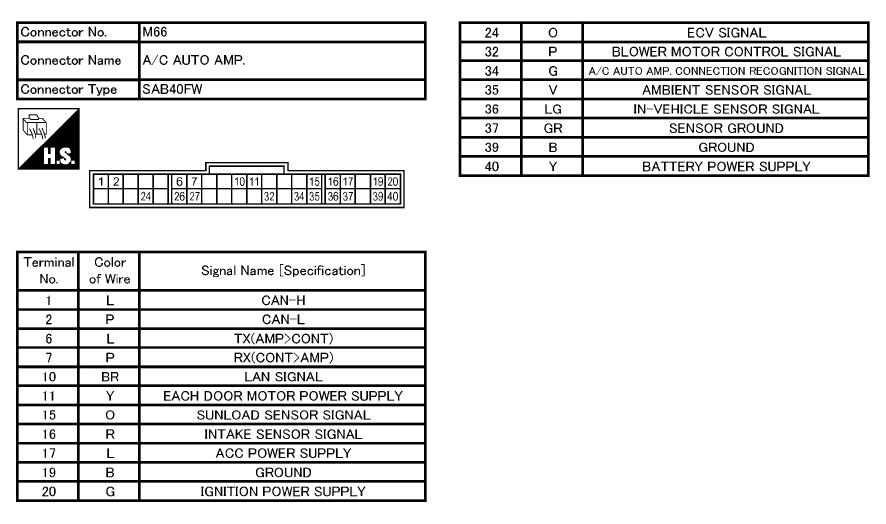

You would need to wire:
Pin 5 of M67 to pin 6 of M66
Pin 4 of M67 to pin 7 of M66
Pin 1 of M67 to pin 20 of M66
Pin 6 of M67 to ground

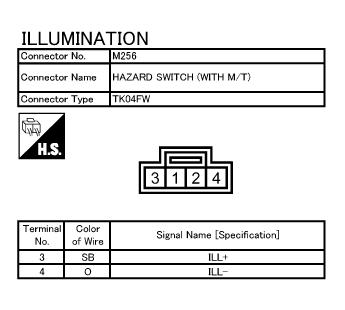
Possible illumintaion wiring.
Pin 2 of M67 to pin 3 of M256
Pin 3 of M67 to pin 4 of M256

M256 is the hazard lights switch connector, pin out below.


Then swap out the A/C Auto Amp
From:
NAV A/C Auto Amp part # 27760-1EA1A
To:
Non-NAV A/C Auto Amp part # 27760-1EA0A


Enjoy!


If something is wrong let me know.
I hate putting out bad info.
scope22 is offline   Reply With Quote